Minecraft with RTX PBR Texturing Guide
Introduction
Minecraft for Windows 10, aka Bedrock edition, has been upgraded with cutting-edge path-traced ray tracing, enabling gamers and world builders to craft incredible new sights and immersive environments. To take full advantage of the new possibilities ray tracing introduced in the free 1.16.200 update for Minecraft for Windows 10, physically-based textures have also been introduced, featuring extra surface detail, the ability to emit light, and more. To further enhance the visual experience of RTX, creators can also define their own settings for the fog.
In this guide, we’ll walk you through the steps of creating your own Minecraft PBR textures, or upgrading your existing textures and texture packs, so that your ray-traced Minecraft worlds take full advantage of everything that Bedrock Minecraft brings to the table.
In addition, we’ll demonstrate how you can create your own high-resolution textures for worlds made of lifelike high definition blocks, and offer an alternative, simpler, easier workflow using the premium Substance Painter application.
Lastly, we’ll cover the system for setting up your own definition for the custom fog to polish off your custom PBR-enhanced resource pack.
For a guide on how to convert your world, head here. And to ensure you have optimal gaming experiences, download the latest Game Ready Driver for Minecraft for Windows 10 For more information on Minecraft with ray tracing, check out the Mojang Studios FAQs.
Minecraft Texturing Overview
Most texture files in vanilla Minecraft (Bedrock) only use 2 maps: base color and opacity. The base color map is stored in the RGB channels of the texture. This is the texture map that most people think of when talking about Minecraft textures.
Some textures also have an additional opacity map that is either stored in the alpha channel (for .TGA texture files) or stored implicitly (for .PNG texture files). For Minecraft with RTX, you’ll want to use .TGA files with alpha channels for opacity maps. More on that later.
The new PBR system uses these 2 maps, as well as 5 additional ones, to help describe the realistic material surface that is being represented by the texture:
- Metallic map (sometimes called “metalness”)
- Emissive map
- Roughness map
- Normal
- Height map
Asset Flow
This is how the various PBR texture maps relate to objects in the game:
6 PBR Texture Maps >packed into> 3 Texture Files (.PNG) >defined by a> Texture Set >for each> Block/Item/Object
Currently, each of the 6 PBR maps get packed into the channels of 3 texture files, which are then used by the game. Packing the maps reduces the overall file size and number of files of the new texture set. The texture set must be defined by a JSON file.
For example, for a PBR version of the “gold_ore” block:
- Texture set JSON = gold_ore.texture_set.json
- File names or value-uniforms for up to 3 layers.
- The JSON schema is explored in the Texture Set JSON Schema section.
- Texture file 1 = gold_ore.png
- Red, Green, and Blue (RGB) channels = Base Color map
- Alpha (A) channel = None. Not used for this specific texture set since the gold_ore block is intended to be fully opaque.
- Note: Texture sets that do use opacity maps can store them in this alpha channel. See the Opacity Maps section.
- Texture file 2 = gold_ore_mer.png
- Red channel = Metallic map (grayscale)
- Green channel = Emissive map (grayscale)
- Blue channel = Roughness map (grayscale)
- Alpha (A) channel = None. Alpha is ignored, texture image may be 3-channel on disk to save space in a resource pack.
- The “*_mer” suffix is just a reminder that the Metallic, Emissive, and Roughness maps go into the RGB channels, respectively.
- Texture file 3 (option 1)= gold_ore_normal.png
- RGB channels = Normal map
- Note: mutually exclusive with use of heightmap layer.
- Alpha (A) channel = None. Not used at this time
- Texture file 3 (option 2) = gold_ore_heightmap.png
- Note: mutually exclusive with use of normal layer. See the Height Maps subsection of the New PBR Texture Maps section.
NVIDIA and Partner Resource Packs
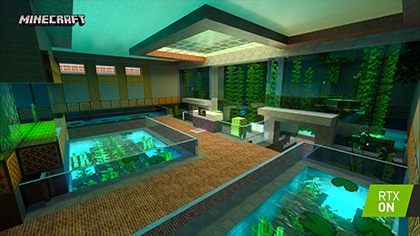
The fourteen, free Minecraft with RTX ray tracing worlds include creator-made PBR resource packs that you can check out. These upgrade textures to follow the Physically Based Rendering pipeline laid out below, and are optimized for maximum performance and detail.
NVIDIA has also released a new resource pack that’s compatible with the latest version of Minecraft with RTX, and has been updated February 2nd, 2021. Download here, then double click the file and it should automatically be installed for use in-game.
To use, download the file and double click the .mcpack file, and it should automatically add the resource pack to your world and enable you to play with RTX ON!
There are also two previously released packs from April 2020 which can be used to experiment with textures (CAUTION: These packs may break the RTX experience in the latest version of Minecraft with RTX). HD Decorative Resource Pack and HD Foundational Resource Pack, were created by NVIDIA, but they should not be activated at the same time. If you do activate them at the same time, you will see a resource pack fall back resulting in other textures down-rezzing.
With these packs, you will be able to experiment with both high-resolution textures (1024x1024) and low-resolution textures (8x8 or 16x16) with PBR capabilities.
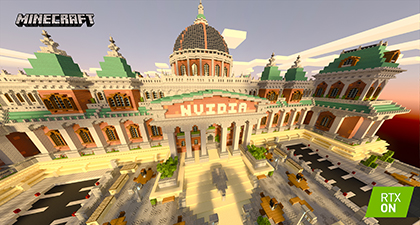
Further, to demonstrate the possibilities of the new Minecraft PBR textures, we’ve worked with Razzleberries to create the RTX Expo Museum world, a large Smithsonian-esque museum showcasing every enhancement, benefit, and improvement offered by Minecraft with RTX. As you stroll through the world, you’ll see how PBR textures work in concert with ray tracing to enable a level of detail and fidelity that was previously impossible to achieve with traditional rasterization and effects.
And if you make your own textures, you can quickly and easily test them in this world by overwriting the existing textures, accelerating your workflow and iteration speed.
In addition, we’ve worked with some of the planet’s best Minecrafters to develop fourteen free Creator Worlds that feature top to bottom path tracing, and PBR texturing, giving you ideas for your own worlds and textures. Download them from the Minecraft Marketplace in-game by searching for “RTX”, or follow the download links here.
Tools Needed
To create your own PBR texture sets, you will need a photo-editing/digital painting application. Here are a few excellent options:
- Adobe Photoshop
- GIMP
- Paint.net
- Pixlr.com
- GraphicsGale, etc.
You will also need a quick plaintext file editor to write your texture set JSON, the default text editor for your operating system will work, but Sublime Text is a good alternative as it supports syntax coloring.
This guide will cover the Photoshop workflow specifically, but the concepts should transfer to other digital painting applications.
Opacity Maps
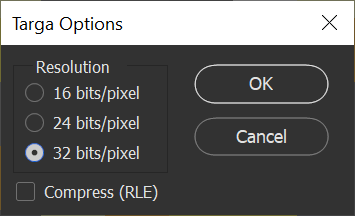
Pay special care to the colors that get stored under the alpha channel as on blocks like Glass, the colors will still apply even if masked by full transparency. To mitigate this, ensure the color is fully white, and save the image as a 32-bits/pixel .TGA file to ensure consistency and avoid an unexpected surprise from PNG image exporters.
Note: In the initial release of Minecraft with RTX, the client will use the same textures for both RTX enabled and disabled. This means that an opacity value that is tuned for RTX enabled might look too transparent when RTX is disabled. To help balance this out, the game will only use the upper half of the range of the texture’s alpha channel (0.5 - 1) when RTX is enabled, but it will map this range to the full range of opacity in the game so no functionality is lost. For RTX disabled, the full range of the alpha channel will be mapped to the full range opacity in the game.
Examples:
If the texture’s alpha channel value = 0 (black), then:
For RTX enabled in the game, texture opacity = 0 (fully transparent)
For RTX disabled in the game, texture opacity = 0 (fully transparent)
If the texture’s alpha channel value = 0.5 (middle gray), then:
For RTX enabled in the game, texture opacity = 0 (still fully transparent)
For RTX disabled in the game, texture opacity = 0.5 (50% opaque)
If the texture’s alpha channel value = 0.75 (light gray), then:
For RTX enabled in the game, texture opacity = 0.5 (50% opaque)
For RTX disabled in the game, texture opacity = 0.75 (75% opaque)
If the texture’s alpha channel value = 1 (white), then:
For RTX enabled in the game, texture opacity = 1 (fully opaque)
For RTX disabled in the game, texture opacity = 1 (fully opaque)
Texture Set JSON Schema
To begin your PBR enhancements for any texture, you must start it off with a JSON file to define the PBR settings. For further info and documentation, head to the official Minecraft.net page.
The JSON schema is defined as follows:
- format_version: The schema version this JSON was written for.
- minecraft:texture_set: The material definitions for the PBR Texture
- color: Your base color layer.
- This can be a quoted image file name reference (PNG, TGA, or JPG file types allowed), with or without file extension.
- It can also be a comma-separated square bracketed list of 3 or 4 values of Red, Green, Blue, and Alpha to set the whole texture as a uniform color. These values can range between 0 and 255.
- It can also be an ARGB hex value as a string beginning with the # character.
- This layer is required and your texture will be a pink/black checkerboard otherwise.
- metalness_emissive_roughness: Your texture containing metallicity, emissivity, and roughness information.
- This can be a quoted image file name reference (PNG, TGA, or JPG file types allowed), with or without file extension.
- It can also be a square bracketed list of 3 values for metallicity, emissivity, and roughness to set the texture uniformly. These values can range between 0 and 255.
- It can also be an RGB hex value as a string beginning with the # character.
- Excluding this layer will result in the texture having a non-metallic matte look.
- normal: Your material containing per-pixel normals for the texture.
- This can only be a quoted filename reference (PNG, TGA, or JPG file types allowed), with or without file extension.
- It is mutually exclusive with heightmap.
- heightmap: Your material containing per-pixel heights for the texture.
- This can only be a quoted filename reference (PNG, TGA, or JPG file types allowed), with or without file extension.
- It is mutually exclusive with normal.
- color: Your base color layer.
For the file name, take the name of the original texture without the extension and add it to the beginning of .texture_set.json, for instance, gold_ore.texture_set.json, for the gold_ore.png. Then the JSON file goes into the same folder.
Here is an example JSON file following the texture set schema, also demonstrating the correct value usage for each definition:
{
"format_version": "1.16.100",
"minecraft:texture_set": {
"color": [118, 185, 0, 255],
"metalness_emissive_roughness": “#0008FF”,
"normal": "an_example_normal"
}
}
Further details on each of these texture set attributes are explained in depth in the following.
New PBR Texture Maps
The PBR system doesn’t require you to use all of the PBR maps for every texture set. However, you will get the best looking results if you do.
- Metallic map - How metallic is a pixel in your texture:
- Value of 0 (black) means non-metallic (wool, wood, plastic, dirt, grass. etc.)
- Value of 1 (white) means fully metallic (gold, iron, copper, etc.)
- Grayscale values between 0 and 1 can also be used. Values other than black or white will function, but are usually incorrect in PBR rendering. A well-made metallic map will usually contain black and white pixels only.
In the example above, the block has uniform roughness on all of its surfaces, but it is using a metallic map to control which pixels are metallic (white), and which pixels are non-metallic (black). The metallic pixels look more like gold while the non-metallic pixels look more like shiny, yellow plastic.
- Emissive map - How much a pixel in your texture should glow:
- Value of 0 (black) means no glow
- Value of 1 (white) means the strongest glow
- Grayscale values between 0 and 1 can also be used
- The Color of the glow is determined by the pixels in the base color map
- Roughness map - How rough (to the touch) is a pixel in your texture:
- Value of 0 (black) means very smooth (glass, polished stone, etc.)
- Value of 1 (white) means very rough (dry dirt, bark, wool, etc.)
- Grayscale values between 0 and 1 can also be used
In the example above, the block has uniform metalness on all of its surfaces, but it is using a roughness map to control which pixels are very rough (white), which pixels are very smooth (black), and some pixels that are somewhere in between (gray). The smooth, less rough pixels look more like shiny blue gemstones while the rough pixels look more like rough gray rock.
- Normal map - how raised is a pixel in your texture
- Normal maps use the 3 color channels (RGB) in the texture to change how light behaves when hitting the texture. By doing this, it can fake surface details that appear to stick up or recede down into the surface of the 3D mesh.
- RGB values of (128, 128, 255) means the pixel doesn’t stick up or recede down when lit. It will appear at the height of the surface of the 3D mesh. When in doubt, use this default color for your normal map, or don’t use one at all to save on file size.
- RGB values other than this default color (above) should not be manually painted unless you’re confident working with normal maps this way. Normal maps are usually automatically generated from other height information when using specific software applications. More details can be found later in this document.
Height map - alternative to a normal map for giving pixels height or depth.
Height maps have some limitations and should only be used for pixelated texture sets like the 16x16 pixel vanilla Minecraft textures. If you’re painting non-pixelated textures, consider using a normal map instead of a heightmap.
- Heightmaps use a 1 color channel (grayscale) in the texture to change how light behaves when hitting the texture.
- R channel values mean the pixel sticks up or recedes inward.
- Value of 1 means the pixel will appear to stick out
- Value of 0 means the pixel will recede inward
- Value of 0.5 means no surface change
Defining the Texture Set
First things first, let’s start our PBR texture set for the Gold Ore block before we start texturing our example, with the gold_ore.texture_set.json texture set JSON:
{
"format_version": "1.16.100",
"minecraft:texture_set": {
"color": "gold_ore",
"metalness_emissive_roughness": "gold_ore_mer",
"normal": "gold_ore_normal"
}
}
Creating the Base Color and Opacity Texture File
Let’s create custom base color and opacity maps:
1. Open a vanilla Minecraft texture in the app as a starting point, or skip to Step 2.
2. Create a new document at the texture resolution that you want. (16x16 pixels for most vanilla Minecraft textures) Also, 72 pixels/inch is recommended for the pixel density.
3. Create working layers for the base color and opacity map (if needed). Paint what you want and make any edits in these layers. In the example below, multiple layers have been painted to edit the base color map (more gold!).
4. Once you have the base color and opacity map layers looking the way you want, it’s a good idea to save your Photoshop document using the name of the object’s texture set.
For this example, this file was saved as “gold_ore.PSD”. Next, we need to save out a texture file that the game can use.
Note: For most game objects, transparent pixels in the opacity map must also be painted black in the base color map (e.g. tree leaves). However, there are exceptions where the transparent pixels must also be painted white in the base color map in order to appear correct in the game (e.g. rails). Some experimentation may be necessary.
5. (Optional, for non-opaque objects only) - Duplicate your opacity map layers, merge the duplicates together to create a single layer, and then copy it (Ctrl+C).
6. (Optional, for non-opaque objects only) - In the Channels tab, create a new alpha channel, and paste (Ctrl+V) your merged opacity map into this channel. Click on the small gray box to the left of the RGB channel to make the RGB channels visible again.
You now have your base color map being stored in the RGB channels and the opacity map stored in the alpha channel.
7. (Optional, for non-opaque objects only) - Go back to the Layers tab and hide any of your opacity map layers. Only your base color map layers should be showing.
8. Re-save the .PSD.
9. Use the Save As command to save a .PNG texture file that can be used by the game.
Note on opacity: You will save out a 32-bits/pixel .TGA file at this step if your object is intended to be non-opaque and uses an opacity map in the alpha channel. See the Opacity Maps section above.
Note on naming: File naming is important at this step! This .PNG should have the same name as the game object that you are modifying. For this example, this file was saved as “gold_ore.PNG”.
10. You have successfully created the first of 3 texture files for a complete PBR texture set.
Creating the Metallic, Emissive, and Roughness Texture File
Next, you’ll want to create the second PBR texture file combining the metallic, emissive, and roughness PBR maps.
1. (Optional) Open a vanilla Minecraft texture in Photoshop or a similar app as a starting point, or skip to the next step.
2. Create a new document at the same texture resolution as your first texture file (base color and opacity map). (16x16 pixels for most vanilla Minecraft textures) Again, 72 pixels/inch is recommended for the pixel density.
3. Create working layers for the metallic, emissive, and roughness map. Paint what you want and make any edits in these layers.
Note: You only need to paint these maps using grayscale values.
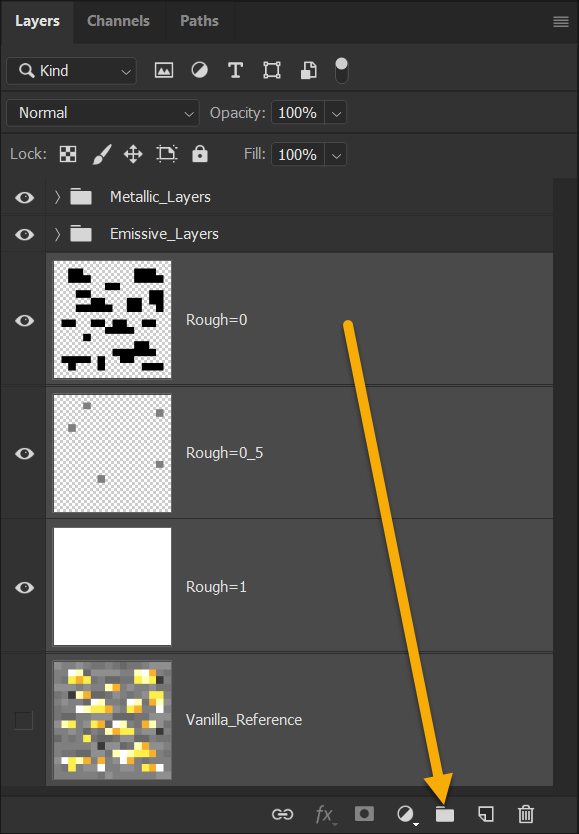
In the example below, multiple layers have been painted to create the desired roughness map result.
4. Make sure to place layers of each map type into layer groups. This is important for the next few steps.
5. Right-click on the Metallic layer group and select “Blending Options”.
6. Uncheck the green (G) and blue (B) channels:
7. Click “OK” to close the Blending Options window for the Metallic layer group.
8. Right-click on the Emissive layer group and select “Blending Options”.
9. Uncheck the red (R) and blue (B) channels:
10. Click “OK” to close the Blending Options window for the Emissive layer group.
11. Right-click on the Roughness layer group and select “Blending Options”.
12. Uncheck the red (R) and green (G) channels:
13. Click “OK” to close the Blending Options window for the Roughness layer group.
14. Once you have the metallic, emissive, and roughness map layers looking the way you want, it’s a good idea to save your Photoshop document using the name of the object’s texture set with the addition of the *_mer suffix.
For this example, this file was saved as “gold_ore_mer.PSD”. Next, we need to save out a texture file that the game can use.
15. Use the Save As command to save a .PNG texture file that can be used by the game.
Note: Again, file naming is important at this step. This .PNG file should have the same name as the game object that you are modifying with the addition of the *_mer suffix. For this example, the file was saved as “gold_ore_mer.PNG”.
16. You have successfully created the second of 3 texture files for a complete PBR texture set.
Creating the Normal Texture File
Normal maps are usually created using specialised tools. There are many professional software options as well as some great, free alternatives available:
- Free Tool - xNormal
- Adobe Photoshop - Filters → 3D → Generate Normal Map
- PBR Painting - Substance Painter
- PBR Painting - Quixel Mixer
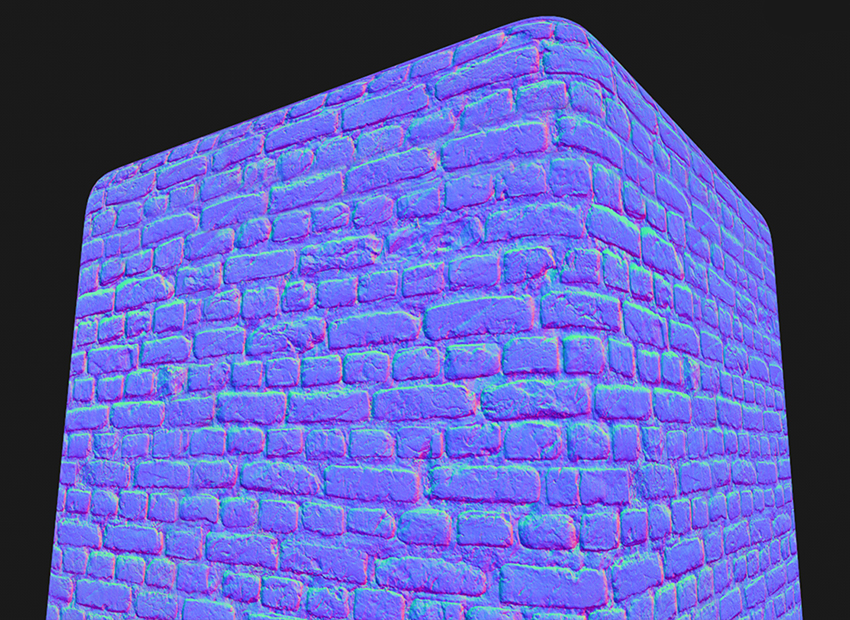
Example of a brick wall PBR texture set (left) and its normal map (right):
- Create a normal map using your preferred tool or workflow at the same resolution as your first texture file (base color and opacity map). Again, 72 pixels/inch is recommended for the pixel density.
- Use the Save As command to save a .PNG texture file that can be used by the game.
Note: Again, file naming is important at this step. This .PNG should have the same name as the game object that you are modifying with the addition of the *_normal suffix. For this example, the file was saved as “gold_ore_normal.PNG”.
If you’re not familiar with creating normal maps, you can always just leave it out or create a “blank” normal map by filling a texture with (128, 128, 255) RGB color and saving the .PNG file.
Alternatively, since the “gold_ore” example is a pixelated texture, we could have also used the height map option to create surface details. The file name would still be “gold_ore_normal.TGA” in this example, but the information stored in the texture channels would be different. See the Height Maps subsection of the New PBR Texture Maps section above for more info.
- Finished! You have created the third and final texture file for a complete PBR texture set.
Alternate Workflow: Using Photoshop’s Generate Image Assets Function
Instead of having 3 Photoshop .PSD files for each of the 3 PBR texture files, you could alternatively use a single .PSD file and take advantage of Photoshop’s Generate → Image Assets function in the File menu.
As long as you create a layer group for each PBR texture file and name it with the correct file name and file type (.png), they will save themselves automatically after each change (after you initially save the .PSD file).
More information can be found here.
Note: Since this function cannot output .TGA files, you won’t be able to use it to save a texture file with an alpha channel like those needed for non-opaque texture sets.
Caveats for Creating Mirrors with Perfect Reflections
Using PBR maps like metalness and roughness along with ray tracing, you can create highly reflective materials like shiny plastics, smooth metal, or polished stone. All of these will have high quality reflections.
However, for perfectly reflective objects like mirrors, you’ll want to configure your PBR maps to enable a perfect mirror. If you use a solid black roughness map (0.0) and a solid white (1.0) metalness map, the game will interpret your material as a perfect mirror. This means that the ray tracing code can take some shorter paths during its calculations since it knows that the material will fully reflect the environment without any additional details to take into account.
How to Create PBR Textures in Substance by Adobe
If you have access to the Substance Painter app, you can create higher resolution PBR texture sets in a much more intuitive manner. This software lets you see all of the maps of your PBR texture set displayed in real-time on mesh geometry. This allows you to tune your texture maps as you work without having to launch the game, move any files around, or modify channels.
1. Launch the application and select New Project from the File menu.
2. Template = Unreal Engine 4 - This will automatically set a variety of application and viewer settings. Feel free to try other options or make your own template!
3. File → Select - This is where you select what mesh you would like to display and paint your textures on. For Minecraft with RTX, using a 1 meter by 1 meter cube mesh with just 6 faces (no subdivisions) will give you an exact preview of how your textures will look when mapped onto a block in the game. Using the .FBX mesh format is recommended.
4. Document Resolution - This is the texture resolution that you’re targeting. Note: This setting can be changed later non-destructively at any time. For HD textures, it’s recommended to work at 1024 - you’ll get lots of detail in your textures with minimal pixelation, the app will run nice and fast on most PC setups, and your HD textures should look sharp in the game.
If you’ve only ever worked with textures in vanilla Minecraft, you’ll notice that you can’t select 16 pixels by 16 pixels here for your resolution (the lowest is 128). However, you can always author and export textures at 128x128 (or larger) and scale them down later in an image-editing application like Photoshop.
5. Normal Map Format = DirectX (leave as default)
6. Compute Tangent Space Per Fragment = True (leave as default)
7. Add - (Optional) Here you can choose to import any supporting textures that you already have completed. If replacing a vanilla Minecraft texture with an HD version, it can be helpful to import the vanilla texture here for use as a reference. Note: This import step can also be performed later at any time. For this example, the vanilla “iron_block” texture file is going to be imported when the new project is created to be used as a reference.
8. Click “OK”. The application should open this new project that you’re creating and look something like this:
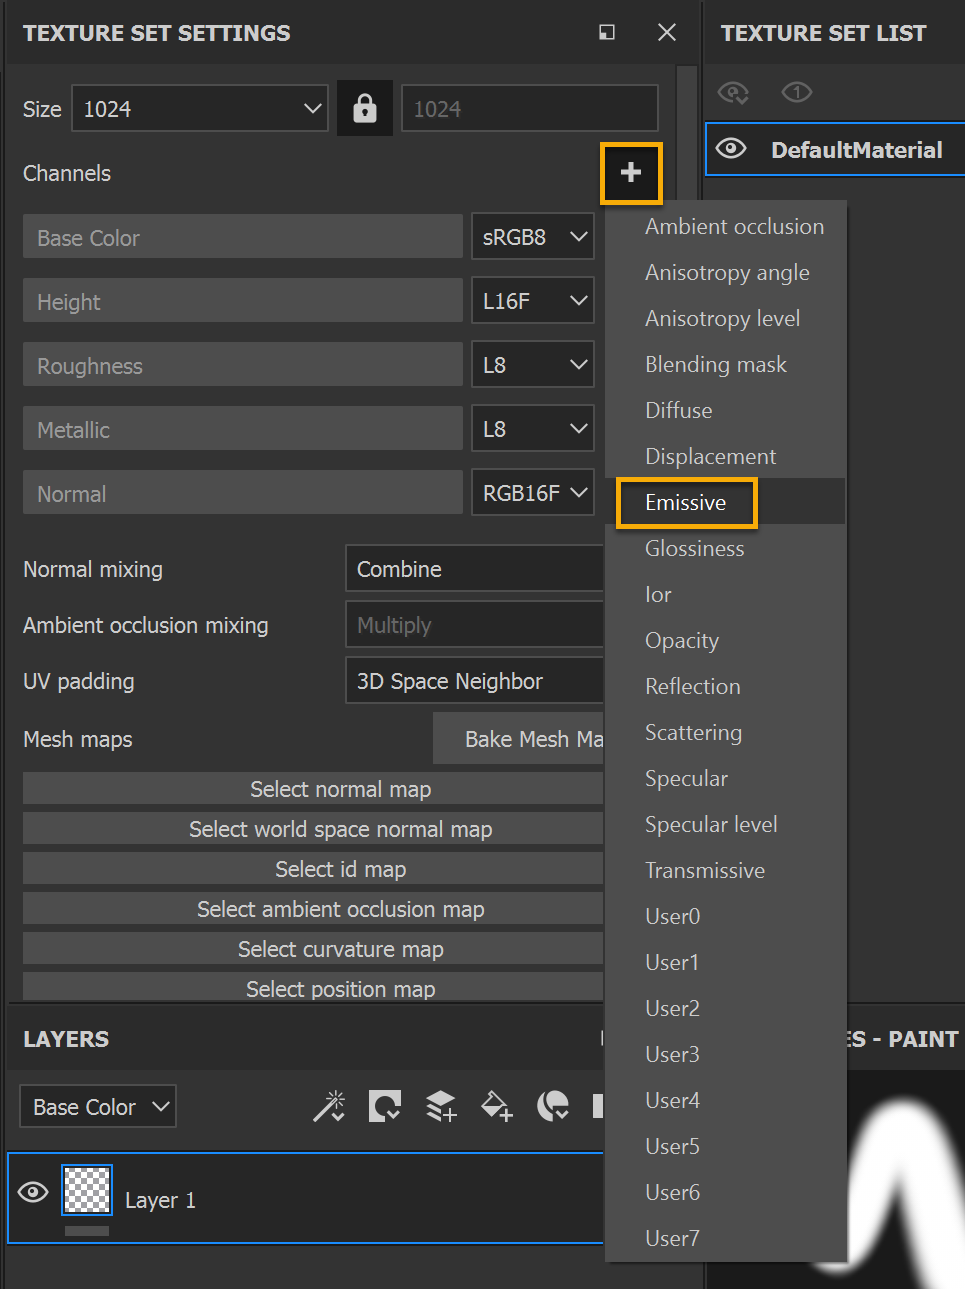
9. It’s a good idea to add the emissive map to your texture set list at this point. Even if your texture set isn’t going to use emissivity, don’t worry, it will default to black (0.0) and won’t hurt anything.
Note: You can also add an opacity map to your texture set list in the same way if you’re planning on creating a non-fully opaque texture set.
10. (Optional) Next, add your texture reference to a new fill layer in the Base Color slot. You’ll find your imported reference texture on the Shelf under the Project heading.
Layers are automatically set to bilinear filtering when created, which can make pixelated textures like vanilla Minecraft textures look blurry. To correct this, just set the layer’s Filtering to Nearest. However, if you’re not using pixelated textures, leave your layer filtering on the default setting of bilinear HQ.
From here, it’s also a good idea to set this reference layer to have full roughness (1.0), no metalness (0.0), and no emissivity (black: 0, 0, 0). This will make sure that the reference texture is displayed in Painter as close to the vanilla game as it can be.
Note: If you didn’t import reference textures or other resources when you created the project, you can do so at any time using the Import Resources button on the Shelf.
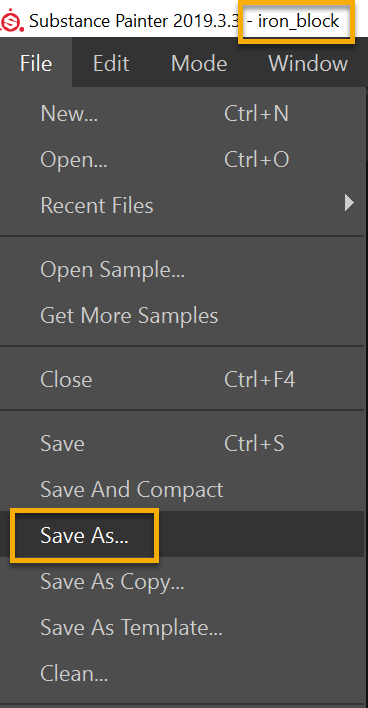
11. Now is a great time to save your project. It’s recommended to name your Painter project after the game object whose texture set you are replacing. For this example, this project file has been saved as “iron_block.SPP”. Naming your project this way will make things easier when exporting your texture set later.
12. From here, you can create your texture set with all of its PBR maps as you see fit.
In this example, a new fill layer was added (with some adjustment sub-layers) to create a dark, high definition iron material.
13. Next, a new fill layer adding an indent detail to give the surface of the block some new character.
14. And finally, another fill layer to add some dirt collecting in the corners of the indent and some scratches randomly across the surface.
15. Re-save as needed.
16. Now that the whole texture set is looking great inside Painter, you need to export your textures.
Select: File → Export Textures to open the export subwindow.
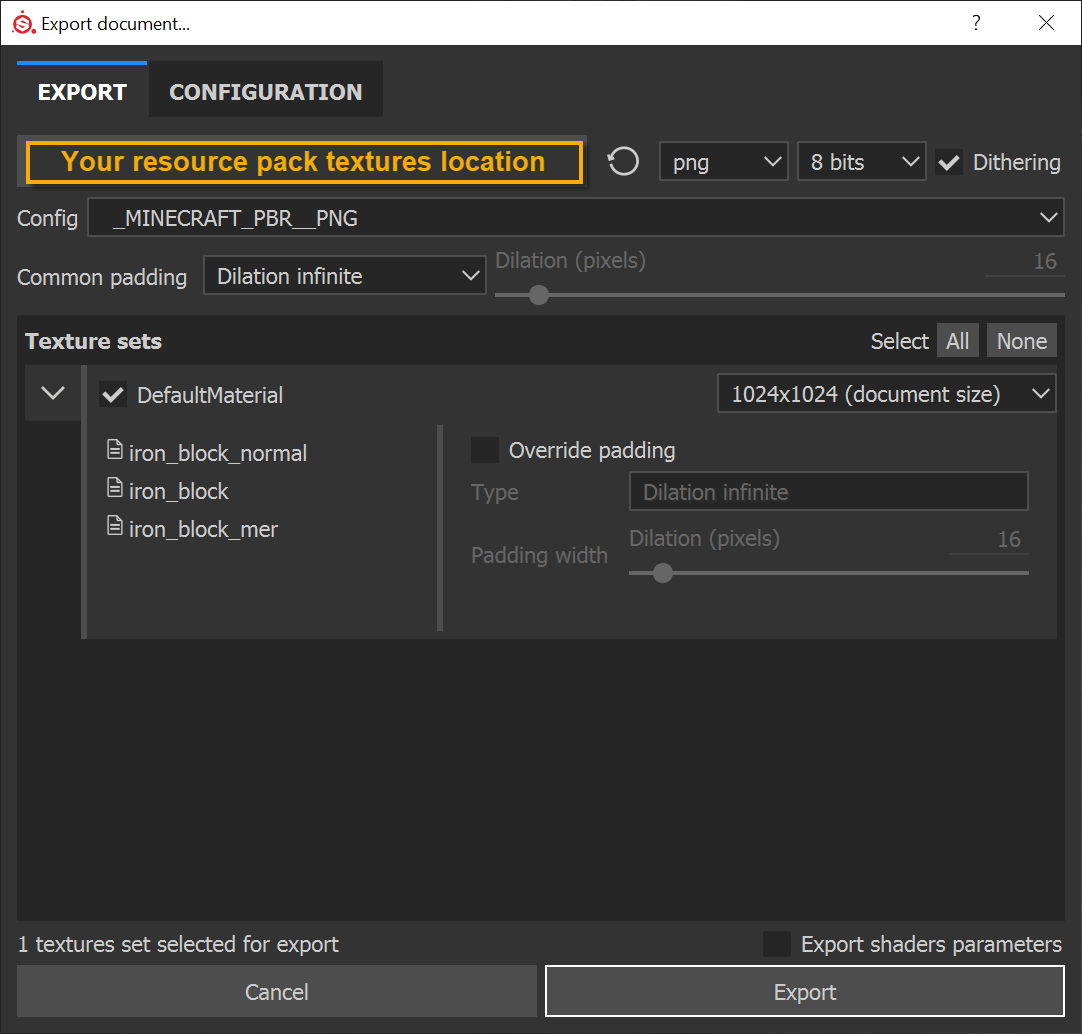
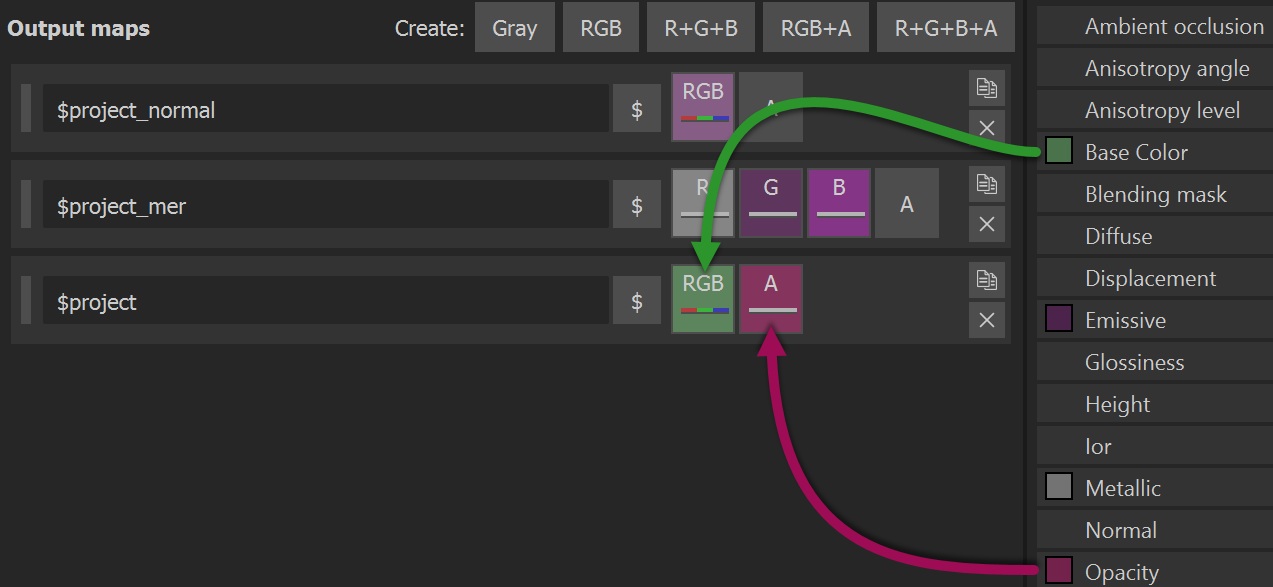
17. Create a new export preset configuration like this, which will output your texture set in a way that can be used by the game build.
Note that the “$project” prefix on each output map will name each of the exported texture files after the name of the project. So, if you named your project after the game object that this texture set will belong to, all of your exported textures will immediately be ready for use in the game without any additional renaming.
18. Once you have your export preset set up, select it in the “Config” field and use these recommended settings:
Location - This can be the textures location for the resource pack that you’re working on. This makes things easier because you can export textures from Painter and they will immediately show up or be updated in the same folder that the game is referencing when it runs (assuming that you have your resource pack activated in the game).
PNG - Use this setting to ensure that your files can be used by the game and that they are as small and efficient as possible.
Texture set resolution - This is the size of the textures that will be exported. This setting is independent of the resolution of your project. So, if you want you work on your project at one resolution and then export files at another resolution. 1024x1024 is recommended for HD texture sets.
Note: The example above is for a fully opaque texture set. If you are using an opacity map in your texture set list for transparency, you will want to export your base color map as a targa (.TGA) file (instead of a .PNG) with the opacity map being stored in the alpha channel.
19. Re-save your project! This will save your export settings as well, which will make your workflow much faster as you do further iterations with your texture set.
20. Finished! You have created your first set of HD PBR textures for Minecraft with RTX! Refer to the earlier sections, Resource Pack Setup and How to Test Your Textures in the Game, to find instructions on how to view your new textures in the game.
Credit:
All textures were created with “Substance” the leading software solution for 3D digital materials.
https://www.substance3d.com/
@Substance3d
#MadeWithSubstance
#CreateWithSubstance
Customizing the Fog
On top of prettifying textures with PBR enhancements, PBR-enhanced resource packs can also add custom fog definitions and apply them through the new fog stack (for further info, head to Minecraft.net). This fog stack is ordered by lowest priority to highest:
- Hardcoded Engine defaults
- Data Default settings from “default” object within biomes_client.json
- Per-Biome settings in biomes_client.json
- /fog Command
Both biomes_client.json and /fog Command refer to Fog Definitions which are defined in JSON with the “fog” folder of Resource Packs.
Fog Definitions
Each Fog Definition is a JSON file in the “fog” folder of a Resource Pack. An example looks like:
{
"format_version": "1.16.2100",
"minecraft:fog_settings": {
"description": { "identifier": "nvidia:example_fog" },
"distance": {
"air": {
"fog_start": 0.92,
"fog_end": 1.0,
"fog_color": "#ABD2FF",
"render_distance_type": "render"
}
},
"volumetric": {
"max_density": {
"air": {
"max_density": 0.1,
"max_density_height": 56,
"zero_density_height": 70
}
},
"media_coefficients": {
"air": {
"scattering": [ 0.02, 0.02, 0.02 ],
"absorption": [ 0.0, 0.0, 0.0 ]
}
}
}
}
}
The schema for a Fog Definition.
- format_version: The schema version this JSON was written for.
- minecraft:fog_settings: An entry for the fog definition.
- Description
- identifier: A quoted unique name, prefixed with a namespace followed by a colon. The unique identifier is used to refer to a Fog Definition, e.g. from biomes_client.json and from the /fog Command.
- distance: An optional object containing settings for distance fog that limits the player’s view from seeing anything beyond a specific distance from their camera. Contains a group of one or more optional, enumerated objects:
- air: When the player’s camera is in air.
- weather: When the player’s camera is in air with active weather (e.g. rain or snow).
- water: When the player’s camera is in water.
- lava: When the player’s camera is in lava.
- lava_resistance: When the player’s camera is in lava while under the effects of the “Fire Resistance” buff.
- Each enumerated object has the following distance values:
- fog_start: Distance in units or percentage where the fog begins solidifying.
- fog_end: Distance in units or percentage where fog becomes fully opaque.
- render_distance_type: Either fixed or render:
- fixed : The distance values are units and applied as blocks from the player’s camera.
- render: The distance values are percentages, in range of 0.0 to 1.0, and are multiplied against the client’s render distance setting.
- fog_color: the color of the fog as a square bracketed list of 3 values in the range of 0 to 255; or as a quoted hexadecimal RGB value following a pound sign.
- volumetric: An optional object containing settings for volumetric fog which is calculated as light passing through blocks:
- density: An optional object containing settings for height-based fog. Contains a group of one or more optional, enumerated objects:
- air: When the player’s camera is in air.
- weather: When the player’s camera is in air with active weather (e.g. rain or snow).
- water: When the player’s camera is in water.
- lava: When the player’s camera is in lava.
- lava_resistance: When the player’s camera is in lava while under the effects of the “Fire Resistance” buff.
- Each enumerated object has the following density and height values:
- max_density: A fractional value to multiply the fog density. 0 will have zero fog and 1 will have completely opaque fog.
- uniform: A boolean value: false scales the fog density based on depth into the enumerated medium and true makes the fog distribute evenly across height, ignoring the values of zero_density_height and max_density_height.
- zero_density_height: Height in blocks where the fog starts densifying. Ignored if uniform is true.
- max_density_height: Height in blocks where the fog stops densifying. Ignored if uniform is true.
- media_coefficients: An optional object containing settings for how light is dispersed and refracted by density fog as rays travel through various mediums. Contains a group of one or more optional, enumerated objects:
- air: used when light is passing through air.
- water: used when light is passing through water.
- cloud: used when light is passing through clouds.
- Each enumerated object has the following coefficient settings:
- scattering: A square bracketed list of 3 values for red, green, and blue colors to spread for the light passing through the enumerated medium. These values range between 0.0 and 1.0. It can also instead be a quoted hexadecimal RGB value following a pound sign.
- density: An optional object containing settings for height-based fog. Contains a group of one or more optional, enumerated objects:
- Description
absorption: A square bracketed list of 3 values for red, green, and blue colors to absorb for the light passing through the enumerated medium. These values range between 0.0 and 1.0. It can also instead be a quoted hexadecimal RGB value following a pound sign.
Biomes
The biome layer of the Active Fog Stack is an average of settings from biomes around the player’s position. Each biome, in biomes_client.json,may reference a Fog Definition by its unique identifier for applying biome specific fog settings.
Fog Command
The /fog Command can further manage which Fog Definitions are applied to the Active Fog Stack for each player.
Fog settings within this layer of the stack are ordered via push, pop, & remove modes the /fog Command.
push: applies a fog definition, along with a user-provided ID, onto the top of the Fog Command layer(s) of the selected player(s).
pop: removes the top-most fog definition, from the selected player(s), that matches the user-provided ID (i.e. as provided previously via a /fog Command using the push mode).
remove : removes all fog definitions, from the selected player(s), that matches the user-provided ID.
The state of players’ Fog Command layer of the Active Fog Stack is saved and loaded for each player throughout play sessions of a world.


