How To Reduce Lag - A Guide To Better System Latency
If you want more responsive gameplay, but don’t know how to get started, you’ve come to the right place.
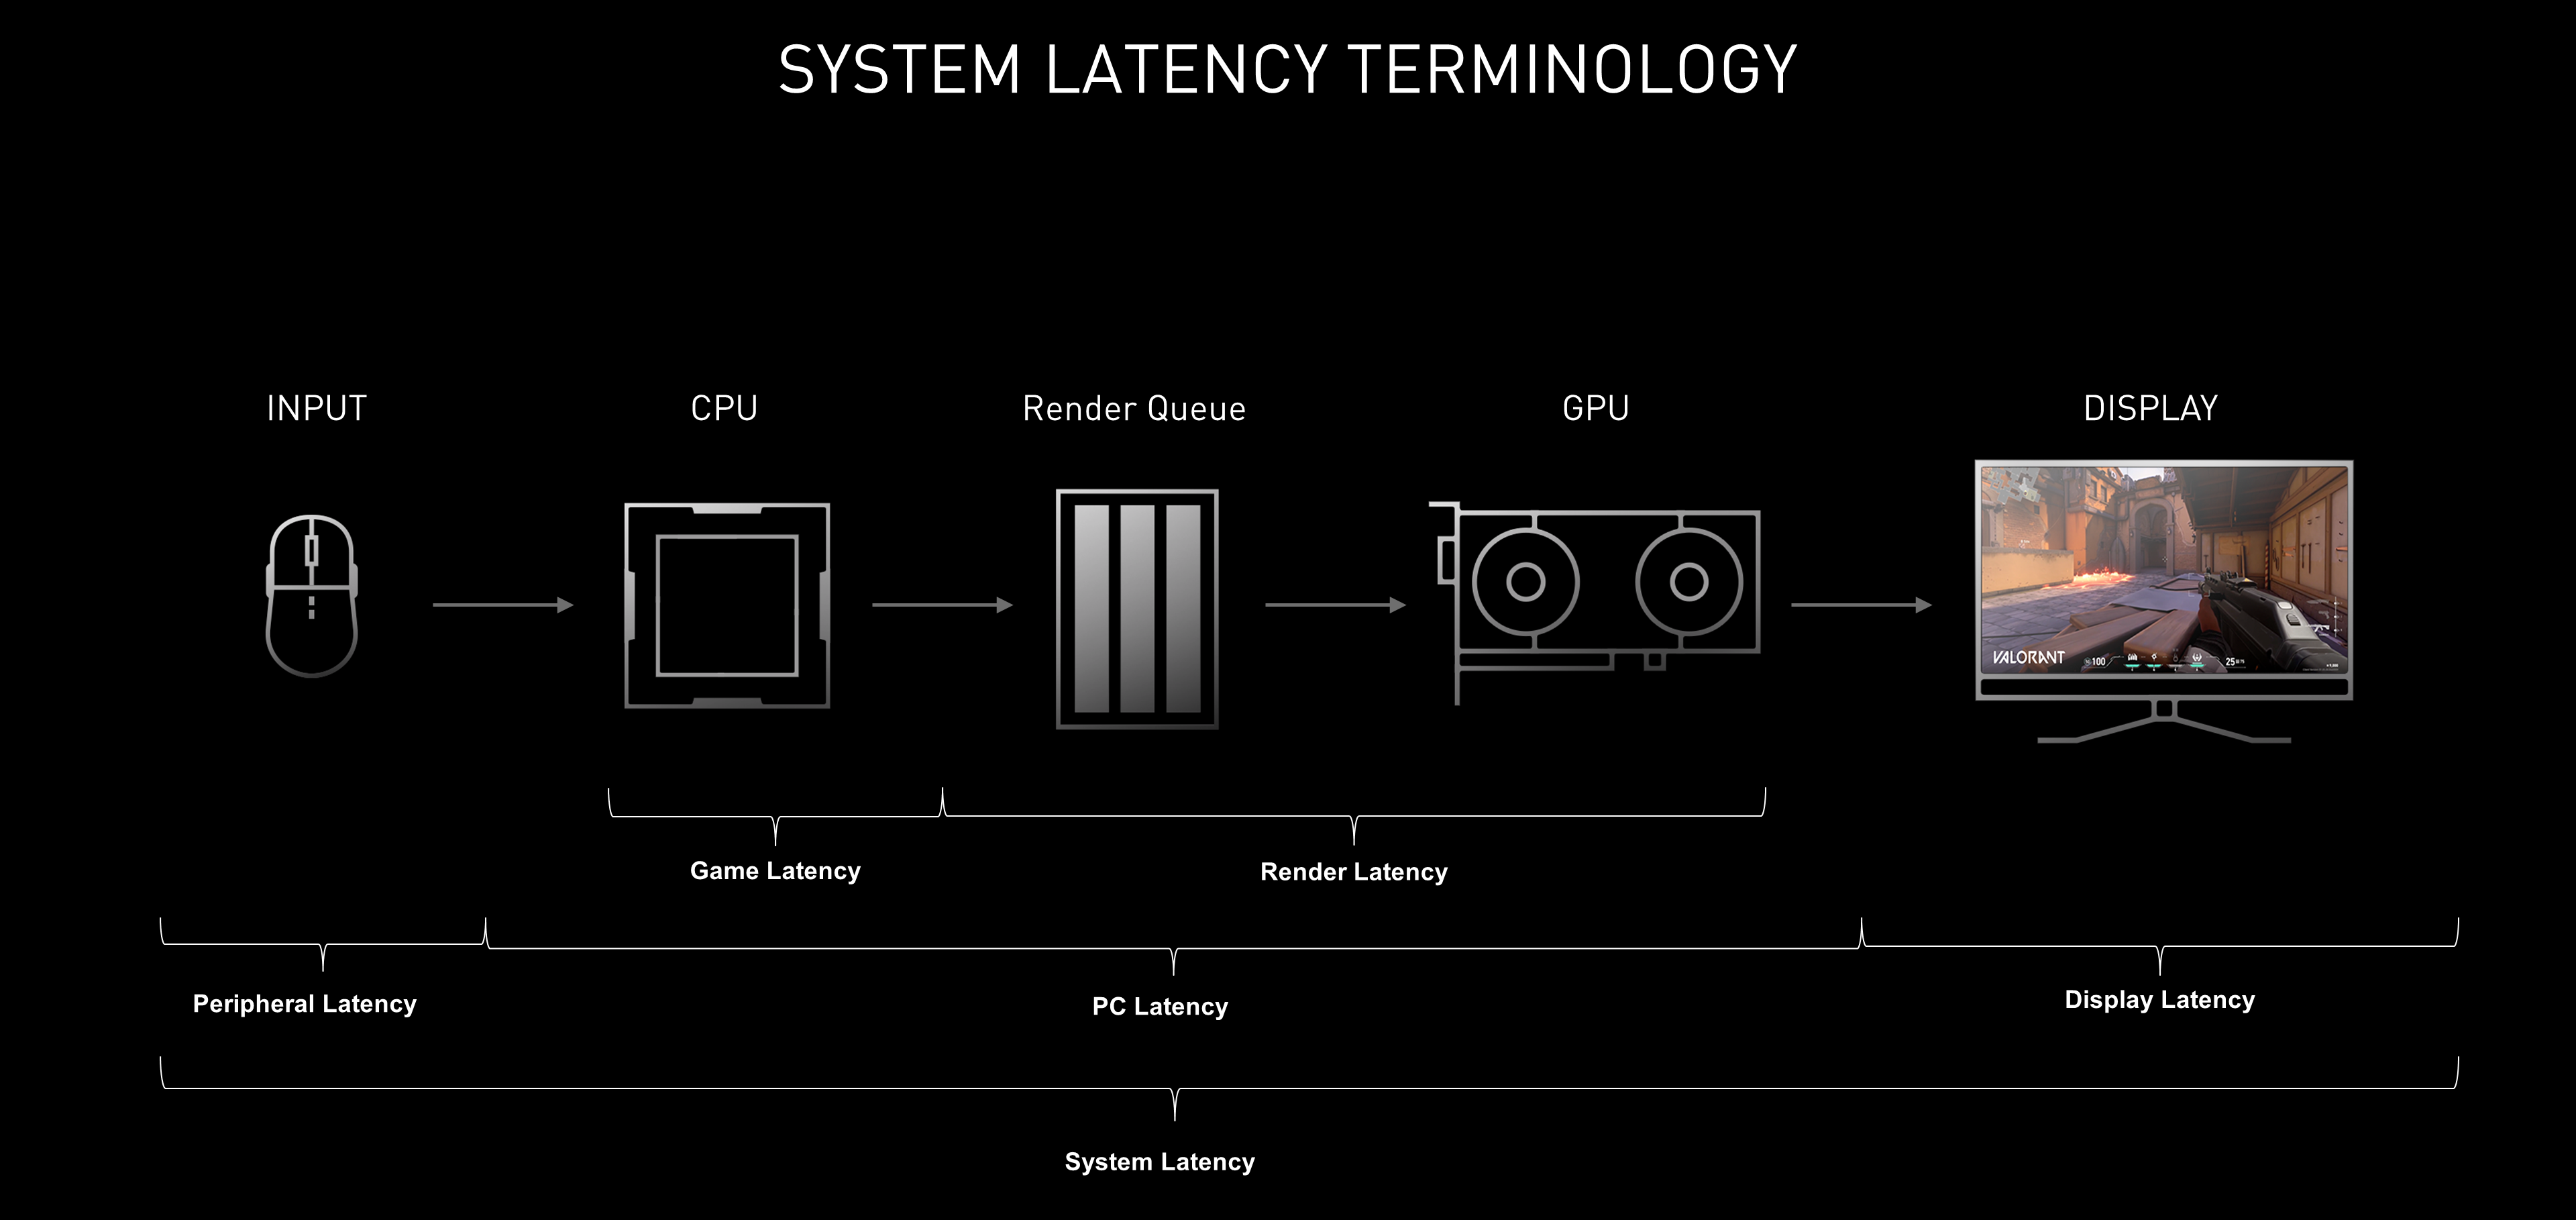
In this guide, we’ll cover how to optimize your setup using NVIDIA Reflex technologies, system changes, peripheral tweaks and more for the lowest possible system latency - the time it takes your mouse clicks to end up as pixels on screen. If you are new to system latency, check out our recent NVIDIA Reflex article that starts at a high level and breaks down the concepts of end to end system latency.
As a quick refresher, here is a video that details the differences between network latency and system latency, walks through the rendering pipeline, and discusses some basic optimizations that can be done to reduce system latency.
Let’s dive in.
The Approach
When optimizing for system latency, we recommend starting at end to end system latency, and digging down deeper from there.
As a gamer, system latency impacts us in a number of ways: aiming precision, peekers advantage, and PC responsiveness. System latency breaks down into three key parts: peripheral latency, PC latency, and display latency.
Using the NVIDIA Reflex Latency Analyzer integrated in G-SYNC 360Hz Esports displays coming this Fall, you can measure end-to-end system latency, peripheral latency, and PC+Display latency. Until you can get your hands on one of these butter-smooth displays, you can get started by measuring parts of the latency pipeline using in-game latency stats in games that have integrated NVIDIA Reflex technology, or with the rendering latency metric in the GeForce Experience performance overlay.
How To Optimize Peripheral Latency
Mice and keyboards sense and process key presses and movements. That processing time can vary in duration depending on the mechanical parts used in the peripheral, the techniques used to handle click detection, and the polling rate of the device.
As gamers, we only have a couple options when it comes to optimizing our mice and keyboards:
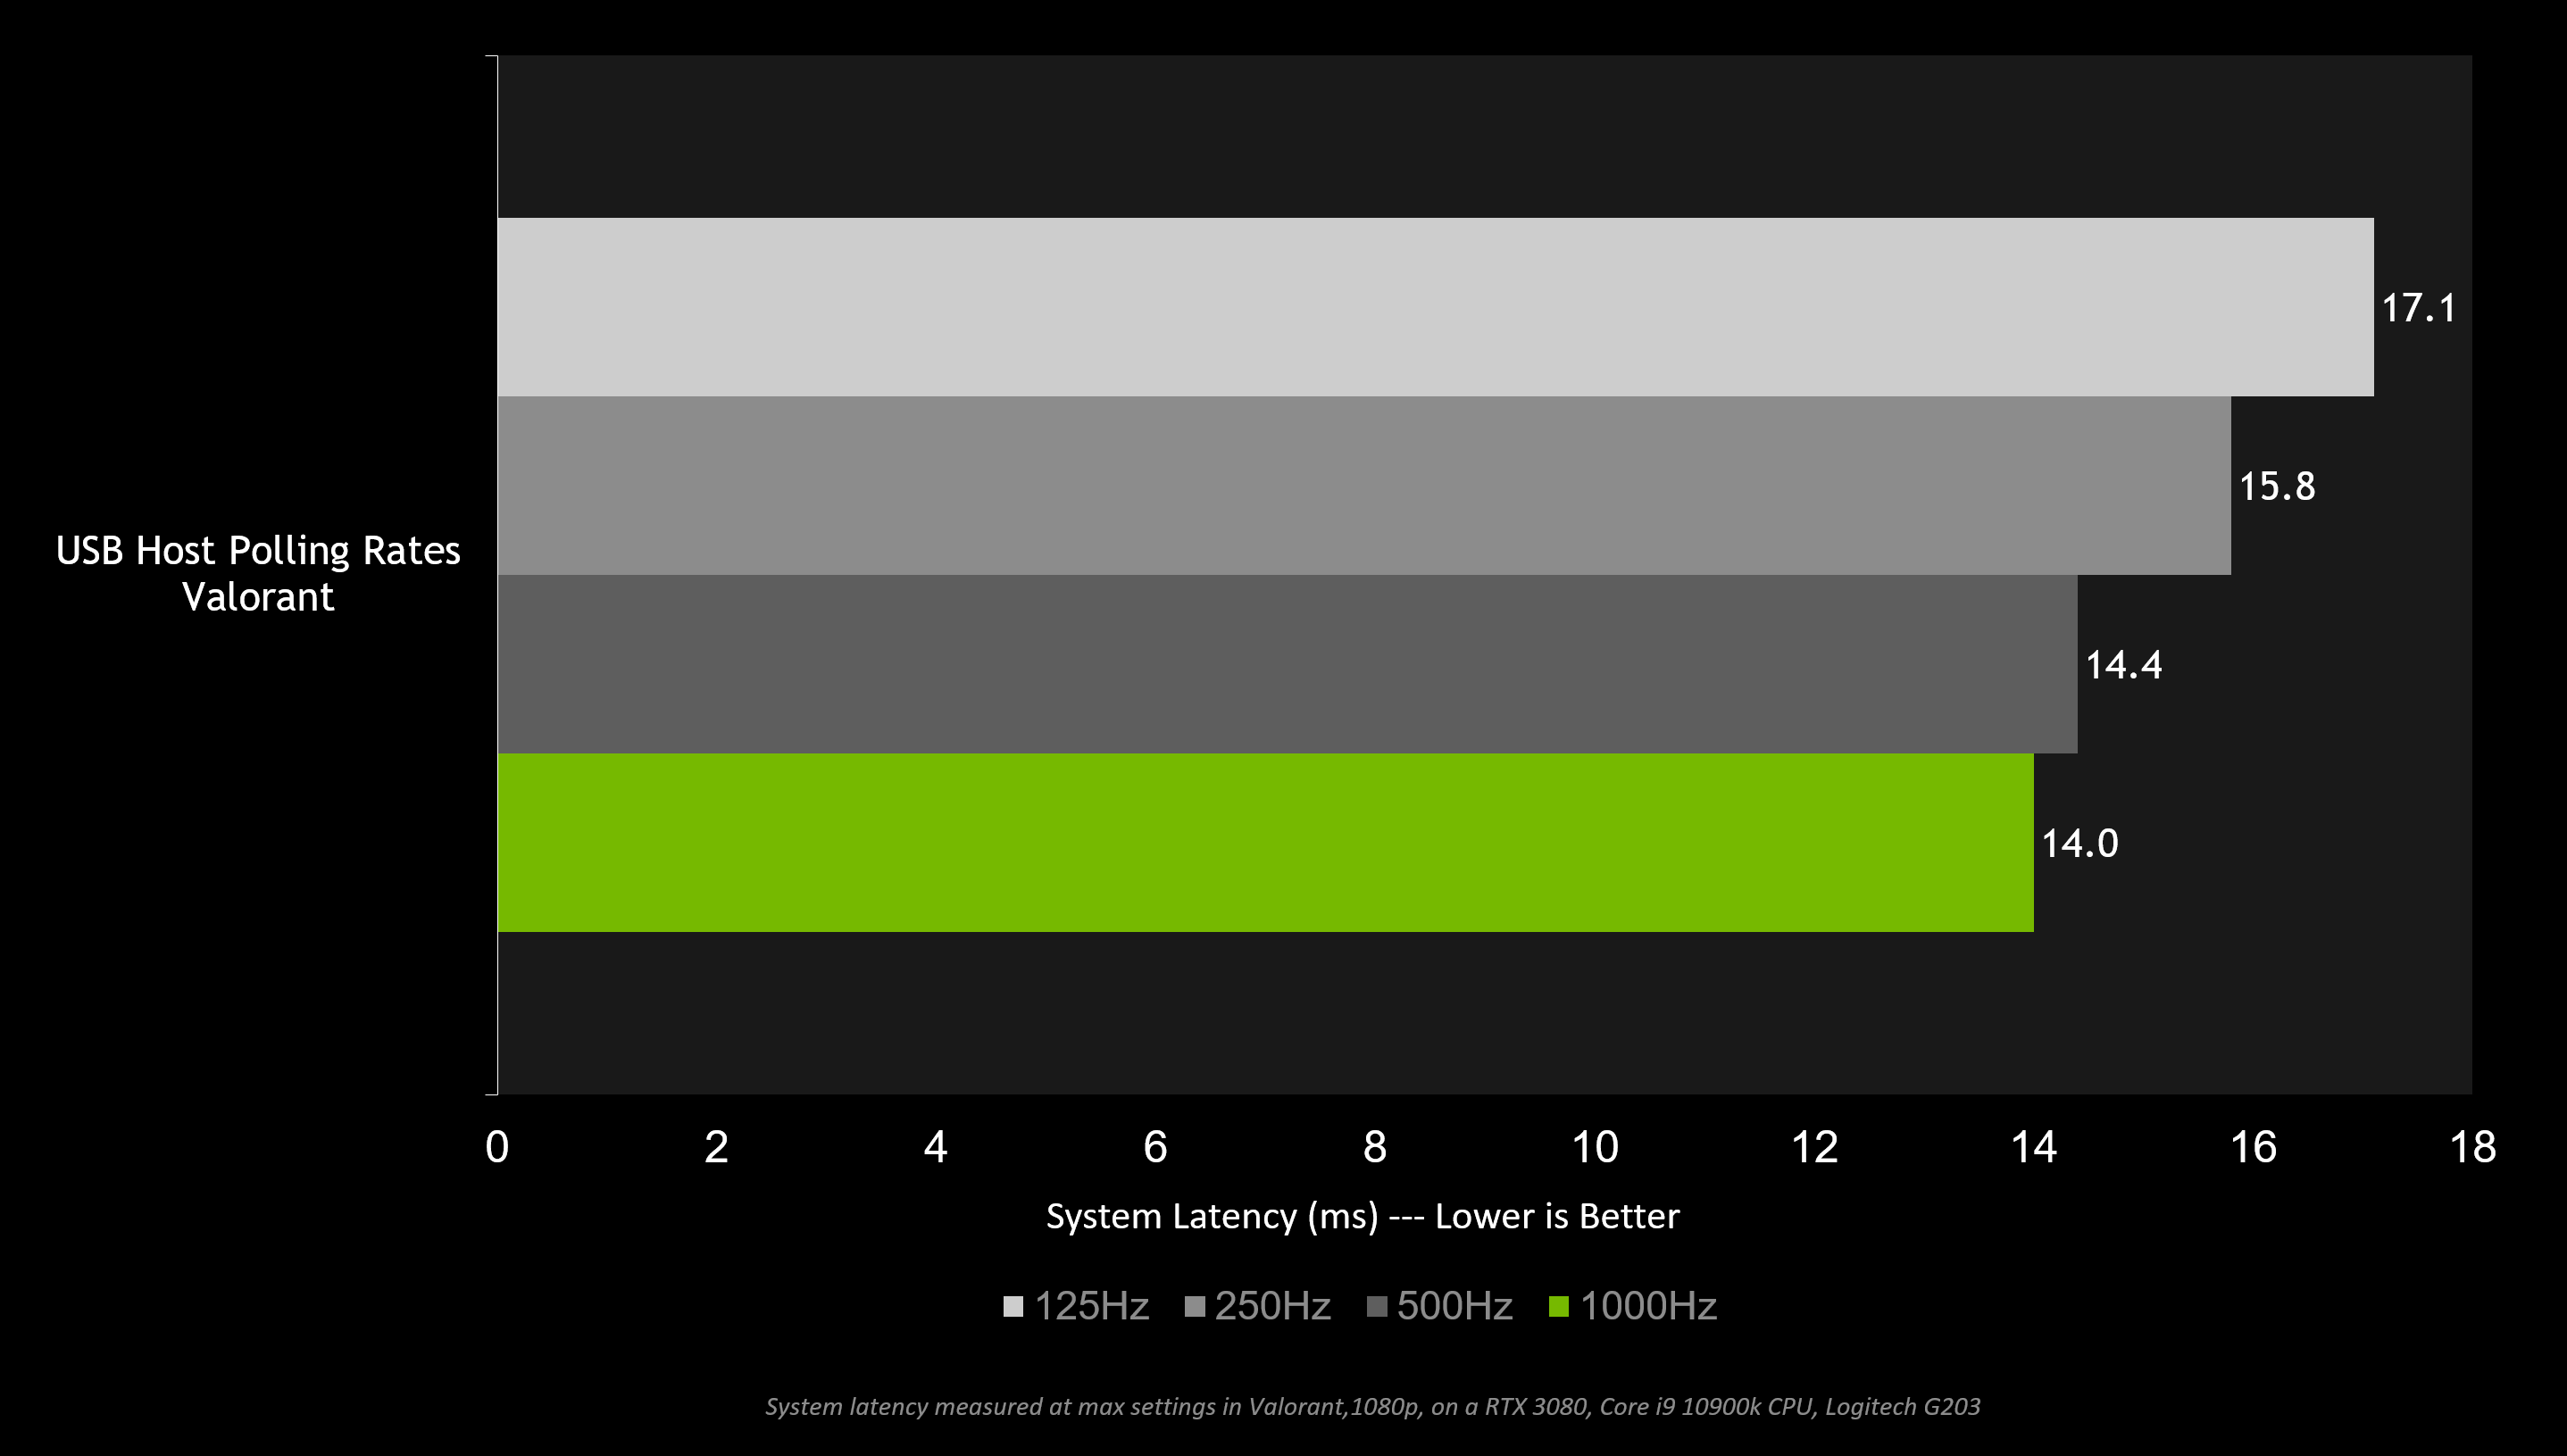
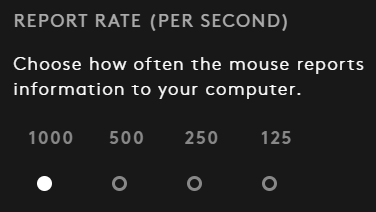
Increase your polling rate - Increase the polling rate of your device to the maximum. The polling rate is how often the USB host (your PC) asks for information from the device. For low or full speed devices, that is 1000Hz. Higher polling rate means that your mouse can deliver more frequent clicks and movements to the PC.
A low polling rate such as 125Hz adds up to 3ms of system latency on average compared to a 1000Hz polling rate! If your mouse has an adjustable polling rate, you can often find this option in your mouse’s software, or by pressing a button on the mouse.
Invest in a lower latency mouse/keyboard - Mice and keyboards can range anywhere from 1ms of latency to ~20ms of latency! Mousespecs.org has a great list of latency measurements to help you understand the latency of your mouse. Do note though -- there are other factors than latency to consider when choosing a great mouse, such as weight, maximum polling rate, wireless support, and a style that fits your hand.
Note: your mouse sensitivity will not significantly impact the latency of the mouse. Higher DPI does not mean lower latency. Don’t be afraid to lower your DPI if you prefer lower sensitivity.
How To Optimize PC Latency
PC Latency is often the largest contributor to total system latency. This includes the OS, game, and the rendering portions of the latency pipeline.
If you would like to optimize your PC for system latency, here are some helpful tips:
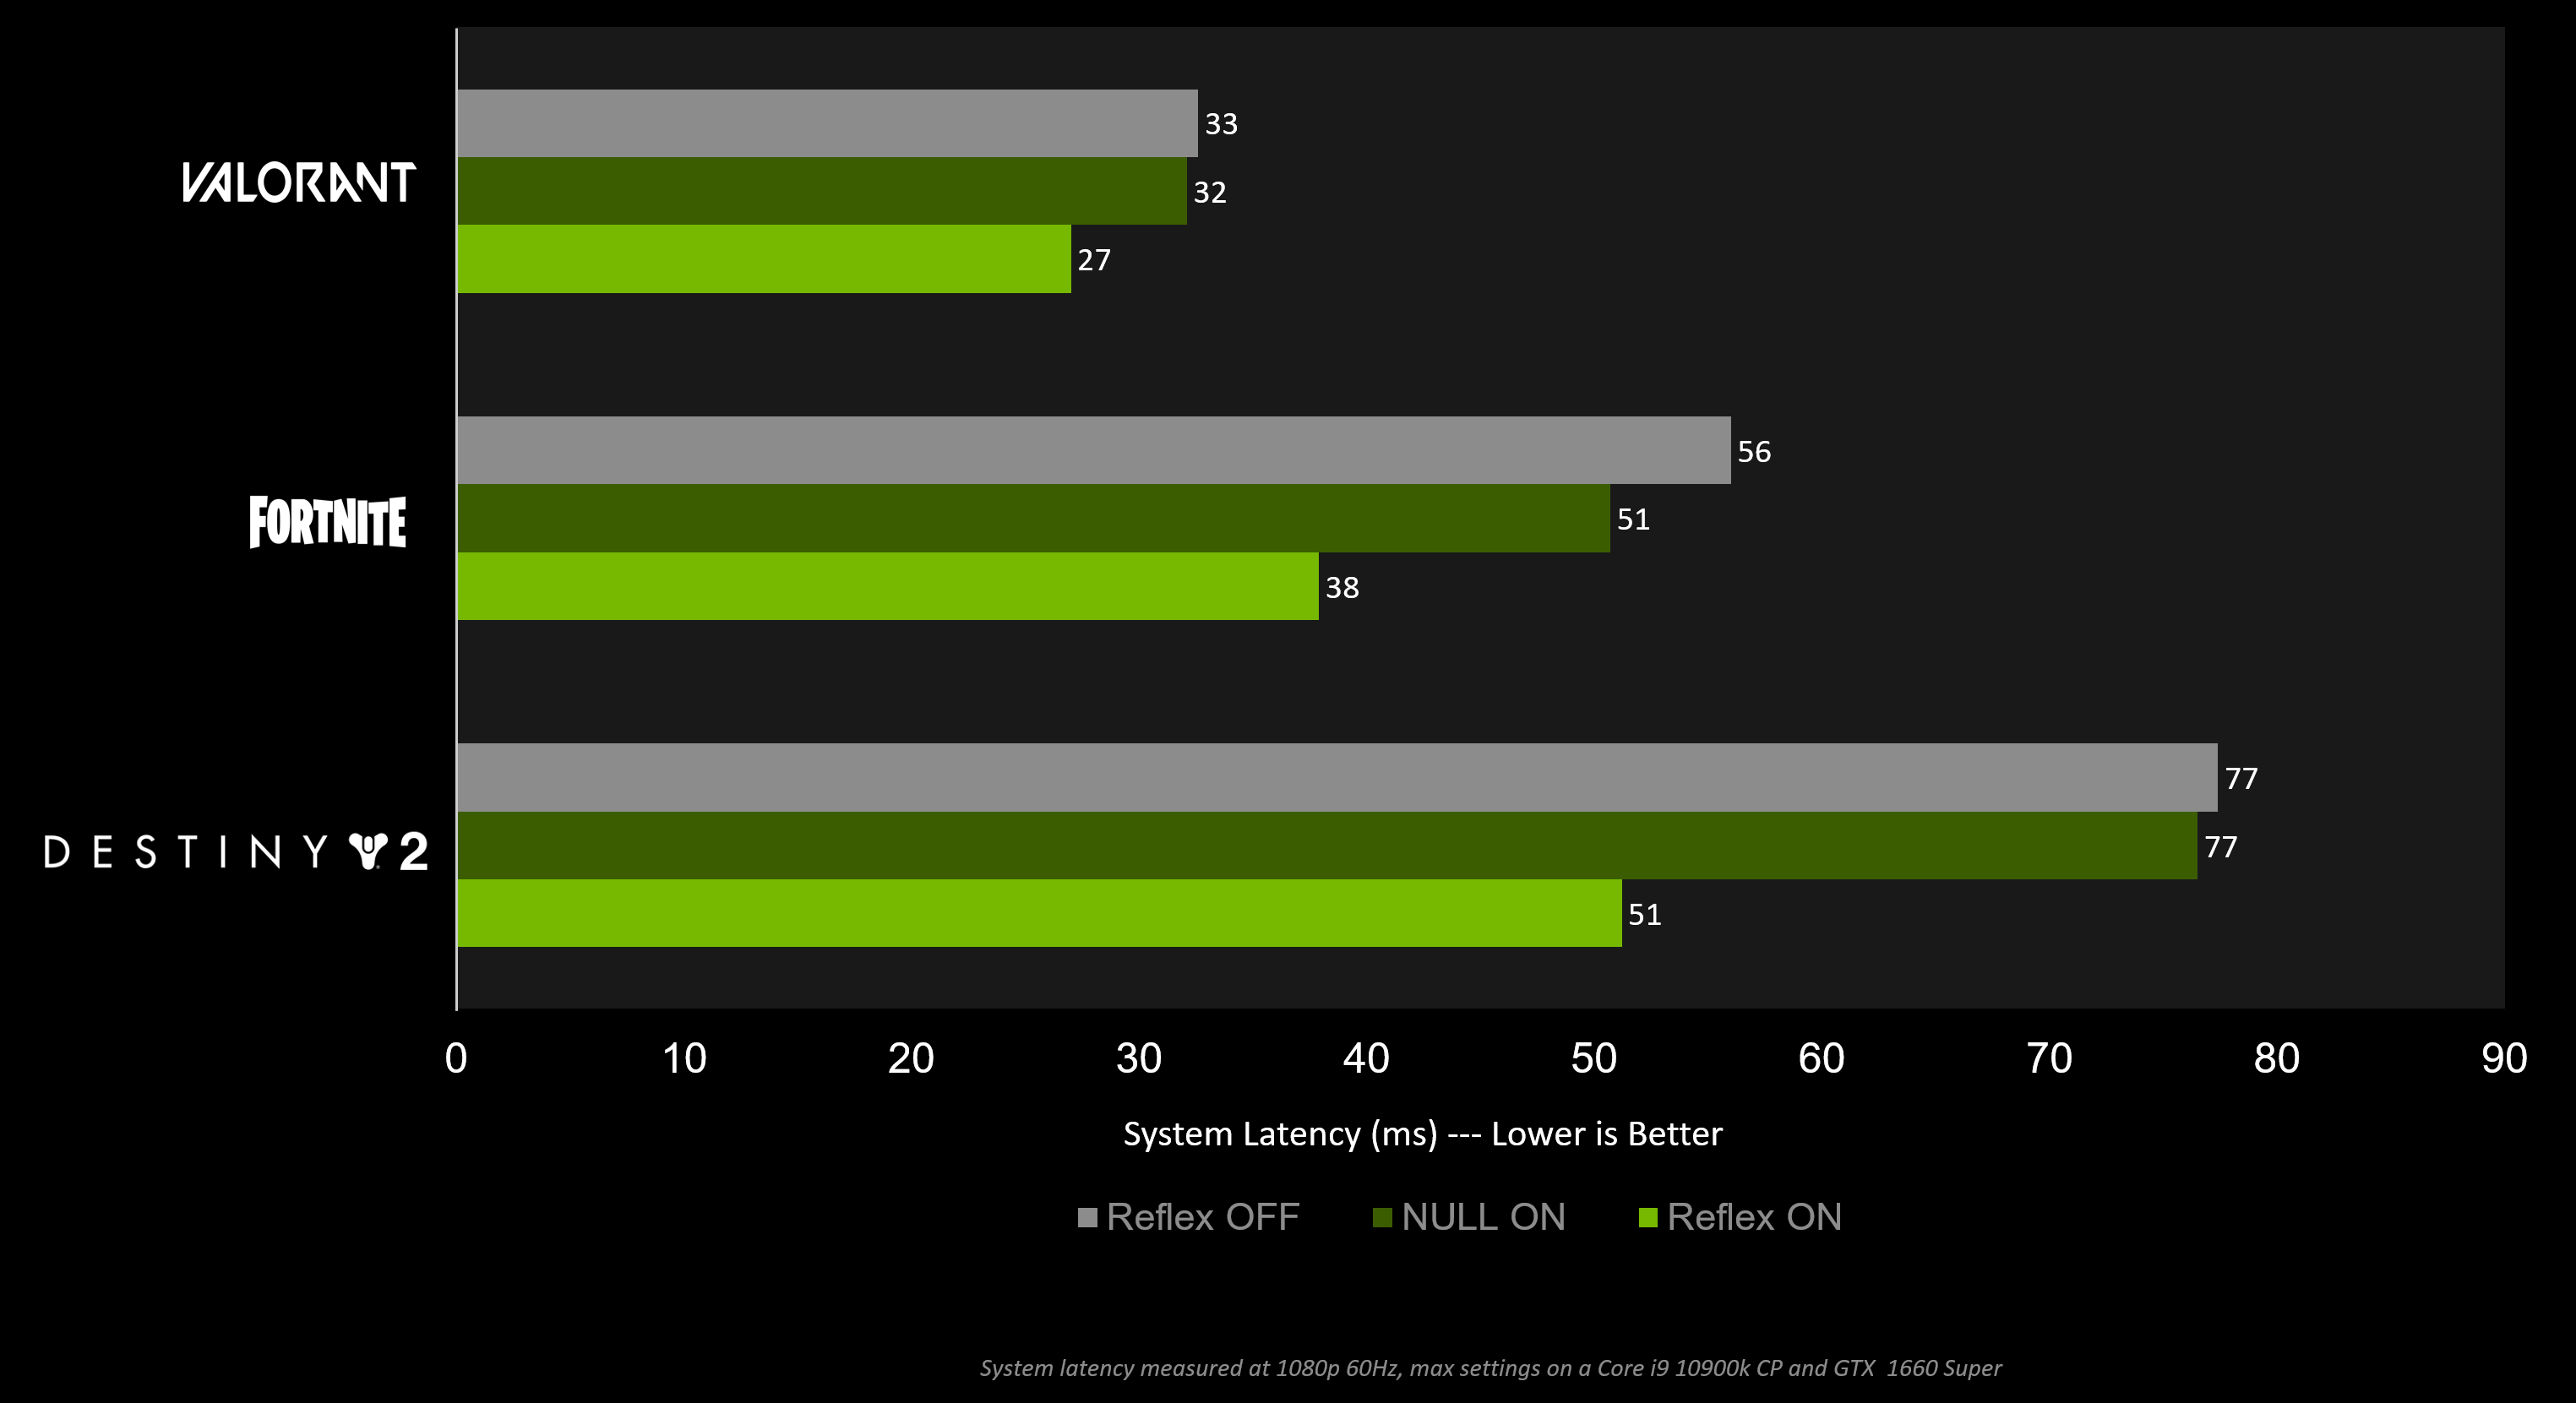
Turn on NVIDIA Reflex - If NVIDIA Reflex is available in your game, we highly recommend turning NVIDIA Reflex Low Latency Mode to On. Simply navigate to the option in your games options menu and turn on the setting. This will ensure your CPU is submitting work to the GPU just in time for it to be rendered.
The NVIDIA Reflex Low Latency mode supports GPUs all the back to the GTX 900 series! Check our growing list of supported games to see if you can take advantage of NVIDIA Reflex.
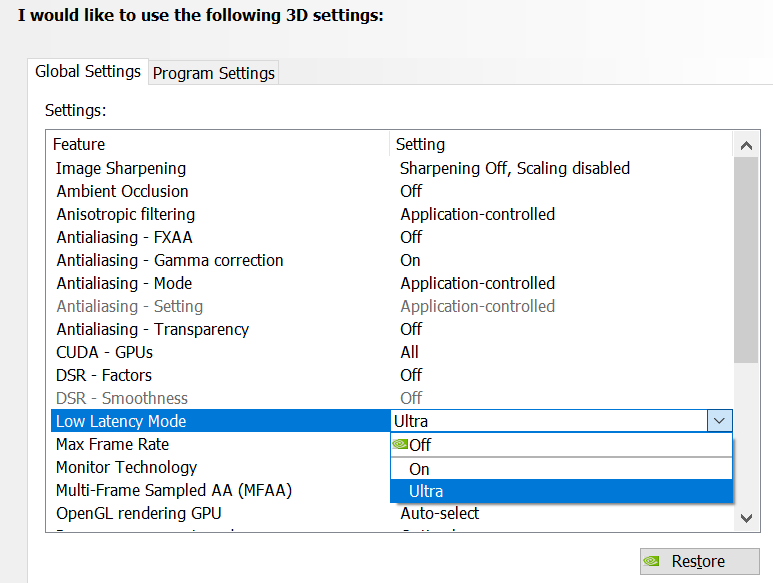
Turn on Ultra Low Latency Mode - If NVIDIA Reflex is not available, your next best option is to turn on the Ultra Low Latency mode in the NVIDIA graphics driver. This setting also reduces the render queue, but does so from the driver instead of the game.
NVIDIA Reflex is more effective at reducing latency and operates independently of NVIDIA Ultra low latency mode. If both NVIDIA Reflex and the Ultra Low Latency mode are enabled, NVIDIA Reflex will override Ultra Low Latency functionality.
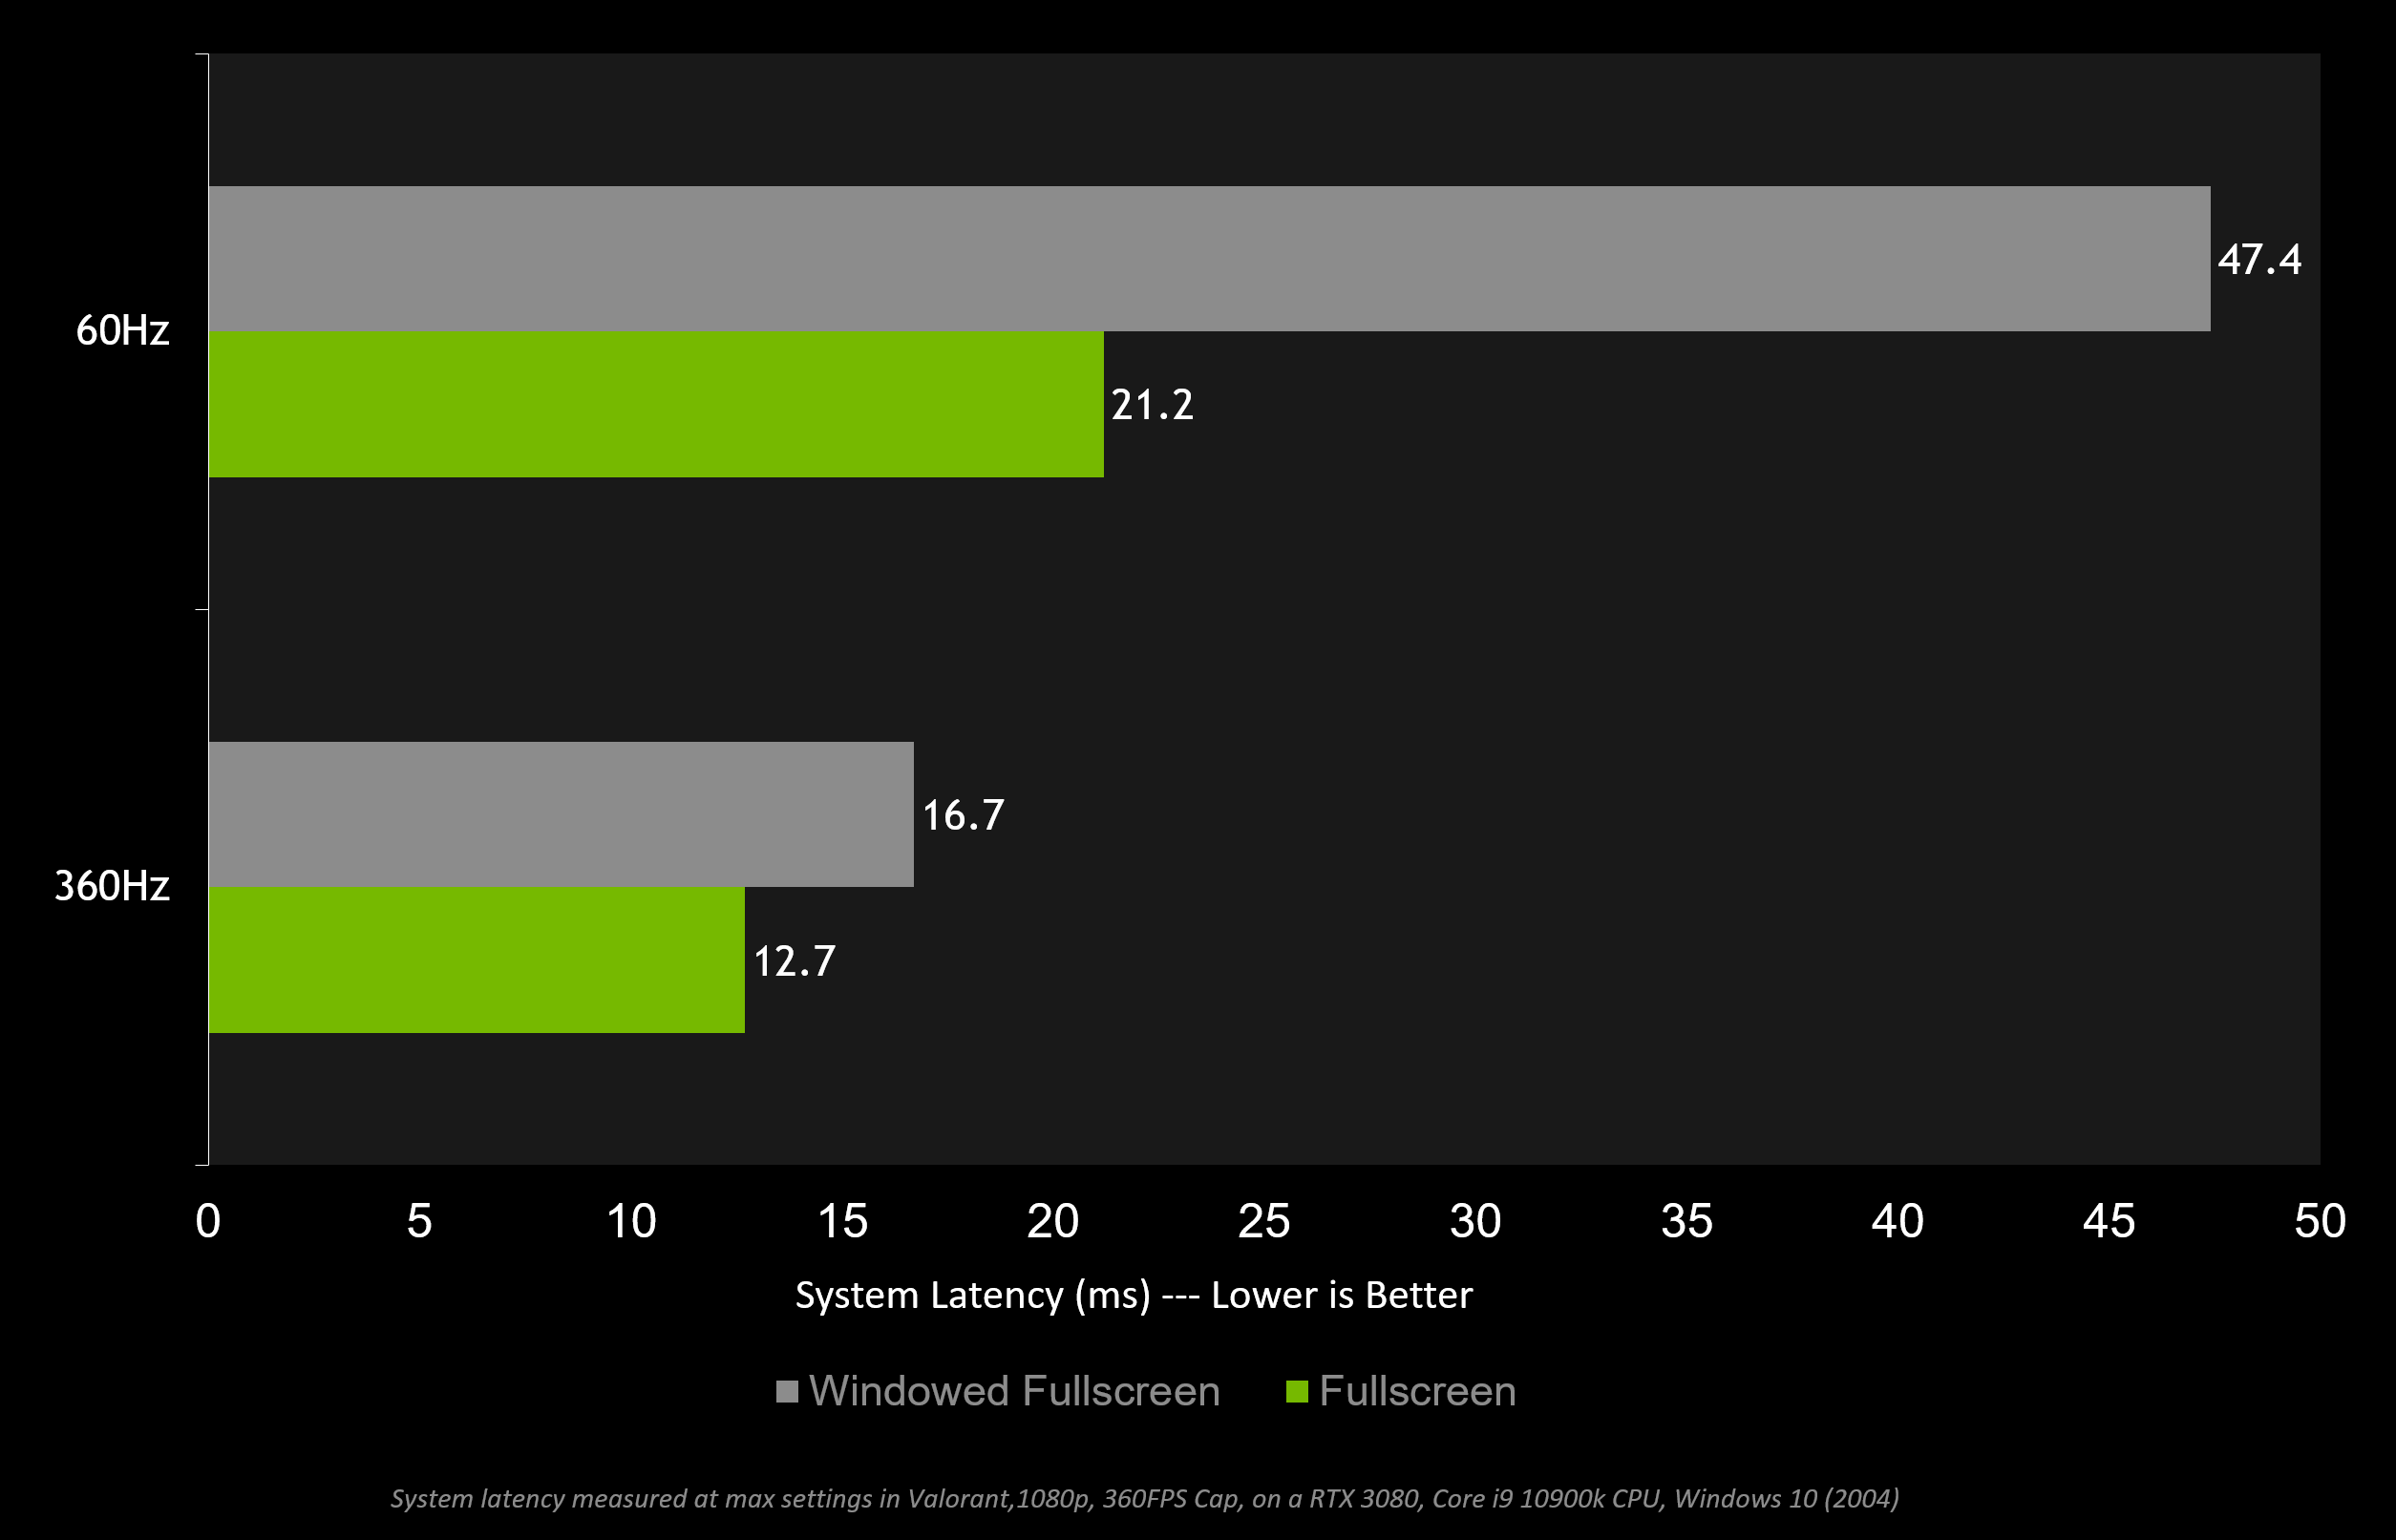
Turn on Exclusive Fullscreen - If possible, always be in Exclusive Fullscreen mode. This will bypass the windows compositor that adds latency.
Display mode options are typically found in your game’s video settings. Simply go to the settings, and enable fullscreen or fullscreen exclusive mode. In recent Windows updates, the latency of borderless windowed (windowed fullscreen) mode has slightly improved, but based on our tests we still recommend the fullscreen setting.
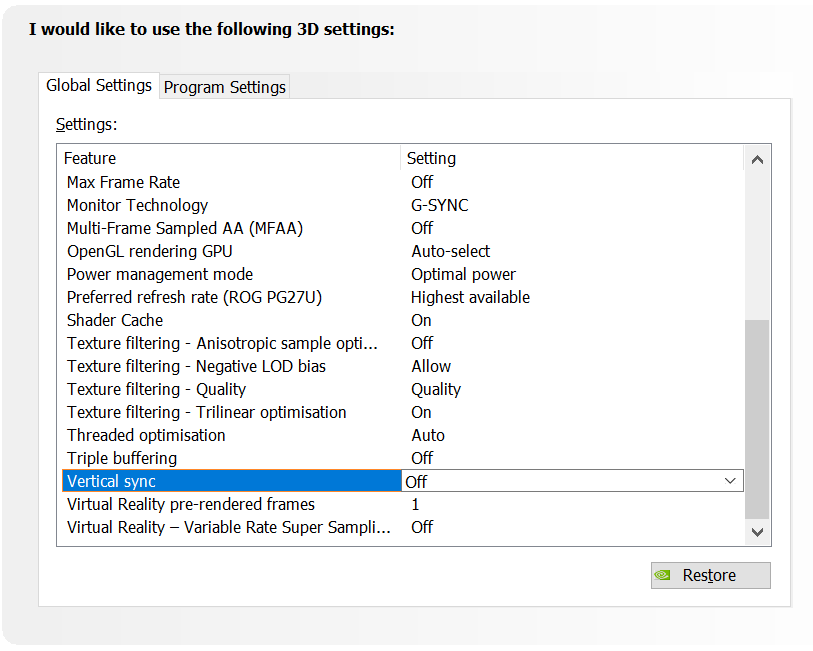
Turn off VSYNC - The age old latency optimization; turn off VSYNC. VSYNC causes back pressure from the display that reverberates through the entire system. In general, we highly recommend turning VSYNC OFF if you are willing to tolerate tearing.
In addition to the NVIDIA Control Panel, don’t forget to disable VSYNC in the in-game settings, as well.
However, if you have a variable refresh rate display, like an NVIDIA G-SYNC monitor, you can get the best of both worlds: no tearing (if your FPS is below your refresh rate), and no VSYNC latency.
For G-SYNC gamers who don’t want to tear, keeping VSYNC ON while using NVIDIA Reflex or NVIDIA Ultra Low Latency Mode, will automatically cap the framerate below the refresh rate, preventing VSYNC backpressure, eliminating tearing, and keeping latency low if you become GPU bound below the refresh rate of your display. Do note, however, that this method will result in slightly higher latency than just letting your FPS run uncapped with NVIDIA Reflex enabled.
As a side note, VSYNC ON in the NVIDIA Control Panel will only work for Fullscreen applications. In addition, MS Hybrid-based laptops do not support VSYNC ON. If you are gaming in windowed mode or on one of these laptops, and want to utilize G-SYNC + VSYNC + Reflex mode, use in-game VSYNC.
Turn on “Game Mode” in Windows - Turning on Windows Game Mode helps prioritize processes that are associated with your game. This can help reduce latency by letting the CPU stay focused on collecting your inputs and simulating the game.
To turn Game Mode on:
- Press the Windows Start button, and then select Settings.
- Choose Gaming > Game Mode.
- Turn Game Mode On.
Overclocking - Overclocking can be a great way to squeeze a few extra milliseconds of latency out of your system. Both CPU and GPU overclocking can reduce total system latency.
In the latest release of GeForce Experience, we added a new feature that can tune your GPU with a single click. The automatic tuner scans your GPU, finding the ideal voltage/frequency curve to your particular GPU. Download the GeForce Experience Beta, press ALT+Z to open the overlay and click ‘Performance’, and give it a try on your GeForce RTX 20 Series or 30 Series GPU today!
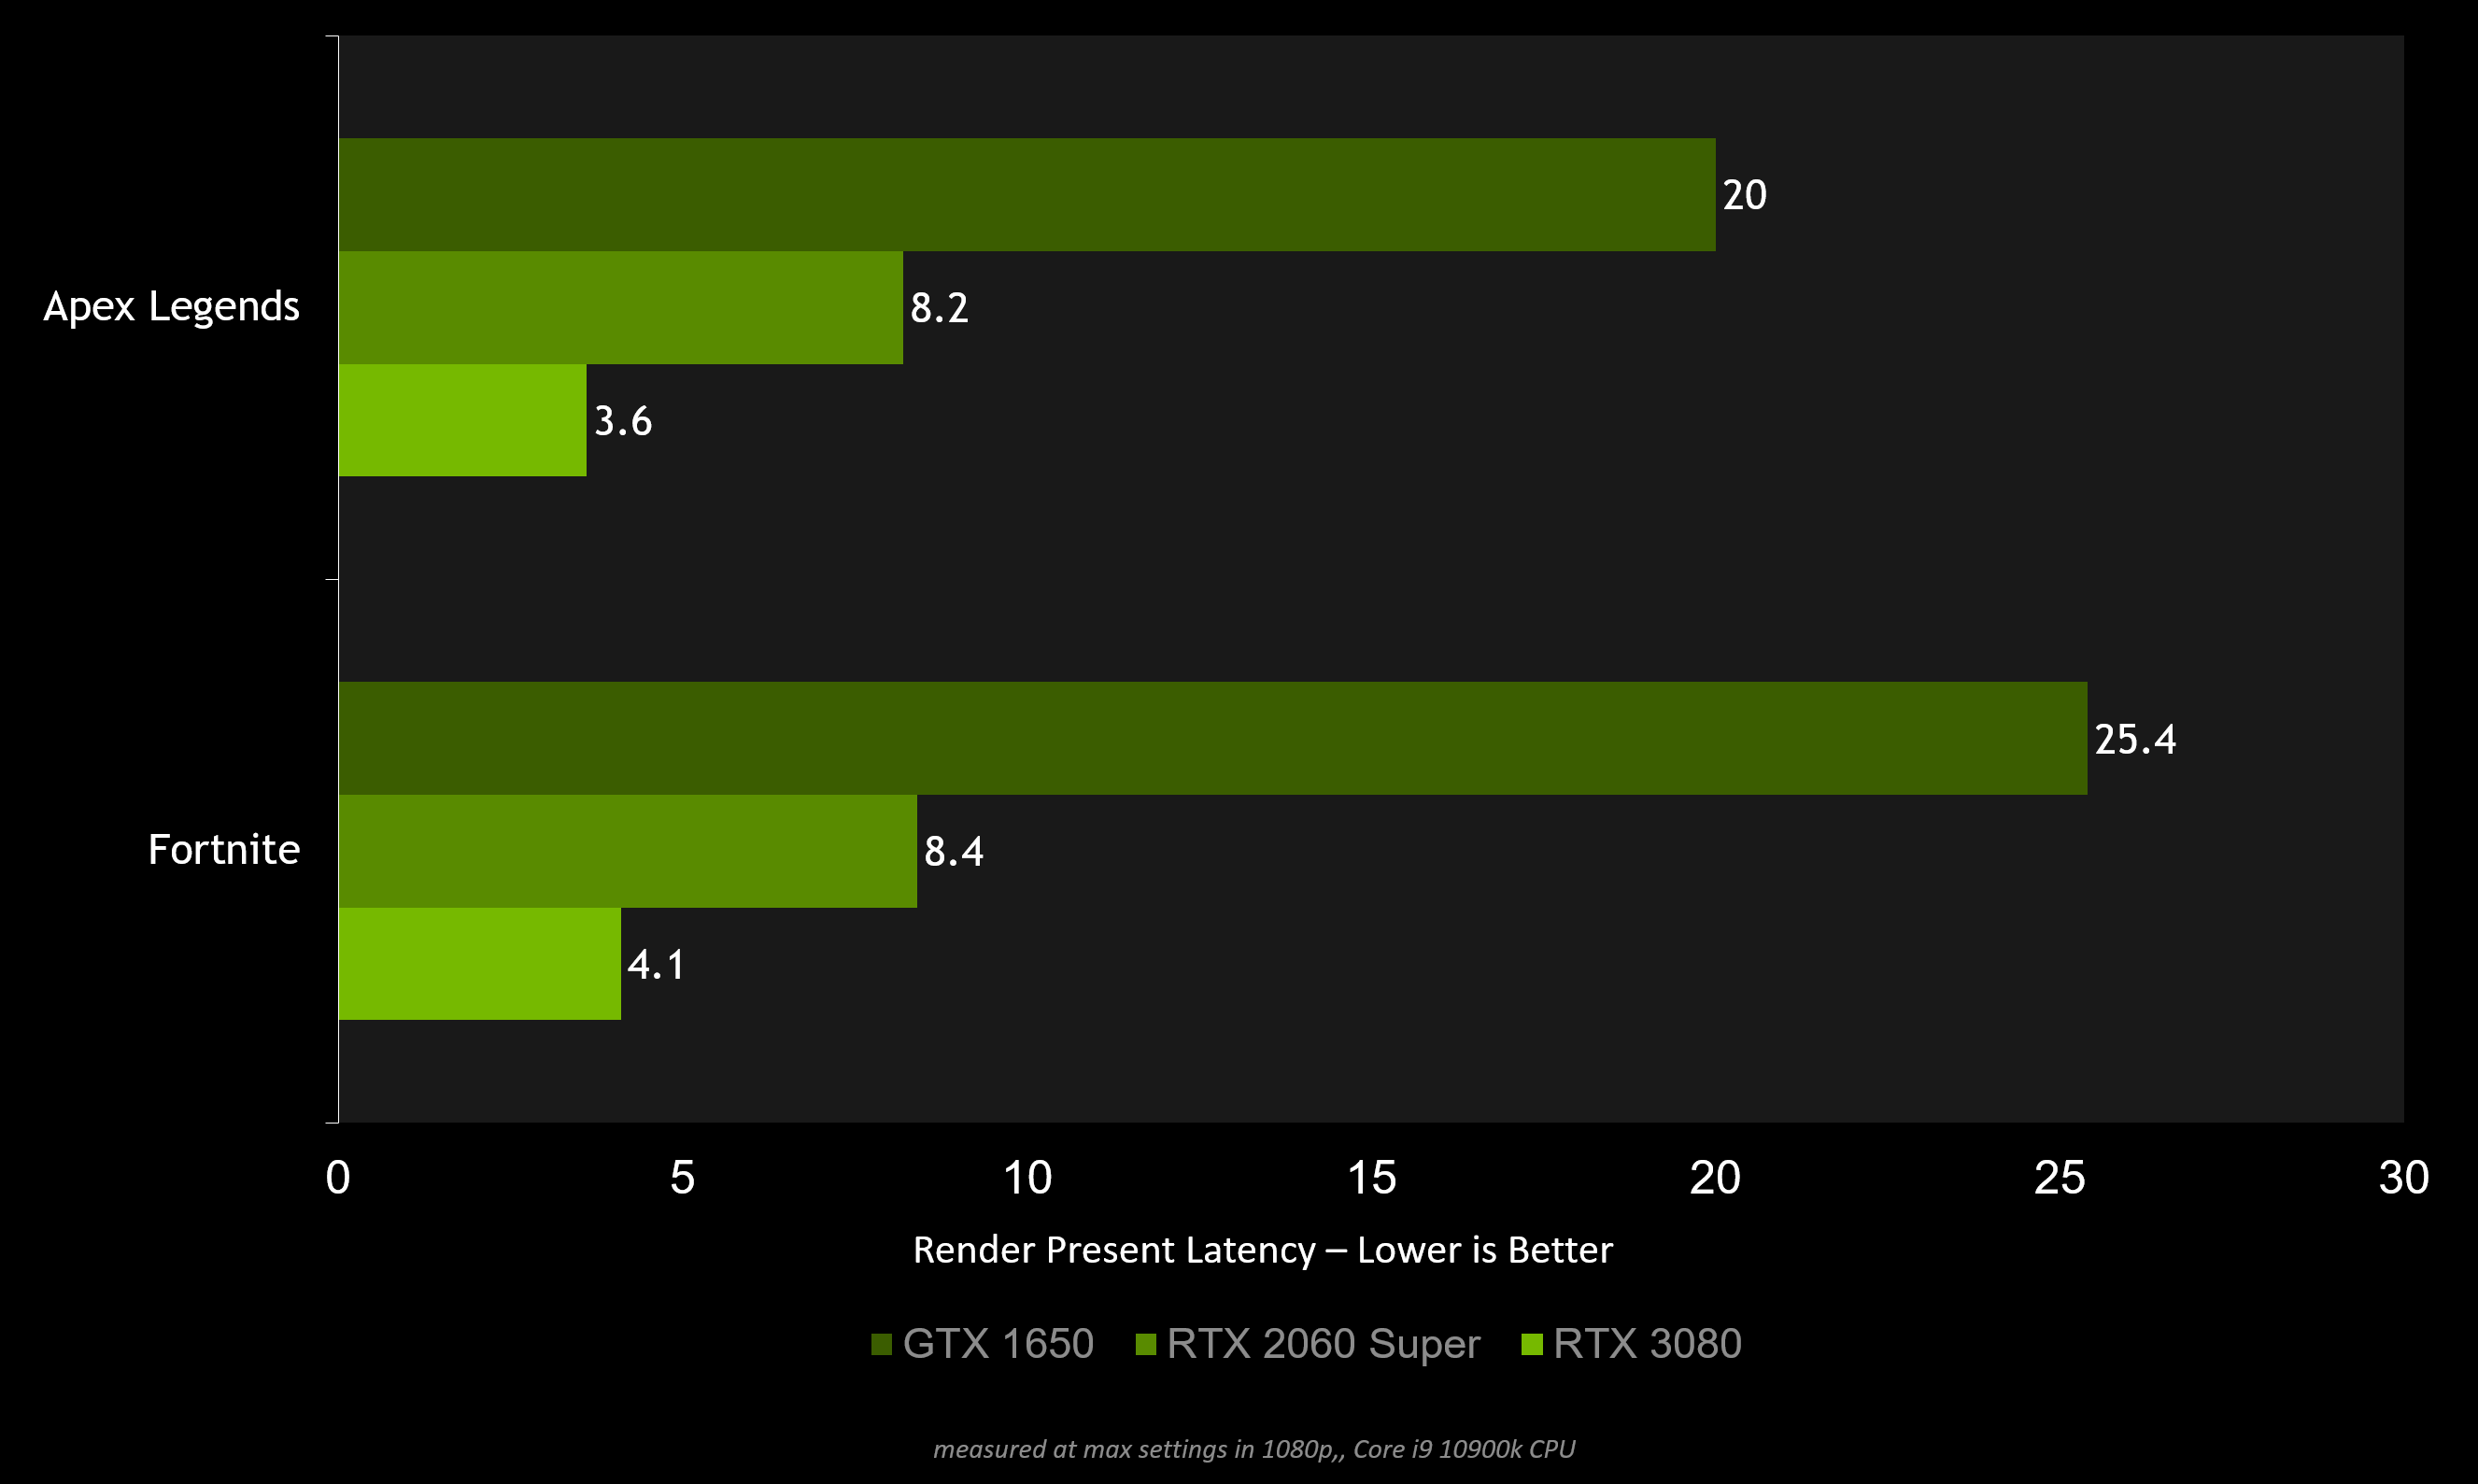
Consider Faster Hardware - There is only so much optimization you can do in software. At some point, the best way to get lower latency is to invest in faster hardware. A faster CPU and GPU can significantly reduce latency throughout the system.
Using the Game and Render latencies provided by the Reflex SDK in game:
- If your Game Latency is high, consider picking up a faster CPU.
- If your Render Latency is high, consider picking up a faster GPU like one of the GeForce RTX 30 Series GPUs.
Render Latency can also be measured through the GeForce Experience performance overlay for any game.
Reduce settings - you can also make visual tradeoffs to improve performance and reduce latency by lowering in-game settings.
Before NVIDIA Reflex, gamers had to make this tradeoff between higher graphics settings and better latency. With the NVIDIA Reflex Low Latency mode, gamers can increase graphics settings and resolution without significantly increasing latency -- latency is only increased by the raw GPU render time.
Advanced PC Latency Optimization
There are other small tweaks that can be done to help reduce latency such as MSI mode, GPU cache write combining, process scheduling quantum modes, interrupt CPU affinity, processor idle states, and IRQ sharing. However, these optimizations are situational and can actually make latency worse in some cases. We recommend testing on your own system and experimenting to find which modes help your particular configuration!
Each setting is not mutually exclusive or additive. In a future article, we will dive deeper into each of these tweaks and help guide you through the experimentation process.
How To Optimize Display Latency
Display latency can be broken down into three main pieces: Scanout, Display Processing, and Pixel Response.
If you want to optimize display latency here are things you can do:
Enable your maximum refresh rate - Check to make sure your display is set to the maximum refresh rate. Higher Hz reduces the scanout latency.
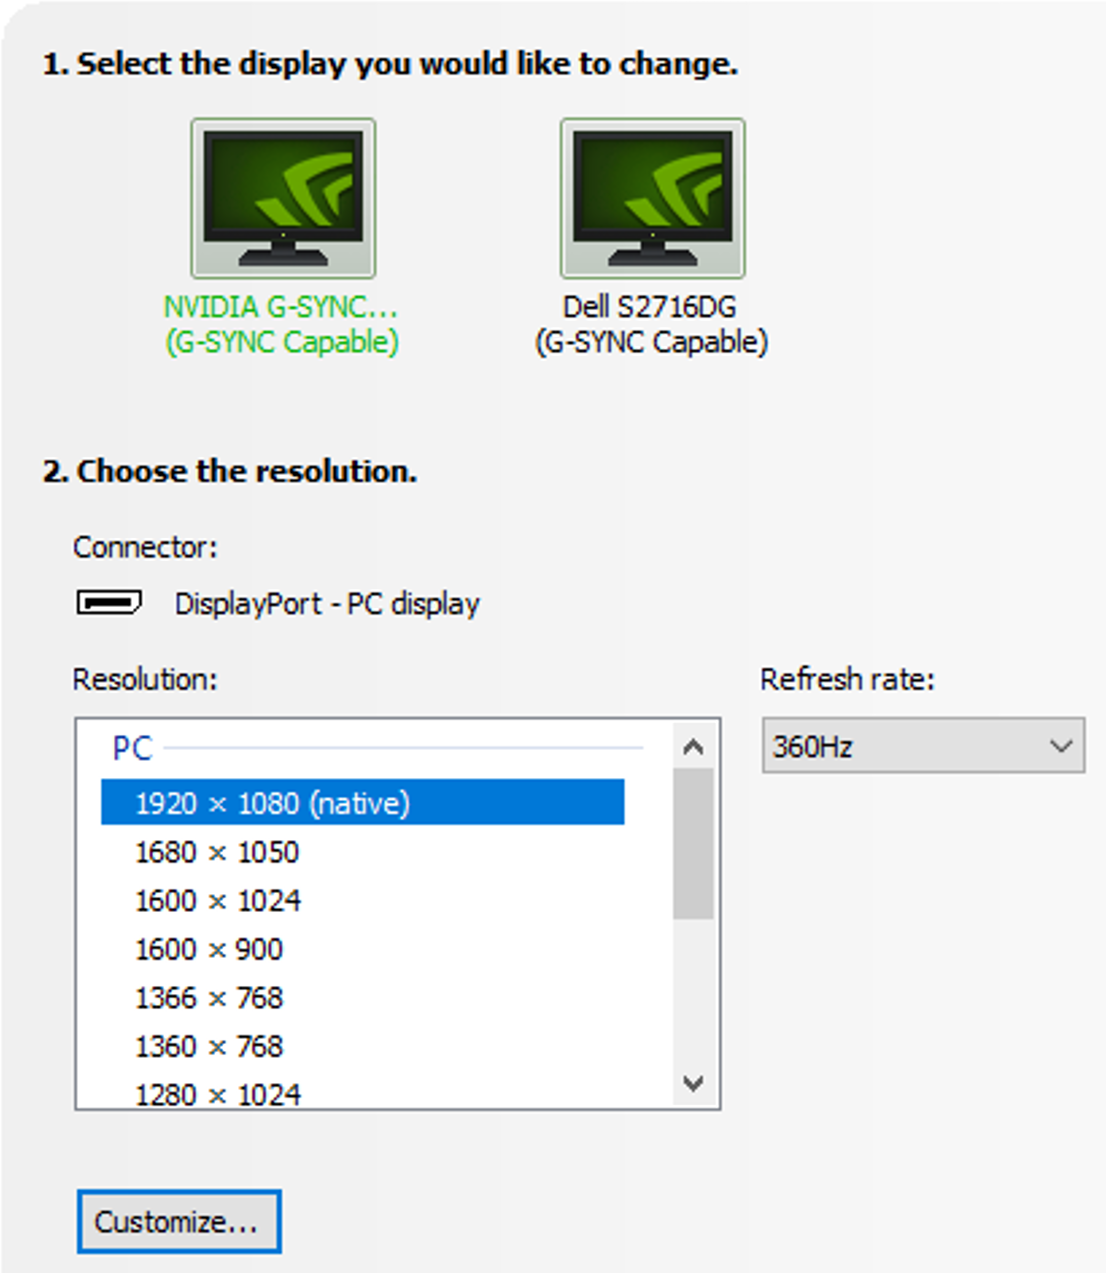
To confirm you are running at the highest refresh rate your display can offer, open the NVIDIA Control Panel -> change resolution -> refresh rate. Set the refresh rate to the highest possible. You might have to change your resolution to the native resolution to run at the maximum refresh rate.
Turn on G-SYNC Esports mode - If you have a monitor that supports G-SYNC Esports mode, enabling this option will ensure settings like variable backlight are disabled and the monitor is running at max performance - reducing display processing latency.
Turn on some overdrive - Use a moderate amount of overdrive to help improve pixel response time. We recommend starting at the first level of overdrive, for most monitors this is the “normal” setting. This setting can be configured in your monitor’s settings menu in the on screen display. However, too much overdrive can create distracting effects that will outweigh any response time benefits.
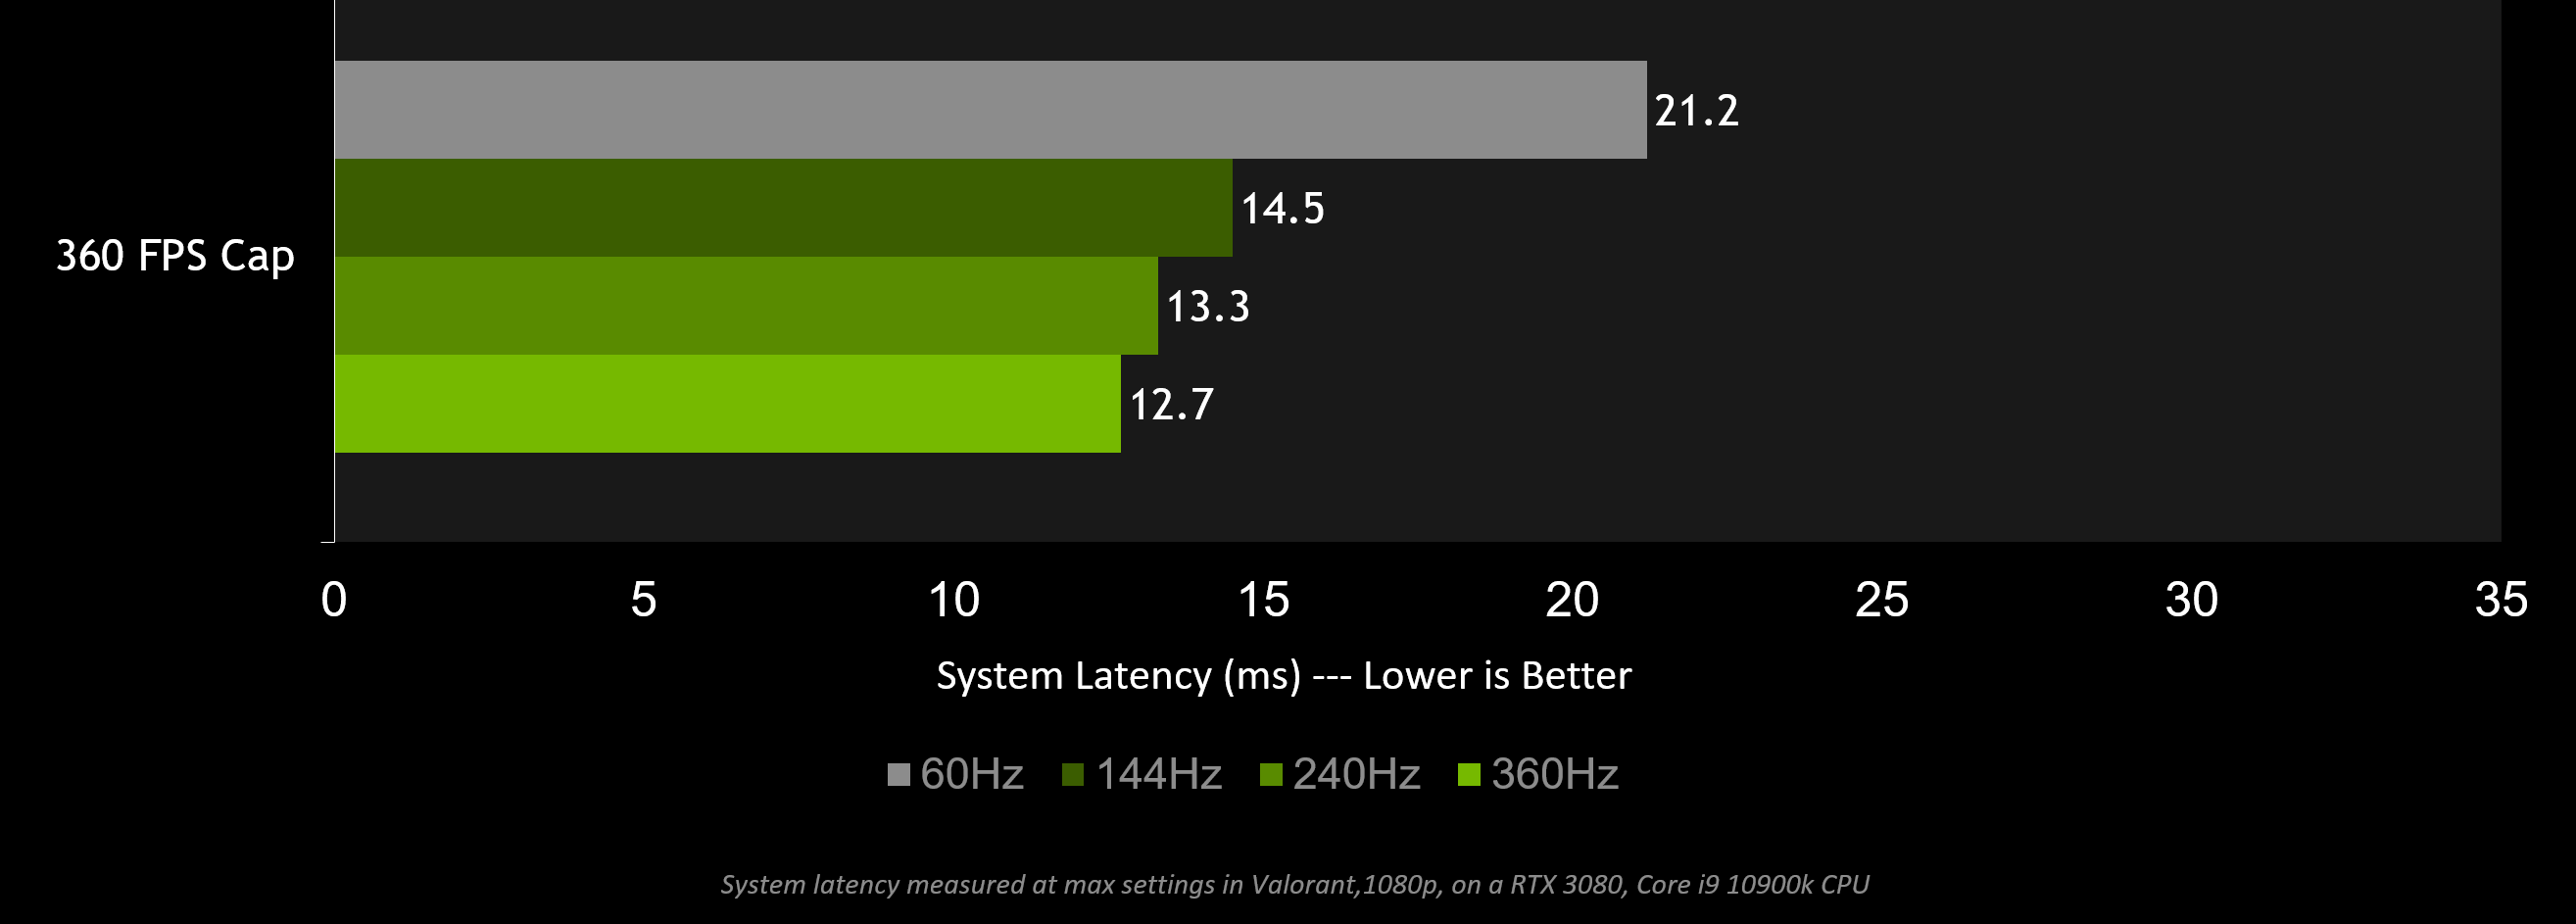
Invest in a higher refresh rate display - Invest in a higher refresh rate and faster pixel response time monitor like the new G-SYNC 360Hz displays.
In general, increasing your Hz is the best way to reduce display latency. The below chart shows how a higher refresh rate can reduce end to end system latency in Valorant.
Wrapping up
Optimizing system latency can seem like a daunting task. If you play a game that supports NVIDIA Reflex, we highly recommend turning it on.
If you have any questions, please join our community and chat with us about your optimization experiences on the NVIDIA Reflex forums. Also, check back at a later date as we’ll be updating this guide over time as new technologies and techniques for reducing latency become available.
