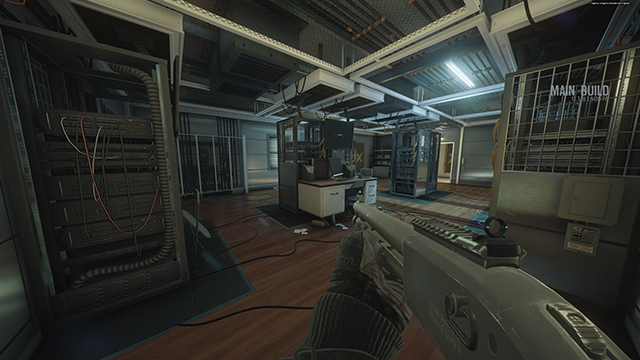
Tom Clancy's Rainbow Six Siege Graphics & Performance Guide
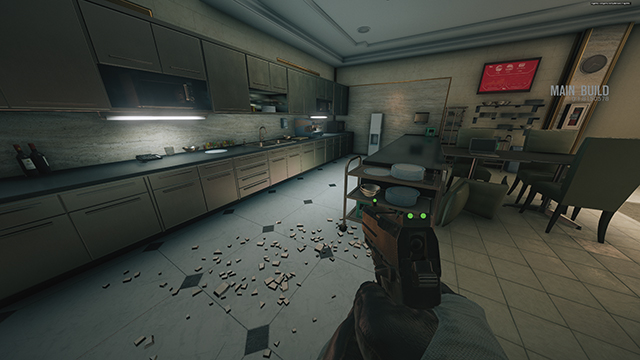
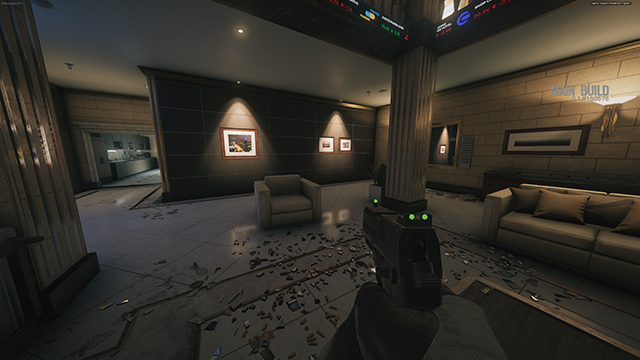
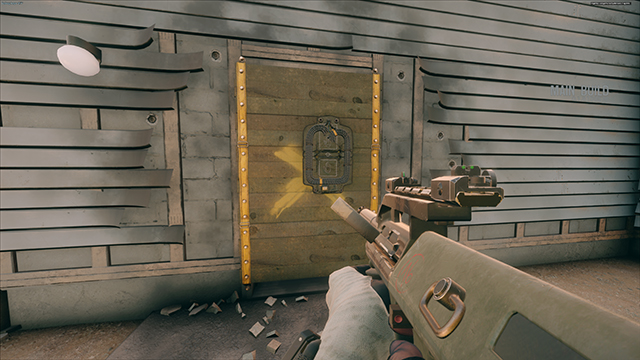
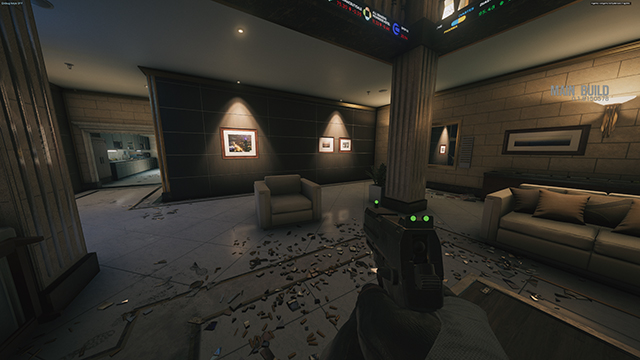
Tom Clancy's Rainbow Six Siege launches worldwide today across multiple platforms. On PC there are enhanced graphics, higher rendering resolutions, and technically-advanced NVIDIA GameWorks effects that raise the bar for graphical fidelity.
In this guide we’ll examine Rainbow Six Siege's PC-only upgrades, explain how they work, show comparisons that highlight their benefits, and reveal their relative performance cost at 1920x1080, the most popular PC gaming resolution. So come on in for the year's final GeForce.com Graphics and Performance Guide.
Article Contents:
- System Requirements
- Tom Clancy's Rainbow Six Siege PC-Exclusive Graphics Enhancements
- Graphics Settings
- Ambient Occlusion
- Anti-Aliasing
- Lens Effects
- LOD Quality
- Reflection Quality
- Shading Quality
- Shadow Quality
- Texture Filtering
- Texture Quality
- Zoom-In Depth of Field
- Settings Wrap-Up
- NVIDIA Dynamic Super Resolution
- Game Ready Rainbow Six Siege Driver
- G-SYNC: Eliminating Stutters & Tearing For The Ultimate Experience
- GeForce Experience: Optimal Playable Settings With A Single Click
- Overclocking
- Conclusion
System Requirements
The official Tom Clancy's Rainbow Six Siege system requirements recommend that gamers equip their systems with a GeForce GTX 670 with 2GB of VRAM. As you'll see in this guide however, Rainbow Six Siege features high-resolution textures, high-fidelity graphics, and NVIDIA GameWorks technology that enhances anti-aliasing and ambient occlusion in each and every match.
For a system capable of enabling these effects and making of the most of the PC-version's graphics you’ll need to build your new PC, or upgrade your old system, with the GeForce GTX 960, which will enable a High level of detail with HBAO+.
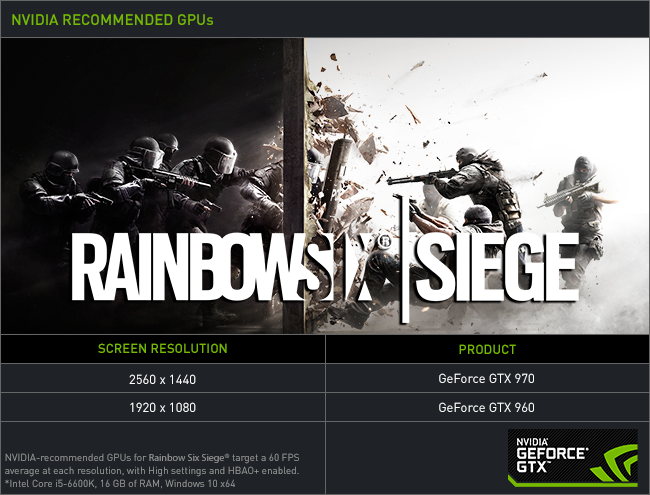
For a maxed out 1920x1080 experience you'll require a faster CPU and GPU combo, as we detail later, and per Ubisoft you'll need at least 8GB of RAM and 47GB of disk space, too.
Tom Clancy's Rainbow Six Siege PC-Exclusive Graphics Enhancements
Playing Tom Clancy's Rainbow Six Siege on a high-end PC gives you the grunt to render the game's PC-exclusive features, effects and technologies, which combine the other enhancements to increase fidelity far beyond the level seen on other platforms.
For detailed explanations of each, and demonstrations of their capabilities, keep reading. For a first look, check out our Tom Clancy's Rainbow Six Siege GeForce GTX Technology Trailer:
Ambient Occlusion
Ambient Occlusion (AO) adds contact shadows where two surfaces or objects meet, and where an object blocks light from reaching another nearby game element. The AO technique used and the quality of the implementation affects the shadowing's accuracy, and whether new shadows are formed when the level of occlusion is low. Without Ambient Occlusion scenes look flat and unrealistic, and objects appear as if they are floating.
In Tom Clancy's Rainbow Six Siege, the Ambient Occlusion option enables players to pick between Ubisoft's SSBC effect, and our HBAO+ technique. First seen in Far Cry 4, SSBC is Ubisoft's current-generation, self-made, cross-platform AO technique that utilizes up to 12 samples (8 in Rainbow Six Siege) to deliver significantly improved AO shadowing compared to SSAO, which was seen in previous Ubisoft titles.
As in Far Cry 4, SSBC does an admirable job and has aesthetically-pleasing —if inaccurate— shadowing around Rainbow Six Siege's ever-visible weapons and gadgets. Over range it falters however, with HBAO+ delivering more accurate, more visible AO shadows across distant views. And up close, SSBC's intentionally-heavy shadows can at times appear out of place, with large halos around placed explosive charges, and thick AO shadows visible even in direct sunlight.
Below, a series of interactive screenshot comparisons highlight these differences, enabling you to choose the AO technique you prefer.
In our first set of screens and comparisons, HBAO+'s ability to accurately shadow all scene elements greatly improves realism and fidelity, with even the inside of storage boxes being shadowed.
| Interactive Comparisons | ||
| HBAO+ vs. SSBC | HBAO+ vs. No AO | SSBC vs. No AO |
Here, halos are removed from around the debris on the floor, and the microwave is correctly shadowed, as there's no illumination within the device or casting directly onto it. This degree of accuracy extends across every scene in every environment in Rainbow Six Siege.
| Interactive Comparisons | ||
| HBAO+ vs. SSBC | HBAO+ vs. No AO | SSBC vs. No AO |
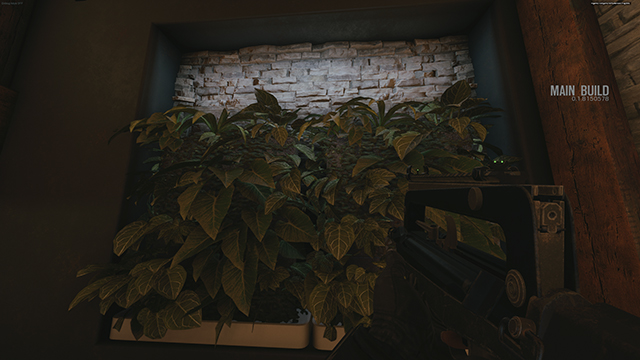
Even something as simple as foliage is difficult to render and shadow accurately, and here HBAO+ correctly shadows the deeper layers that aren't illuminated.
| Interactive Comparisons | ||
| HBAO+ vs. SSBC | HBAO+ vs. No AO | SSBC vs. No AO |
Across a wider view, the benefits of HBAO+ are further exemplified.
| Interactive Comparisons | ||
| HBAO+ vs. SSBC | HBAO+ vs. No AO | SSBC vs. No AO |
HBAO+'s underlying advantages, detailed here, affect every effect. Here, Screen Space Local Reflections are better defined, and on the left-most column are clearly visible because the reflective detail isn't being suppressed by SSBC's overly-intensive shadows.
| Interactive Comparisons | ||
| HBAO+ vs. SSBC | HBAO+ vs. No AO | SSBC vs. No AO |
In some locations, the two implementations merely appear different, rather than right or wrong.
| Interactive Comparisons | ||
| HBAO+ vs. SSBC | HBAO+ vs. No AO | SSBC vs. No AO |
Here though, in direct sunlight, SSBC is undeniably inaccurate, with a sizeable, unrealistic halo being rendered around a breaching charge.
| Interactive Comparisons | ||
| HBAO+ vs. SSBC | HBAO+ vs. No AO | SSBC vs. No AO |
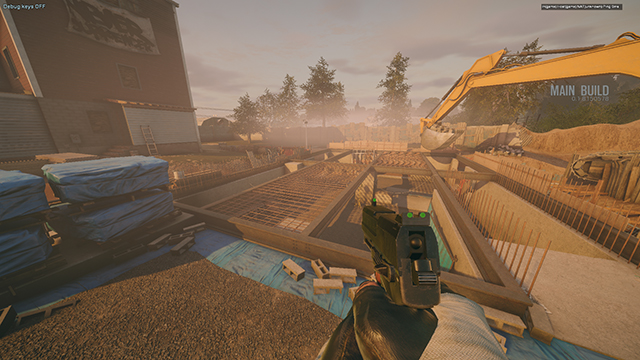
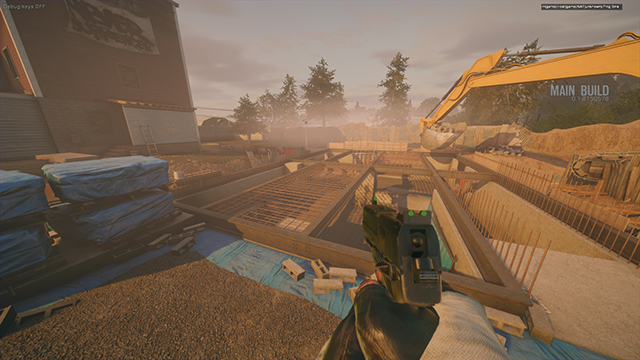
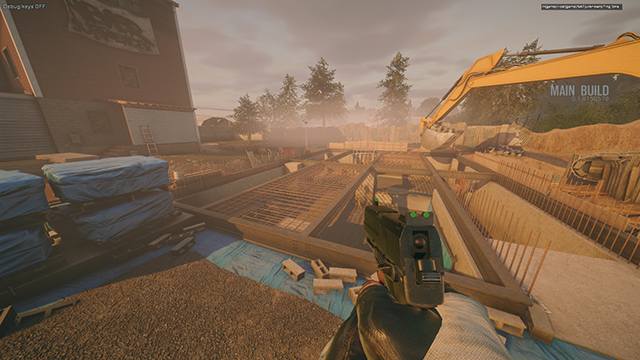
As the interactive comparisons and screenshots demonstrate, our HBAO+ Ambient Occlusion technique improves immensely upon the often-eye-pleasing SSBC technique. With HBAO+, AO shadowing is improved, entirely new shadows are rendered, rendering distances are increased, and detail has even greater depth with the smallest of details being accurately shadowed.
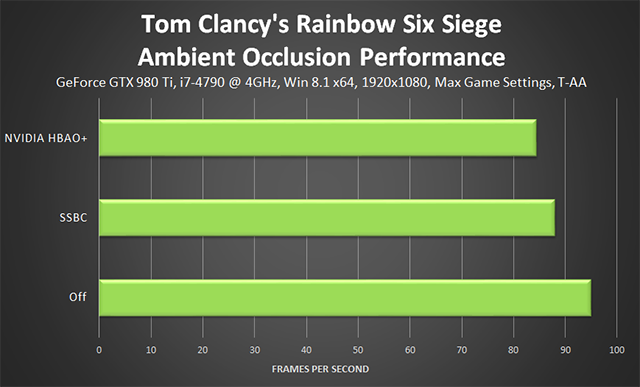
Performance: Enabling SSBC costs a moderately expensive 7 frames per second in Rainbow Six Siege, and HBAO+ 10.6 frames per second.
Without Ambient Occlusion, image quality is greatly diminished, so most players will likely want to opt for at least one of the techniques. Which one that is may come down to personal preference: some may prefer the deep shadows that bring extra depth to weapons, while others may prefer accurate shadows across all surfaces and objects.
Anti-Aliasing
Rainbow Six Siege features seven hardware anti-aliasing modes, plus two post-process anti-aliasing techniques, giving us a total of 231 ways to configure the removal of edge and temporal aliasing. Split between "Multisample Anti-Aliasing" and "Post-Process Anti-Aliasing" options, players can choose between AA Off, Temporal Filtering, MSAA 2x, MSAA 4x, MSAA 8x, NVIDIA TXAA 2x, NVIDIA TXAA 4x, and PPAA Off, FXAA and T-AA (Temporal Anti-Aliasing).
Ideally, players will combine one Multisample option and T-AA for an anti-aliasing solution that effectively removes aliasing from geometry, from effect and foliage transparencies, and from moving game elements and those seen while moving. Alternatively, NVIDIA GeForce GTX users can simply select TXAA, which tackles every form of aliasing game-wide.
Before we dive into the combinations of options and a look at the modes you likely recognize, let's examine Temporal Filtering, found under "Multisample Anti-Aliasing".
Not to be confused with Temporal Anti-Aliasing, which reduces the flickering and shimmering of anti-aliased edges when the player's camera or view point moves, Temporal Filtering renders the game at half-resolution with 2x MSAA. In other words, a 1920x1080 picture is rendered at 960x540, and 2x MSAA is applied to smooth out the now-rougher edges.
As a result, there are the same number of depth samples as the full-resolution 1920x1080 picture, but only a quarter of the shaded samples, improving performance greatly, but also decreasing image quality. This manifests as a reduction in the quality and visibility of Ambient Occlusion shadowing, increased shader aliasing, decreased lighting and shading fidelity, and a loss of fidelity on smaller game elements, such as leaves, grass, visual effects and minute pieces of geometry.
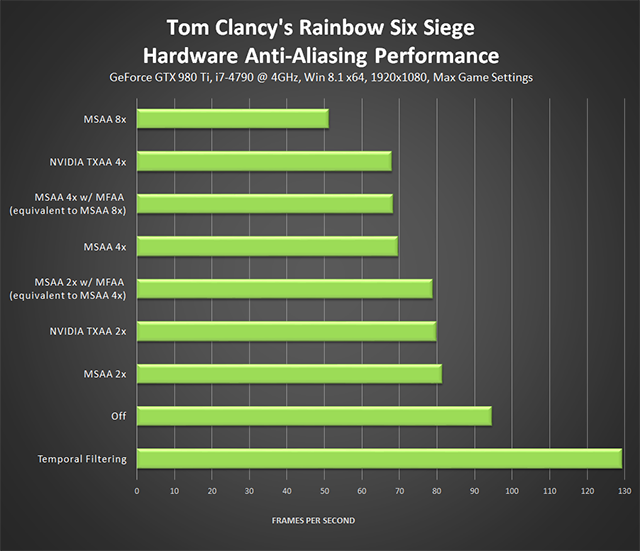
In testing, performance increases by almost 37% at 1920x1080, and VRAM use is reduced by up to 209MB, enabling lower-end systems to play with faster framerates and other options enabled, giving a better overall experience than they could otherwise receive.
However, because of its alternating frame technology, whereby it combines reduced-resolution images from multiple frames to reconstruct a final image, Temporal Filtering should not be used with the game's Post-Process Temporal Anti-Aliasing (T-AA), which uses similar techniques to prevent temporal aliasing. If you use the two together transparencies can be rendered incorrectly, and the quality of other game elements can be further degraded.
Temporal Filtering is an excellent addition for low-end users, and we hope to see it utilized more in the future. Meanwhile, for high-end users there's a similar degree of anti-aliasing lovin' with the addition of MSAA and TXAA.
MSAA is the original anti-aliasing, having tackled aliased edges in games for over 20 years. Nowadays it's often incompatible with advanced lighting engines, and is always expensive in terms of performance and video memory. It does remain the 'cleanest' method of AA, however, having zero impact on the clarity of textures or surfaces. But because it can't anti-alias transparencies, or perform temporal anti-aliasing, it's quickly falling out of favor in games where it can't be combined with another technique.
In Rainbow Six Siege players can combo it, enabling the use of up to 8x MSAA, and Temporal Anti-Aliasing (T-AA), delivering a clean image that can be re-sharpened with a post-process injector to counteract T-AA's softness, which at times reduces detail by a quite considerable degree, as you can see on the rebar in our comparison below.
If you decide to use just MSAA, you can decrease its performance cost with NVIDIA Multi-Frame Sampled Anti-Aliasing (MFAA), a technique exclusive to GeForce GTX 900 Series GPUs. With 2x MSAA selected in-game, and MFAA activated in the NVIDIA Control Panel, MFAA will increase the quality of the anti-aliasing to a level near-identical to 4x MSAA, for only a small performance cost. Learn more here and in the video below, and check out the benchmark chart at the end of this section to see how MFAA improves anti-aliasing performance in Rainbow Six Siege.
Via the in-game menu, GeForce GTX users can also opt for TXAA, which combines MSAA with a custom CG movie-style resolve and a temporal filter to improve upon the edge and temporal aliasing of the MSAA T-AA combo.
To wrap things up here's a look at every AA solution available, with the exception of MFAA as it appears identical to MSAA.
If you spent a few hours checking out each and every comparison above, you no doubt saw that combining T-AA with MSAA can occasionally result in some visual oddities, but on the whole it remains the best platform agnostic solution in our opinion. That said, aliasing does remain at 1920x1080 with any combination of techniques. To tackle what remains, downsampling is required.
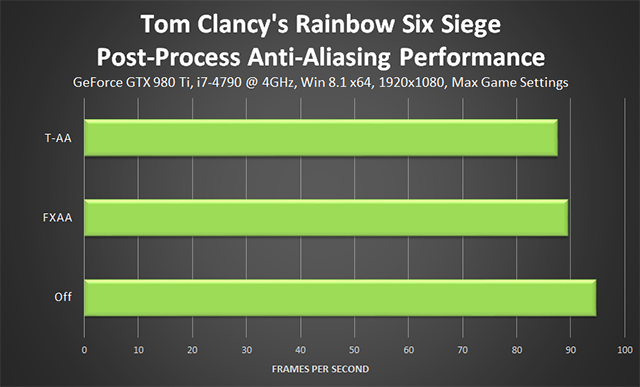
Performance: Like other settings in Rainbow Six Siege the cost of ordinarily inexpensive features, like FXAA, is higher than expected, with the normally-free anti-aliasing option costing 5.3 frames per second. The much-better T-AA, meanwhile, weighs in at 7.1 frames per second, and despite this remains our recommended anti-aliasing technique for the vast majority of configurations.
Multisample Anti-Aliasing has a much greater cost, as you'd expect, with 8x MSAA demanding over 40 frames per second for its services. At the other end of the scale, 2x MSAA costs 13.3 FPS, 2x TXAA 14.8 FPS, and 2x MFAA, equivalent to 4x MSAA in terms of image quality, 16 FPS.
If you're adding T-AA to MSAA, instead of using TXAA, the combo option costs around 6 frames per second more. If you're only using MSAA, MFAA saves you a little over 9 frames per second.
All said and done, here are our recommendations for Anti-Aliasing use:
- Low-End Systems: Temporal Filtering + FXAA
- Mid-Range Systems: T-AA
- High-End Systems: 2-4x MSAA + T-AA + optional injected sharpening
- Top-End Systems: 8x MSAA + T-AA + optional injected sharpening
- Top-End GeForce GTX Systems: 4x TXAA
Ultimately the choice is yours, and with so many options you've got plenty of room to tailor anti-aliasing to your liking.
Lens Effects
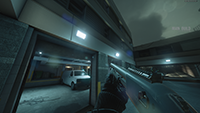
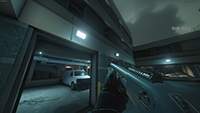
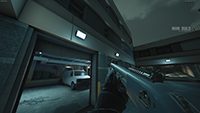
If you like Bloom and Lens Flare effects, "Lens Effects" is your go-to setting.
| Interactive Comparisons | ||
| Bloom & Lens Flare vs. Bloom | Bloom & Lens Flare vs. Off | Bloom vs. Off |
To ensure maximum visibility online, you'll likely want to disable these effects, as nice as they can be, so you can clearly see your opponents at all times.
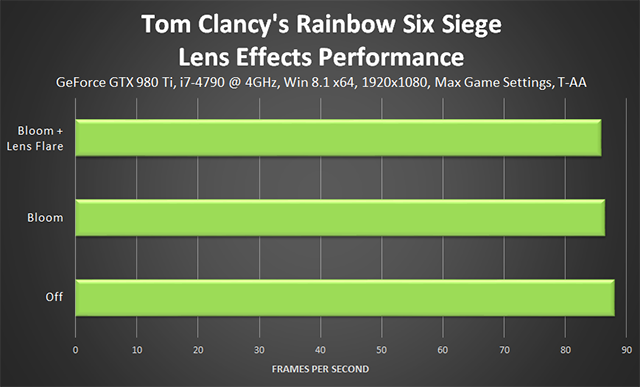
Performance: As post-process settings, Bloom and Lens Flare have a minimal impact on performance, should you wish to enable them.
LOD Quality
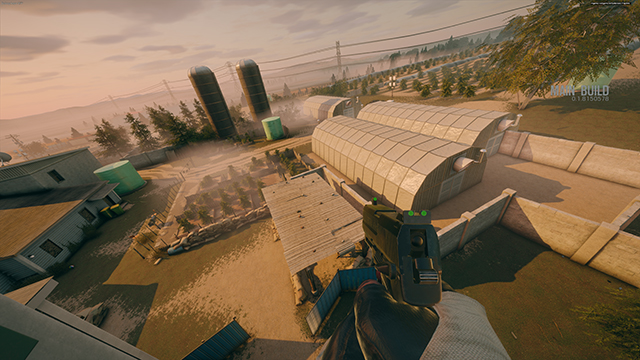
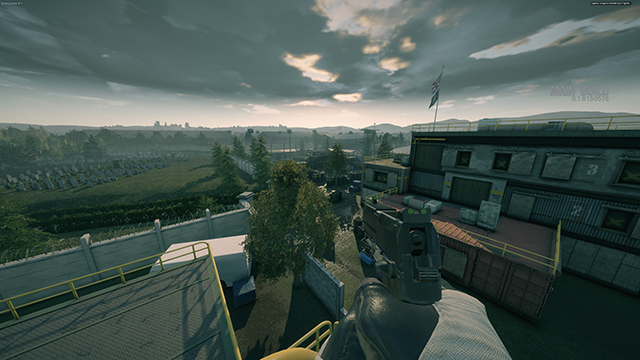
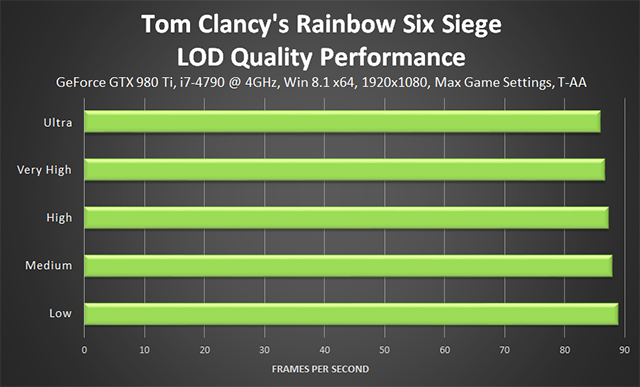
As in other games, LOD Quality adjusts the geometric detail of objects, the visibility and density of foliage, and the visibility and density of visual flourishes around each and every level.
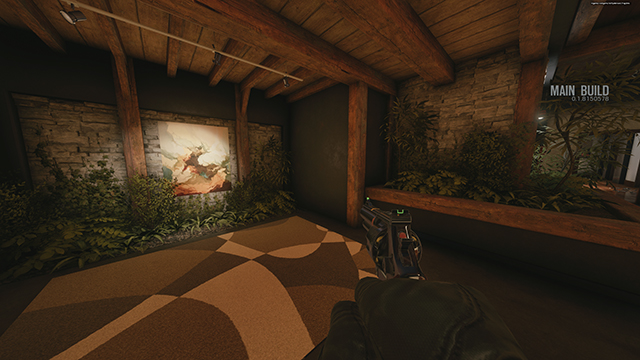
Differences are hard to detect in screenshots, and imperceptible during gameplay as the two sets of comparisons below demonstrate.
| Interactive Comparisons | ||
| Ultra vs. Very High | Ultra vs. High | Ultra vs. Medium |
| Ultra vs. Low | Very High vs. High | Very High vs. Medium |
| Very High vs. Low | High vs. Medium | High vs. Low |
| Medium vs. Low | ||
| Interactive Comparisons | ||
| Ultra vs. Very High | Ultra vs. High | Ultra vs. Medium |
| Ultra vs. Low | Very High vs. High | Very High vs. Medium |
| Very High vs. Low | High vs. Medium | High vs. Low |
| Medium vs. Low | ||
Note: using Low or Medium switches the dynamic skybox to a lower-quality, static skybox, something we can't adequately show in screenshots.
Performance: Adjusting the level of detail has a minimal impact on performance in every level we tested, but can on occasion increase by another few frames per second across distant, highly-detailed views.
Reflection Quality
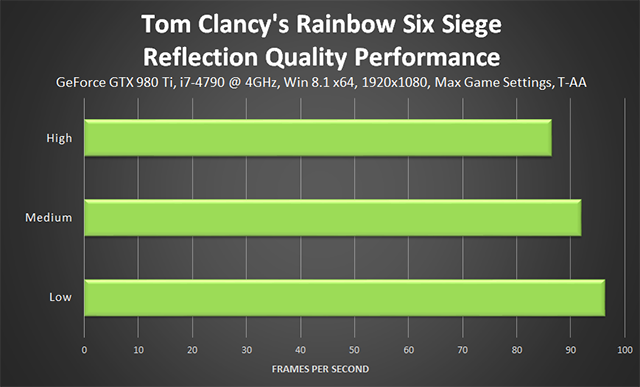
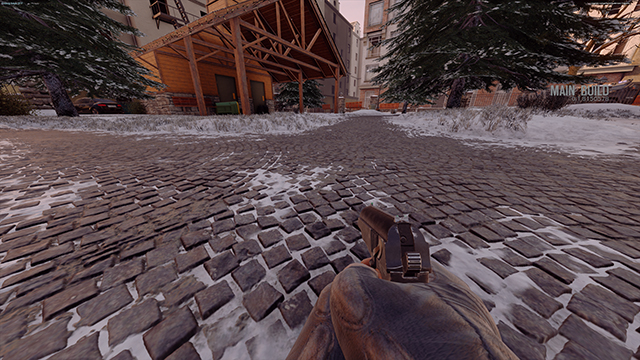
Rainbow Six Siege's reflections are solely for the enhancement of environmental detail, with most being seen as subtle additions to floors and walls. These Screen Space Local Reflections are rendered at half-resolution on Medium, and full resolution on High. On Low, Local Reflections are replaced with pre-baked cube maps that in many circumstances closely match the look of the real deal.
Below are a few of the clearly visible examples of the setting we've found in our many hours of testing. As you can see, detail is well defined on High, closely matching the surroundings, but is barely visible on Medium, and completely removed on Low when the technique is swapped over to Cube Mapping.
| Interactive Comparisons | ||
| High vs. Medium | High vs. Low | Medium vs. Low |
| Interactive Comparisons | ||
| High vs. Medium | High vs. Low | Medium vs. Low |
| Interactive Comparisons | ||
| High vs. Medium | High vs. Low | Medium vs. Low |
Outdoors, the impact of Local Reflections on lighting and shading can occasionally be observed, though away from a like-for-like comparisons it's doubtful you'd note the difference during live gameplay.
| Interactive Comparisons | ||
| High vs. Medium | High vs. Low | Medium vs. Low |
Other reflections, like those found on a car or a metallic surface, such as the one shown below, feature fairly accurate cube maps, slightly increasing image quality without a measurable performance impact.
Performance: Screen Space Local Reflections are a subtle addition to Rainbow Six Siege, and as you're typically staring down the barrel of the gun rather than observing the beauty of your surroundings, their addition often goes unnoticed. As such, most players in search of performance can dial down the setting to Low without impacting image quality to a significant degree.
Shading Quality
The fidelity of Rainbow Six Siege's lighting, light-material interaction, shading, and Subsurface Scattering is controlled by the Shading Quality setting. On Low there's a simplified implementation that's below the level of detail found on consoles, Medium is an exact match for consoles, and High adds Relief Mapping to a multitude of surfaces throughout the game.
If you're unfamiliar with Relief Mapping, it adds depth to surfaces with the help of a pre-made heightmap, converting a flat cobblestone texture into a surface with individual cobblestones that appear to have genuine depth. Essentially, it's the same as the more widely known Parallax Occlusion Mapping (POM) technique.
| Interactive Comparisons | ||
| High vs. Medium | High vs. Low | Medium vs. Low |
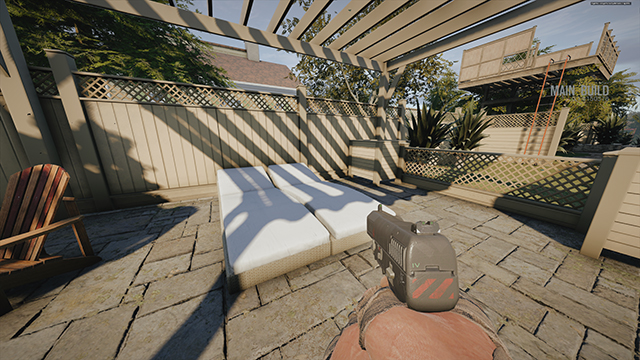
In terms of Lighting and Shading, Medium and Low often appear identical, especially during daytime missions. Here though we do observe a noticeable difference, with foliage, the grass surface, and other game elements being affected. Furthermore, the loss of Subsurface Scattering can be seen on the player's uncovered hands. But aside from this brief glimpse of skin, almost all characters are covered by armor, with the exception of hostages, making its loss a minor one. Note too the Relief Mapping on the shingle surface, and how it is affected when using detail levels other than High.
| Interactive Comparisons | ||
| High vs. Medium | High vs. Low | Medium vs. Low |
At night the differences between Low and Medium are readily seen, with light-material interaction being simplified, and some game elements not being shaded, such as the sign in the distance in the example below.
| Interactive Comparisons | ||
| High vs. Medium | High vs. Low | Medium vs. Low |
The loss of light-material interaction is exemplified by our final set of images and comparisons.
| Interactive Comparisons | ||
| High vs. Medium | High vs. Low | Medium vs. Low |
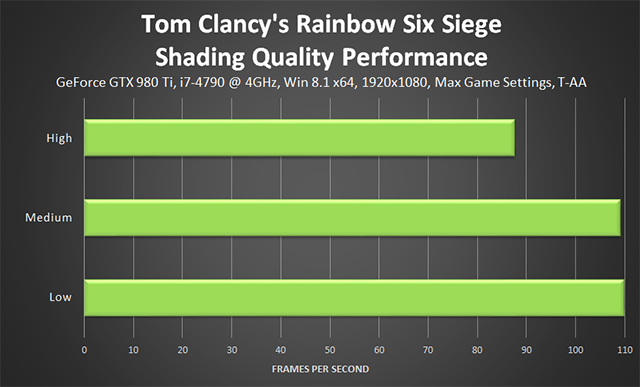
Performance: Aside from anti-aliasing, Shading Quality has the single largest impact on performance of any setting in Rainbow Six Siege. This comes solely from the addition of Relief Mapping, which adds some subtle detail that you're unlikely to notice during action-packed gameplay.
For most, Medium will therefore be the go-to setting, improving framerates drastically.
Shadow Quality
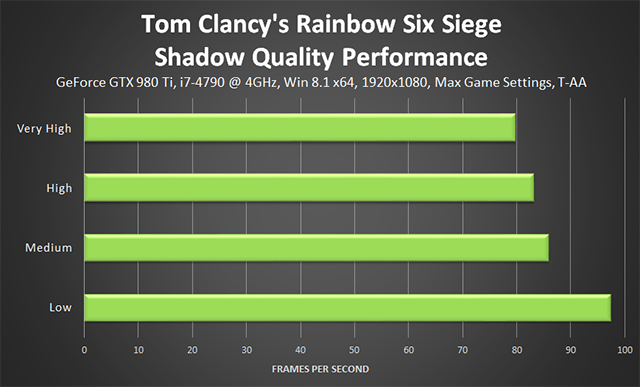
On Low, Shadow Quality disables dynamic shadows, leaving only shadows cast by fixed, static game elements. Above Low we observe a large increase in shadow definition and quality, and another large step-up going from Medium to High. Finally, on Very High we see a much smaller increase in fidelity for those sporting high-end systems. As expected then.
| Interactive Comparisons | ||
| Very High vs. High | Very High vs. Medium | Very High vs. Low |
| High vs. Medium | High vs. Low | Medium vs. Low |
Performance: If you've got performance to spare, setting Shadow Quality to High will give you well-defined shadows in most scenes. If you can, however, set Shadow Quality to Very High to maximize the fidelity of the many shadows seen during gameplay.
Texture Filtering
Texture Filtering, Anisotropic Filtering, and other similarly named options affect the sharpness of textures, especially those seen in the distance, on oblique angles, or on the sides of the screen. Without Texture Filtering surfaces appear blurry, and image quality is significantly degraded.
In Rainbow Six Siege players can choose between several Anisotropic detail levels, and a Linear mode for potato PCs.
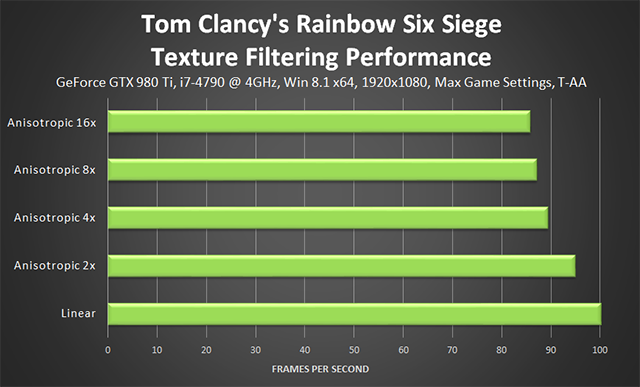
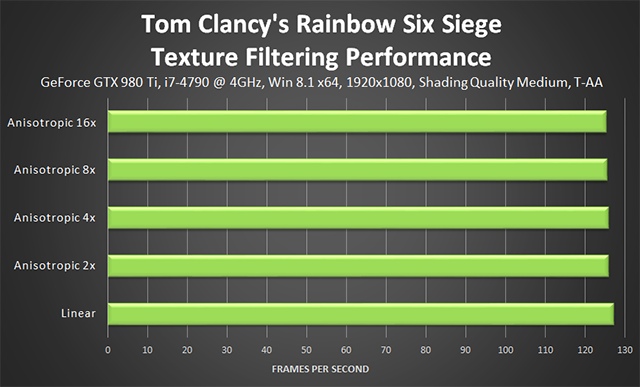
Performance: Anisotropic Filtering typically has a negligible performance cost on PC. Here however 16x requires up to 15 frames per second because of its interaction with the Relief Mapping that's visible on many outdoor surfaces.
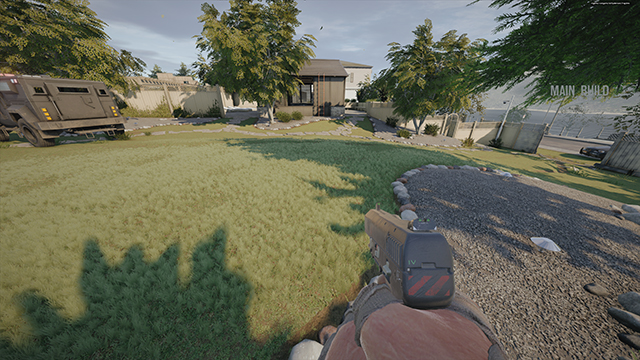
As described earlier, Shading Quality High adds height-based detail to surfaces to increase image quality. With a high level of Texture Filtering surfaces are fully defined and visible, enabling Relief Mapping to enhance more of the scene. At a lower level of Texture Filtering, surfaces are blurred and the bumpy detail cannot be added, decreasing its performance impact. This is shown below on the right-most edge of the shingles, past the tree's shadow.
To resolve this and return Texture Filtering to its expected performance level, set Shading Quality to Medium or Low.
With daytime missions highlighting the lack of texture definition, most players will want to use 4x at minimum, but ideally 16x.
Texture Quality
Texture Quality adjusts the clarity and quality of textures game wide, and in Rainbow Six Siege four detail levels are on offer.
From our comparisons, which are extremely difficult to capture due to randomized spawn locations and the need to restart maps between detail-level changes, we can see the difference between Very High and High is minimal to non-existent in most scenes, and imperceptible during gameplay. Below High, a gradual loss of fidelity is observed on most surfaces, with object textures suffering the most, and when we hit Low almost all detail is stripped away, as is actual geometric detail on models, degrading image quality greatly.
December 16th, 2015 Update: An Ultra-HD texture pack is now available to download in the "DLC" menu on Steam and Uplay. Designed for GPUs with lots of video memory, these higher-quality textures add additional detail to det packs and other objects, and improve world textures ever so slightly.
| Interactive Comparisons | ||
| Ultra vs. Very High | Ultra vs. High | Ultra vs. Medium |
| Ultra vs. Low | Very High vs. High | Very High vs. Medium |
| Very High vs. Low | High vs. Medium | High vs. Low |
| Medium vs. Low | ||
From the same scene, here's an example of how object and gadget fidelity is affected by the Texture Quality setting:
| Interactive Comparisons | ||
| Ultra vs. Very High | Ultra vs. High | Ultra vs. Medium |
| Ultra vs. Low | Very High vs. High | Very High vs. Medium |
| Very High vs. Low | High vs. Medium | High vs. Low |
| Medium vs. Low | ||
Rainbow Six Siege's in-game menu recommends a 4GB graphics card for Very High, 3GB for High, 2GB for Medium, and 1GB for Low. Contrary to this advice, the in-game VRAM meter shows Very High textures can be enabled on a 4GB card with max settings, assuming the only AA option enabled is FXAA or T-AA. Similarly, lower-capacity cards can handle other detail levels when using Post-Process Anti-Aliasing instead of Hardware Anti-Aliasing.
| Resolution | Settings | VRAM Usage |
| 1920x1080 | Min Settings | 1104 MB |
| 1920x1080 | Min Settings with Medium Textures | 1324 MB |
| 1920x1080 | Min Settings with High Textures | 2269 MB |
| 1920x1080 | Min Settings with Very High Textures | 2549 MB |
| 1920x1080 | Min Settings with Ultra Textures | 3569 MB |
| 1920x1080 | High Preset, HBAO+, T-AA | 2498 MB |
| 1920x1080 | Max Settings, Temporal Filtering, FXAA | 3697 MB |
| 1920x1080 | Max Settings, T-AA | 3906 MB |
| 1920x1080 | Max Settings, 4x TXAA | 4236 MB |
| 1920x1080 | Max Settings, 8x MSAA | 4648 MB |
| 2560x1440 | Min Settings | 1377 MB |
| 2560x1440 | High Preset, HBAO+, T-AA | 2858 MB |
| 2560x1440 | Max Settings, Temporal Filtering, FXAA | 3929 MB |
| 2560x1440 | Max Settings, T-AA | 4301 MB |
| 2560x1440 | Max Settings, 4x TXAA | 4888 MB |
| 2560x1440 | Max Settings, 8x MSAA | 5619 MB |
| 3840x2160 | Min Settings | 2158 MB |
| 3840x2160 | High Preset, HBAO+, T-AA | 3886 MB |
| 3840x2160 | Max Settings, Temporal Filtering, FXAA | 4571 MB |
| 3840x2160 | Max Settings, T-AA | 5389 MB |
| 3840x2160 | Max Settings, 4x TXAA | 6710 MB |
| 3840x2160 | Max Settings, 8x MSAA | 8355 MB |
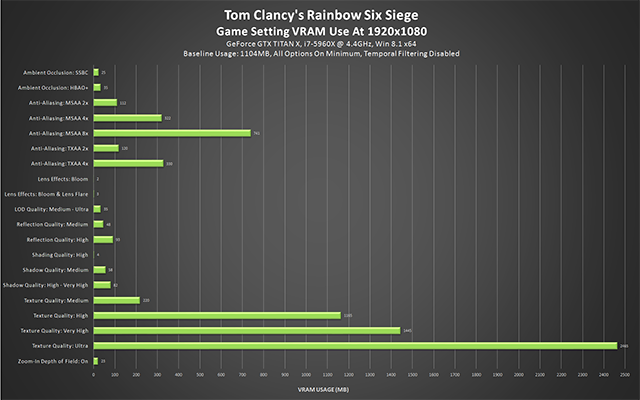
Finally, here's a breakdown of the memory requirements for each setting and detail level that raises Rainbow Six Siege's VRAM requirements:
At 1920x1080, "Temporal Filtering" reduces VRAM usage by 127 to 209 MB, compared to AA Off, depending on the other settings selected.
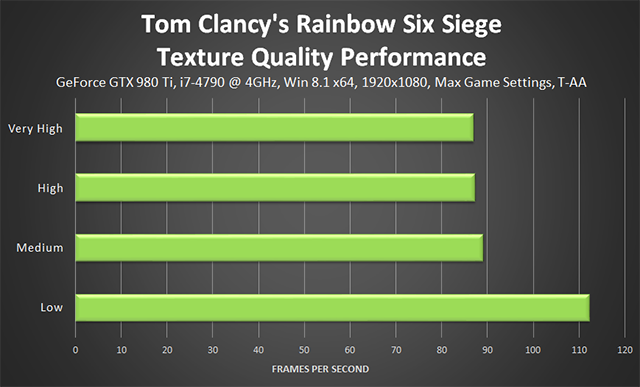
Performance: In the majority of games raising the Texture Quality setting has a negligible impact on performance. The difference here comes from Low dialing down the geometric detail of objects, giving a big boost to performance. Excluding Low, the delta between detail levels is just a few frames per second.
With the in-game VRAM meter and the info above, you can pick and choose a combination of settings that fits within the confines of your video card's memory. As Rainbow Six Siege retains a decent amount of environmental texture detail on Medium, High or Very High, the majority of your experience won't be too greatly impacted if you're sporting a GPU with just 2GB of VRAM.
Zoom-In Depth of Field
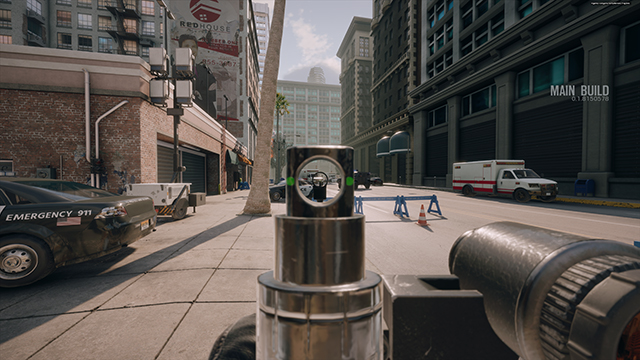
With this setting enabled there's a subtle blurring of hand and weapon models when aiming down the sights of your weapon.
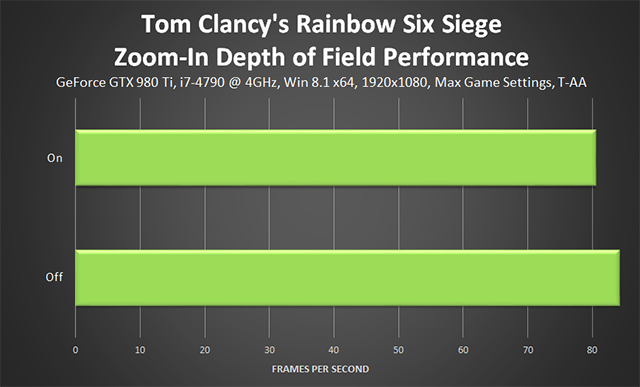
Performance: Given the subtlety of the effect, players can regain 4 frames per second by disabling it, with no real impact to image quality.
Settings Wrap-Up
As you've likely gathered by now Tom Clancy's Rainbow Six Siege can be extremely demanding when every setting is maxed out. You don't have to run at max settings, but many an enthusiast is fascinated to discover what it'll take to gain the definitive level of detail.
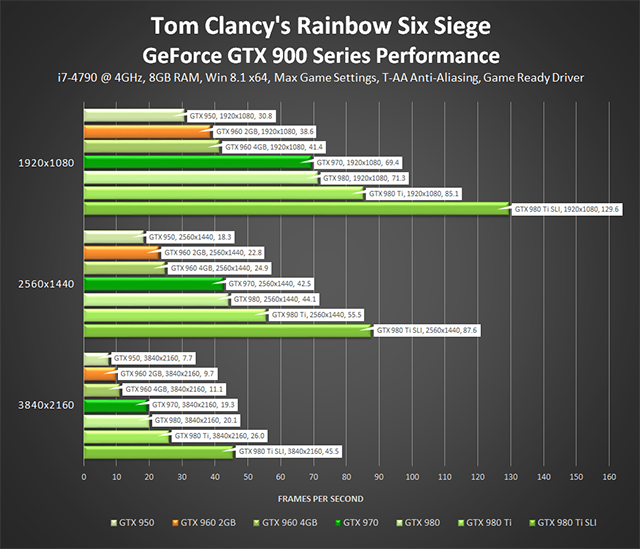
With the less-demanding Post-Process T-AA Anti-Aliasing, several configurations can attain 60 FPS or more at 1920x1080, while only a speedy SLI system can manage the same at 2560x1440:
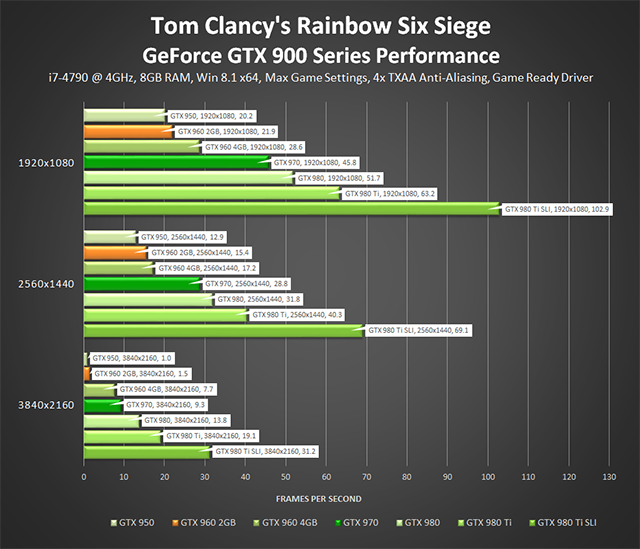
With 4xTXAA enabled only the GeForce GTX 980 Ti can maintain 60 frames per second at 1920x1080, and once again SLI is required for 60 FPS at 2560x1440.
Many systems can vastly improve performance by making one simple tweak: lower Shading Quality to Medium. Relief Mapping has a minimal influence on image quality during gameplay, but decreases performance by over 20 frames per second.
If after that you're still struggling for performance, disable Zoom-In Depth of Field, turn down Reflection Quality, and lower Shadow Quality to High. Image quality will be visibly decreased, but to not to a significant degree, and overall performance will increase by around 35 FPS at 1920x1080, giving even the GeForce GTX 950 a 60 frames per second experience.
NVIDIA Dynamic Super Resolution
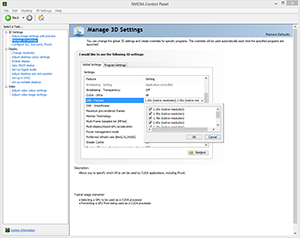
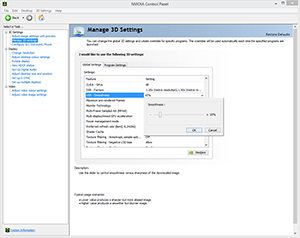
To increase the quality of your graphics even further, activate Dynamic Super Resolution (DSR) to receive up to 4K-quality graphics on your HD monitor. How it works is simple: compatible games, such as Tom Clancy's Rainbow Six Siege, are rendered at a higher, more detailed resolution, and the image intelligently shrunk back down to the resolution of your monitor using a custom-made filter, giving you up to 4K-quality graphics on your screen. The video below explains more, and the images show how to activate the setting in the NVIDIA Control Panel.
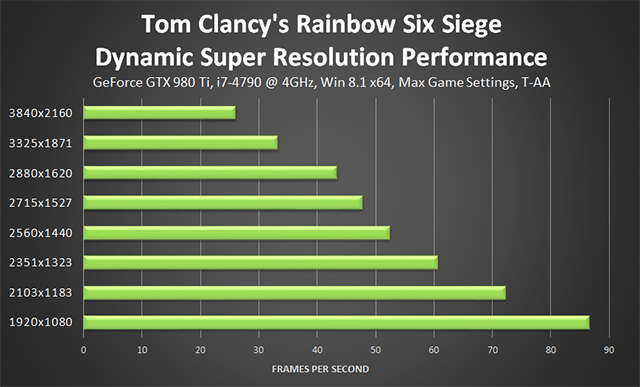
With DSR enabled, textures benefit from improved clarity, aliasing is further reduced, objects have better definition, vegetation is more detailed, and distant game elements are clearer. If you've used DSR in other games you'll know of these benefits already, but if you haven't had the chance here's a look at how Tom Clancy's Rainbow Six Siege's graphics scale with rendering resolutions.
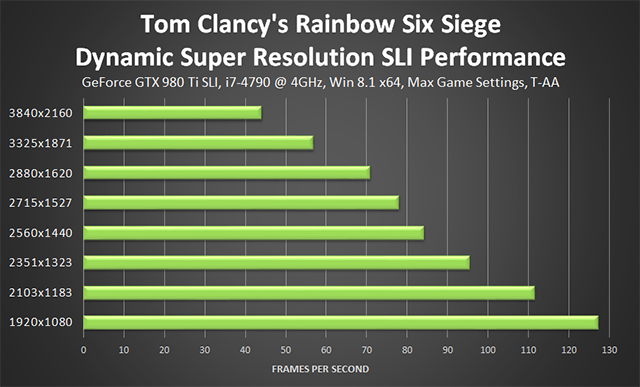
Performance: Using a reference GeForce GTX 980 Ti, the DSR rendering resolution was increased in a benchmark that is representative of Rainbow Six Siege's most demanding moments.
And with SLI enabled, here's a second set of stats.
If you've got the performance, and turn down Shading Quality, a 4K experience can be easily attained on a high-end SLI system.
G-SYNC: Eliminating Stutters & Tearing For The Ultimate Experience

NVIDIA revolutionized computer displays in 2013 with the introduction of variable refresh rates, enabling gamers to enjoy highly responsive, tear-free, stutter-free experiences on G-SYNC monitors. Reviews are phenomenal, and gamers everywhere agree that it's painful to play on anything other than a G-SYNC display once you're used to the flawless experience it provides.
With Tom Clancy's Rainbow Six Siege's and G-SYNC monitors, you can assault and defend in optical bliss with none of the artifacts or hang-ups associated with ordinary monitors or TVs.
Game Ready Tom Clancy's Rainbow Six Siege Driver

For the best Tom Clancy's Rainbow Six Siege experience we recommend updating to the Tom Clancy's Rainbow Six Siege GeForce Game Ready drivers. Included are the latest performance optimizations and tweaks for Tom Clancy's Rainbow Six Siege, and a SLI profile. Download now via GeForce Experience.
GeForce Experience: Optimal Playable Settings With A Single Click
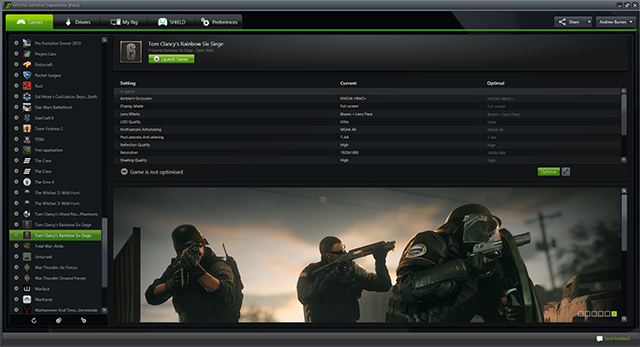
The best way to automatically configure and apply Tom Clancy's Rainbow Six Siege's game settings for a smooth, enjoyable, 60 FPS experience is through GeForce Experience, an invaluable tool for all GeForce GTX users. In addition to optimizing over 300 games, the free GeForce Experience application can automatically update drivers and profiles, record and stream gameplay with ShadowPlay, and can wirelessly stream PC games, including Tom Clancy's Rainbow Six Siege, to NVIDIA SHIELD devices.
Taking into account your GPU and CPU, as well as many additional factors, GeForce Experience's game recommendations can be applied with a single click and are updated over time should developer patches and NVIDIA driver updates improve performance further still. This one-click solution is perfect for gamers who wish to simply play their games, and for those with little experience in configuring settings for an optimal experience.
Overclocking
For increased performance in Tom Clancy's Rainbow Six Siege consider overclocking your CPU and GPU. Discover how with the help of our GeForce Garage guide.
The Definitive Tom Clancy's Rainbow Six Siege Experience
With the addition of HBAO+, TXAA, DSR, G-SYNC, ShadowPlay, and GeForce Experience, GeForce GTX gamers receive the definitive Tom Clancy's Rainbow Six Siege experience. Higher-resolution textures, higher rendering resolutions, higher framerates, exclusive visual effects, and an increase of detail in every sieged city are there to be had on PC.
If you're looking for a new GPU to play Tom Clancy's Rainbow Six Siege, select GeForce GTX graphics cards are currently bundled alongside the game in our Bullets or Blades Bundle. Alternatively, get a free copy of Assassin's Creed Syndicate. Further details can be found here.
