Bedrock 및 Minecraft RTX에 대한 Minecraft 월드 전환 가이드
소개
Minecraft Java 세계를 확장하고 개발하는 데 참여했다면 Minecraft RTX에 필수적인 Windows 10 Bedrock 형식으로의 전환이 가능하다는 소식이 반가우실 것입니다.
이 가이드에서 단계를 안내하지만 이 프로세스는 완벽하지도 않고 실패할 염려가 없는 것도 아니므로 계속하기 전에 모든 세계와 파일을 백업하시기 바랍니다.
이 가이드는 게임 월드 전환을 위한 비공식 안내입니다. NVIDIA는 타사 도구를 사용하며 이러한 전환의 결과물이 Minecraft RTX Beta를 이용 중에 이상적인 경험이 될 것이라고 보장할 수 없습니다.
PBR 향상 레이 트레이싱 호환 텍스처 생성 방법에 대한 가이드는 여기에서 확인하세요.
필수 도구 및 파일
세계를 전환하기 위해서는 Java 및 Windows 10용 Minecraft의 최신 빌드와 몇 가지 비공식적으로 지원되는 서드파티 도구 및 애플리케이션이 필요합니다.
공식 앱
- Minecraft PC (Java)
- 최신 공개 버전으로 업데이트하십시오.
- Windows 10용 Minecraft Bedrock
- 최신 공개 버전으로 업데이트하십시오.
- Minecraft with RTX Beta
- 여기에서 지침 다운로드 및 설치 [참고: 4월 16일 기준으로 MCC 전환 프로세스의 11단계에 도달한 경우에 설치만 하도록 권장함]
- Java
- 최신 공개 버전으로 업데이트하십시오.
비공식 앱
- MCC Tool Chest (Bedrock 버전)
- MCA Selector
- Forge Installer
- 예를 들어, Minecraft Java 1.15.2(Minecraft Java Launcher의 "설치" 탭에 표시되는 버전 번호)과 결합된 "Forge 1.15.2"와 같이 사용 중인 Minecraft Java의 버전 번호에 해당하는 최신 버전을 다운로드하십시오.
- World Edit For Forge
- 위와 같이 사용 중인 Minecraft의 빌드와 일치하는 버전, 예를 들어 Minecraft Java 1.15.2의 경우 "WorldEdit 7.1.0(Forge for MC 1.15.2)"을 다운로드하십시오.
기본 파일 위치
세계 전환을 위해서는 세계 파일과 게임 클라이언트 파일에 액세스해야 합니다. 기본 위치는 다음과 같습니다.
- Minecraft Bedrock(UWP) 세계 저장 폴더
- %USERPROFILE%\AppData\Local\Packages\Microsoft.MinecraftUWP_8wekyb3d8bbwe\LocalState\games\com.mojang\minecraftWorlds
- Minecraft Java 세계 저장 폴더
- %USERPROFILE%\AppData\Roaming\.minecraft\saves
이전 Java 세계는? 시작하기 전에 업데이트
Minecraft Java 1.15.2 이전 버전에서 세계가 실행되는 경우 Bedrock으로 전환을 시작하려면 먼저 업데이트해야 합니다.
- 최신 버전의 Java 및 Minecraft Java를 설치합니다.
- PC에 이전 세계의 로컬 백업을 만듭니다.
- Minecraft Java 1.15.2 이상을 열고 이전 세계의 사본을 로드합니다.
- 메시지가 표시되면 세계를 업데이트하고 게임을 시작한 다음 저장 및 종료합니다.
World Edit 및 World Edit Forge 전환
World Edit 또는 World Edit Forge의 기능 및 설계도 기능을 사용하는 경우 전환 프로세스는 여기에서 시작됩니다. 기능이 적용되지 않으면 아래 MCASelector 섹션으로 건너뜁니다.
- 현재 버전의 Minecraft와 기타 필수 도구를 사용하여 이전 세계를 엽니다.
- // World Edit Forge 명령을 사용하여 빌드의 설계도를 생성하고 .minecraft World Edit 설계도 폴더에 저장합니다. 폴더가 없는 경우 싱글 플레이어에서 테스트 설계도를 만들면 폴더가 생성됩니다.
- 이전 파일 및 설치를 백업합니다.
- 이전에 연결된 최신 소프트웨어를 모두 설치합니다.
- Windows 10 Bedrock을 열고 비어 있는 새 세계를 생성하고 로드합니다. 필요한 경우 설계도를 추가하려는 공간을 생성합니다. 완료되면 저장 및 종료합니다.
- 최신 버전의 Minecraft Java를 로드하고 새로운 싱글 플레이어 세계를 생성합니다.
- 설계도를 로드하고 원하는 위치에 붙여넣습니다(메뉴에서 "LAN 서버 열기"가 선택되어 있는지 확인).
- 저장 및 종료합니다.
- 붙여넣은 설계도를 포함한 새 Java 세계를 사용하여 아래 MCA Selector 지침에 따른 다음 MCC Tool Chest 지침을 따릅니다.
- 이러한 기타 단계가 완료되면 Windows 10 Bedrock을 엽니다. 선택한 좌표에 창작물이 표시됩니다.
MCA Selector 청크 편집
가이드 작성 시점에 Minecraft Bedrock 버전은 MCASelector를 사용하지 않는 한 전환된 세계를 로드할 때 오류가 발생합니다. 이 도구를 사용하면 물, 기포탑, 매끈한 돌, Redstone 링크 및 Nether Portal 링크를 비롯한 성가신 청크를 한꺼번에 수동으로 삭제할 수 있어서 Bedrock에서 세계의 해당 측면을 수동으로 재편집할 필요가 없습니다.
프로세스는 빠르고 간단합니다. 게임을 시작하여 특정한 측면을 수동으로 수정하거나 업데이트하고 싶을 수도 있지만 전환 시에 빈 공간(청크가 삭제된 공간)이 올바른 Bedrock 특정 청크로 자동으로 채워집니다.
언제나 그렇듯이 시작하기 전에 Java 세계를 백업해두는 것이 좋습니다.
1. mcaselector-1.9.3.jar 이상 버전을 마우스 오른쪽 버튼으로 클릭하고 "연결 프로그램…" Java를 선택합니다.
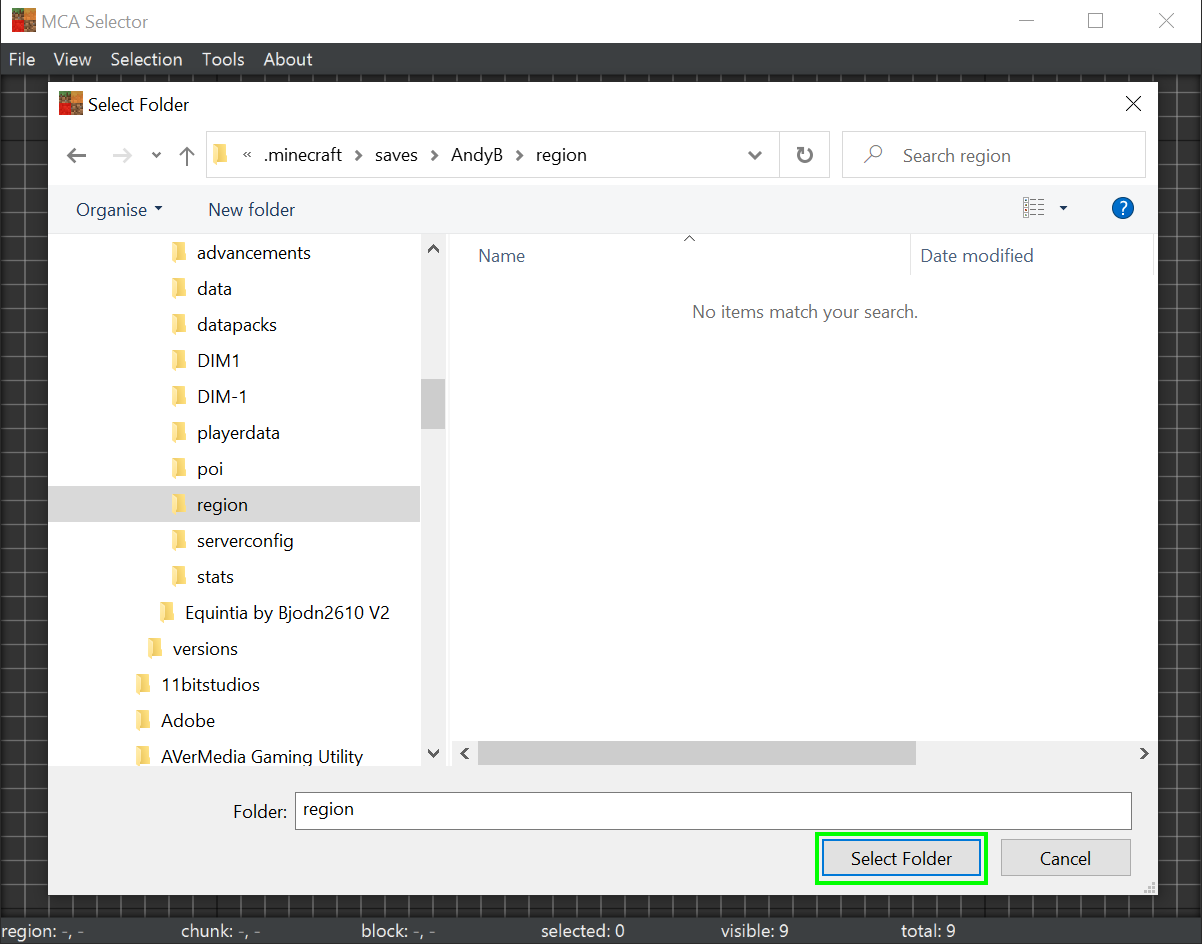
2. 앱에서 "파일" > "열기"를 클릭하고 세계의 .mca 파일을 포함하는 폴더, 예를 들어 C:\Users\%USER%\AppData\Roaming\.minecraft\saves\WorldName\region으로 이동합니다. 폴더에서 "폴더 선택"을 클릭합니다.
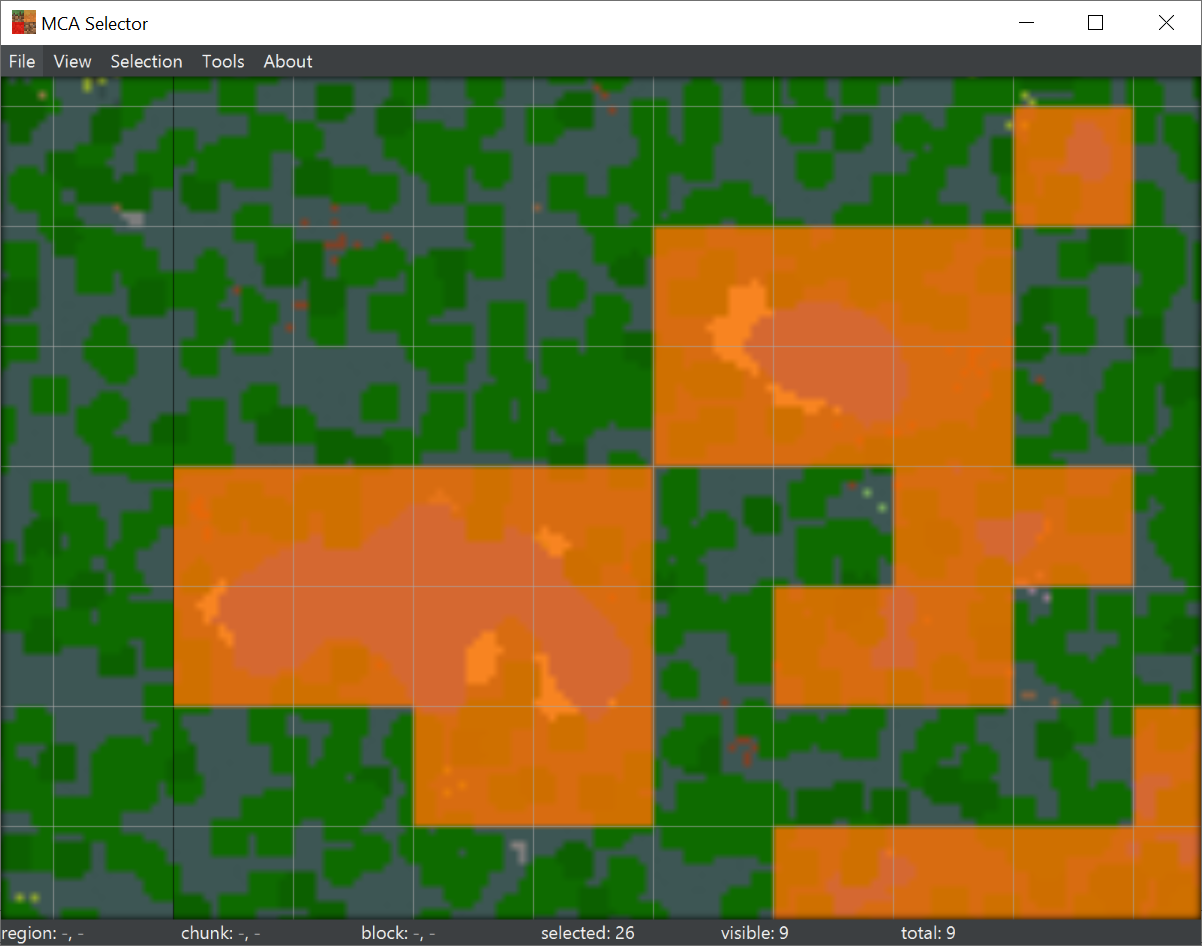
3. 세계가 앱에 로드됩니다. 마우스 가운데 버튼은 이동에, 마우스 휠은 확대 및 축소에 사용합니다.
a. 참고: 매우 큰 세계는 제대로 로드되지 않거나 렌더링하는 데 오랜 시간이 소요될 수 있습니다.
4. 왼쪽 마우스 버튼으로 전환하지 않을 청크를 선택합니다. 청크를 잘못 선택한 경우 마우스 오른쪽 버튼을 클릭하여 선택 해제합니다.
a. 고급 유저는 "도구" > "청크 필터링"을 사용합니다. 특정 청크 유형을 식별하고 찾는 시간이 크게 단축될 수 있습니다.
5. "선택" > "선택한 청크 삭제(Ctrl+D)"를 클릭합니다.
6. 많은 청크가 삭제된다고 나타내는 경고 창이 표시됩니다. 동의하고 기다립니다.
7. 이제 Java 세계에 삭제된/누락된 청크가 포함됩니다.
8. 이제 MCA Selector를 닫아도 됩니다. Bedrock으로 전환한 후 청크를 누락했음을 발견하면 게임 내에서 수동으로 편집하거나 전환하기 전에 MCA Selector에서 단계를 다시 실행합니다.
9. 아래 MCC Tool Chest 지침을 사용하여 청크 해제된 Java 세계를 Bedrock으로 전환합니다.
MCC Tool Chest 전환: 마지막 단계
Java 세계가 업데이트 및 준비되면 이제 MCC Tool Chest(Bedrock 버전)를 로드하여 Windows 10 Bedrock 형식으로 전환을 시작할 수 있습니다. 전환이 시작되면 돌아갈 수 없으므로 시작하기 전에 모든 Java 및 Bedrock 세계 파일이 완전히 백업되었는지 확인하십시오.
1. 이후에 "MCC"라고 하는 MCC Tool Chest(Bedrock 버전)를 설치하고 로드합니다.
2. "파일" > "열기"를 클릭하고 비어 있는 새 세계를 선택합니다.
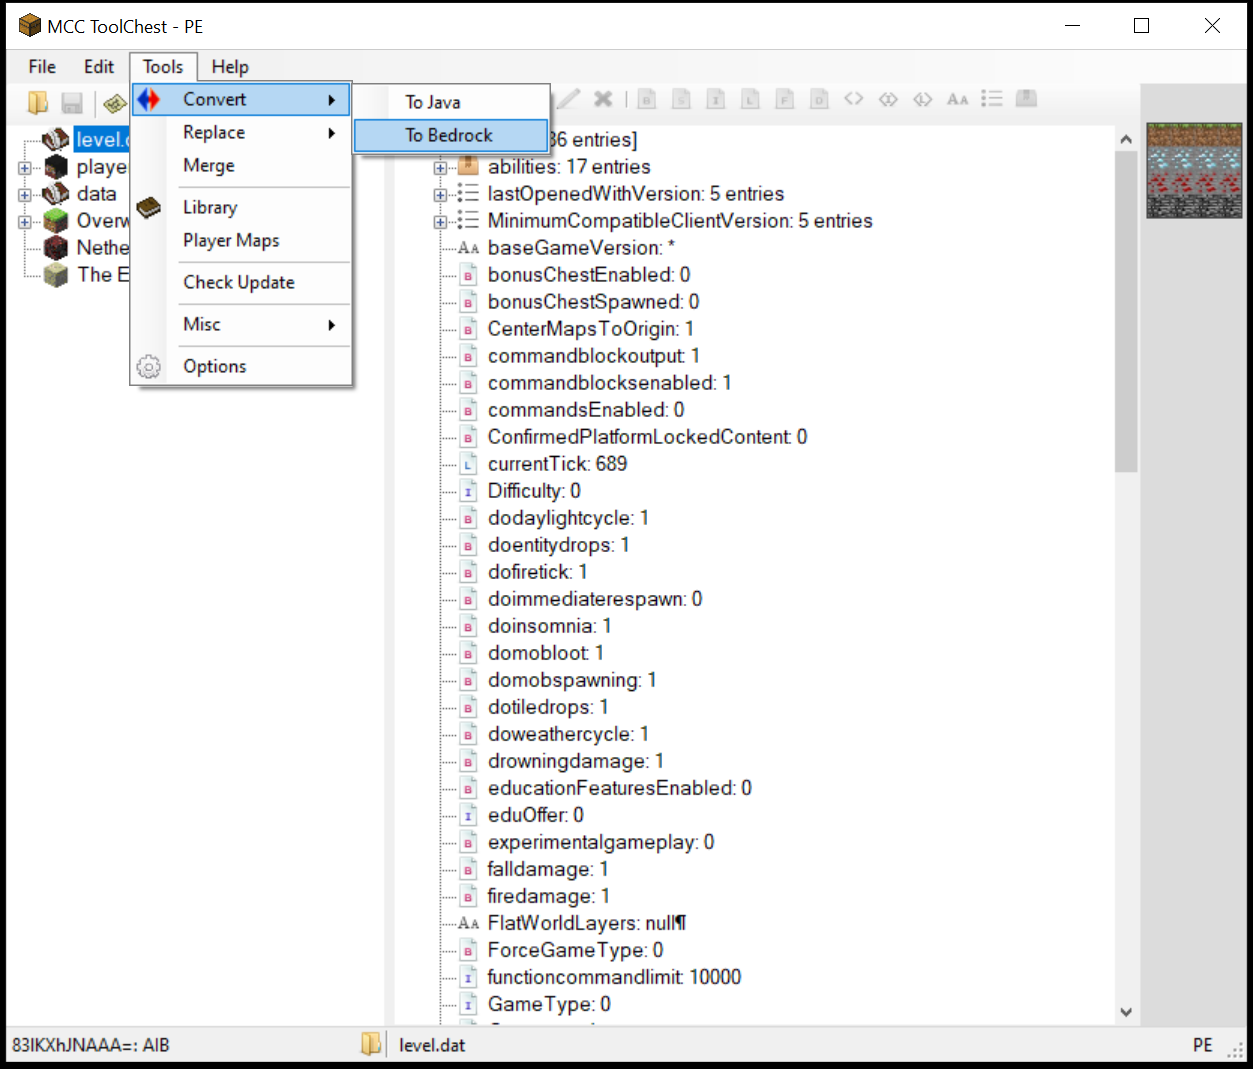
3. "도구" → "전환" → "Bedrock으로"를 클릭합니다.
4. Bedrock으로 전환할 Java 세계를 묻는 메시지가 표시됩니다.
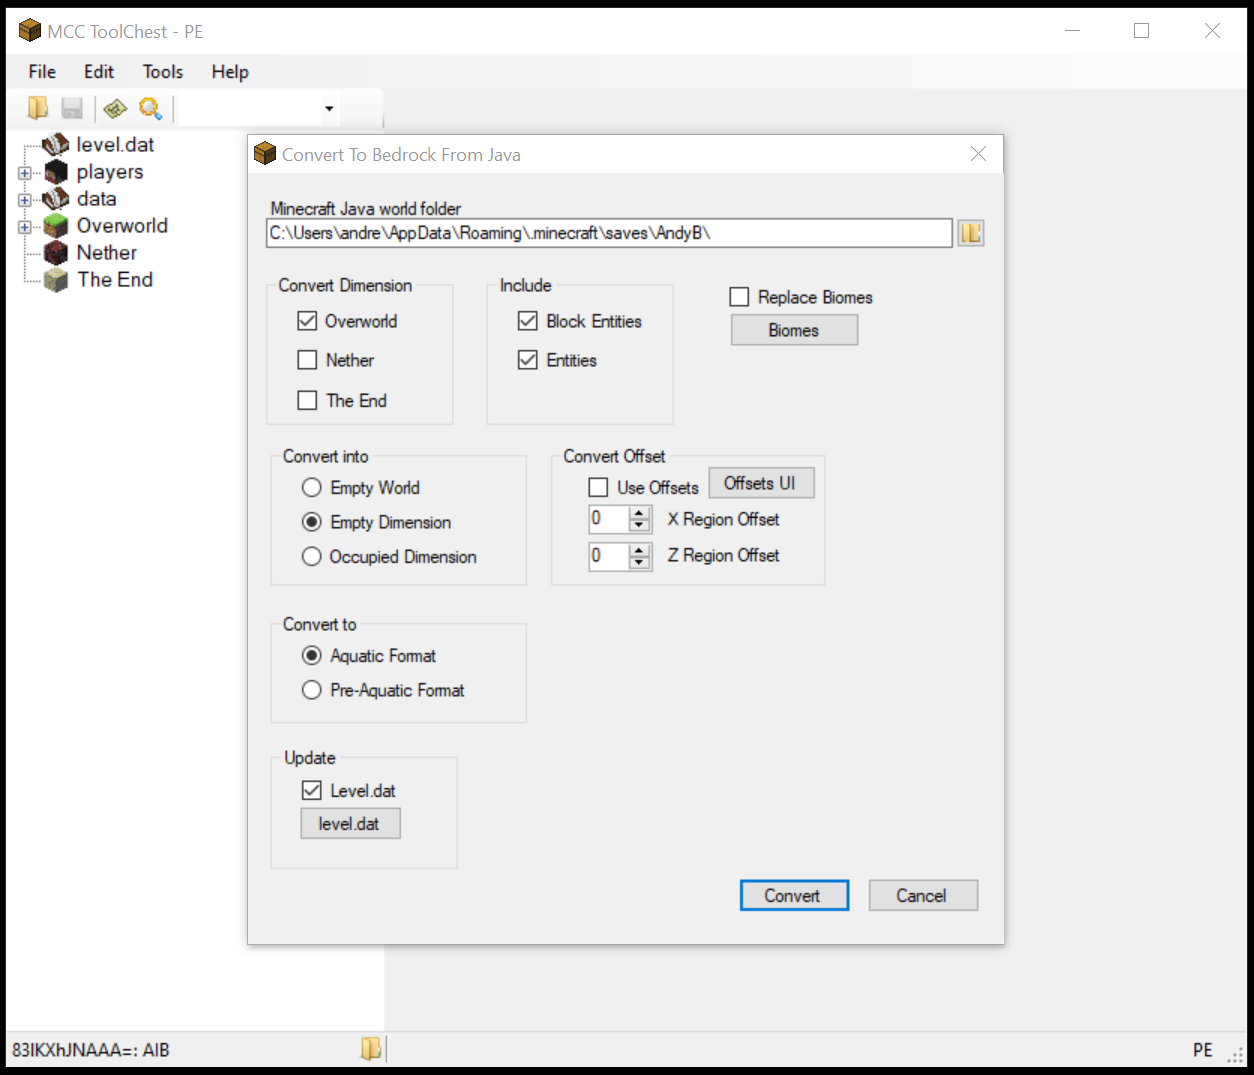
5. 전환하려는 세계를 선택하면 새 화면이 표시됩니다.
a. 참고: MCC가 자동으로 Java 세계 폴더를 찾지 못하면 먼저 아래 화면이 표시됩니다. "Minecraft Java 세계 폴더" 옆에 있는 오른쪽 상단의 폴더 아이콘을 사용하여 폴더 위치, 예를 들어 C:\Users\%USER%\AppData\Roaming\.minecraft\saves\WorldName\을 지정하고 아래 전환 화면으로 돌아갈 때까지 이후 메시지를 따릅니다.
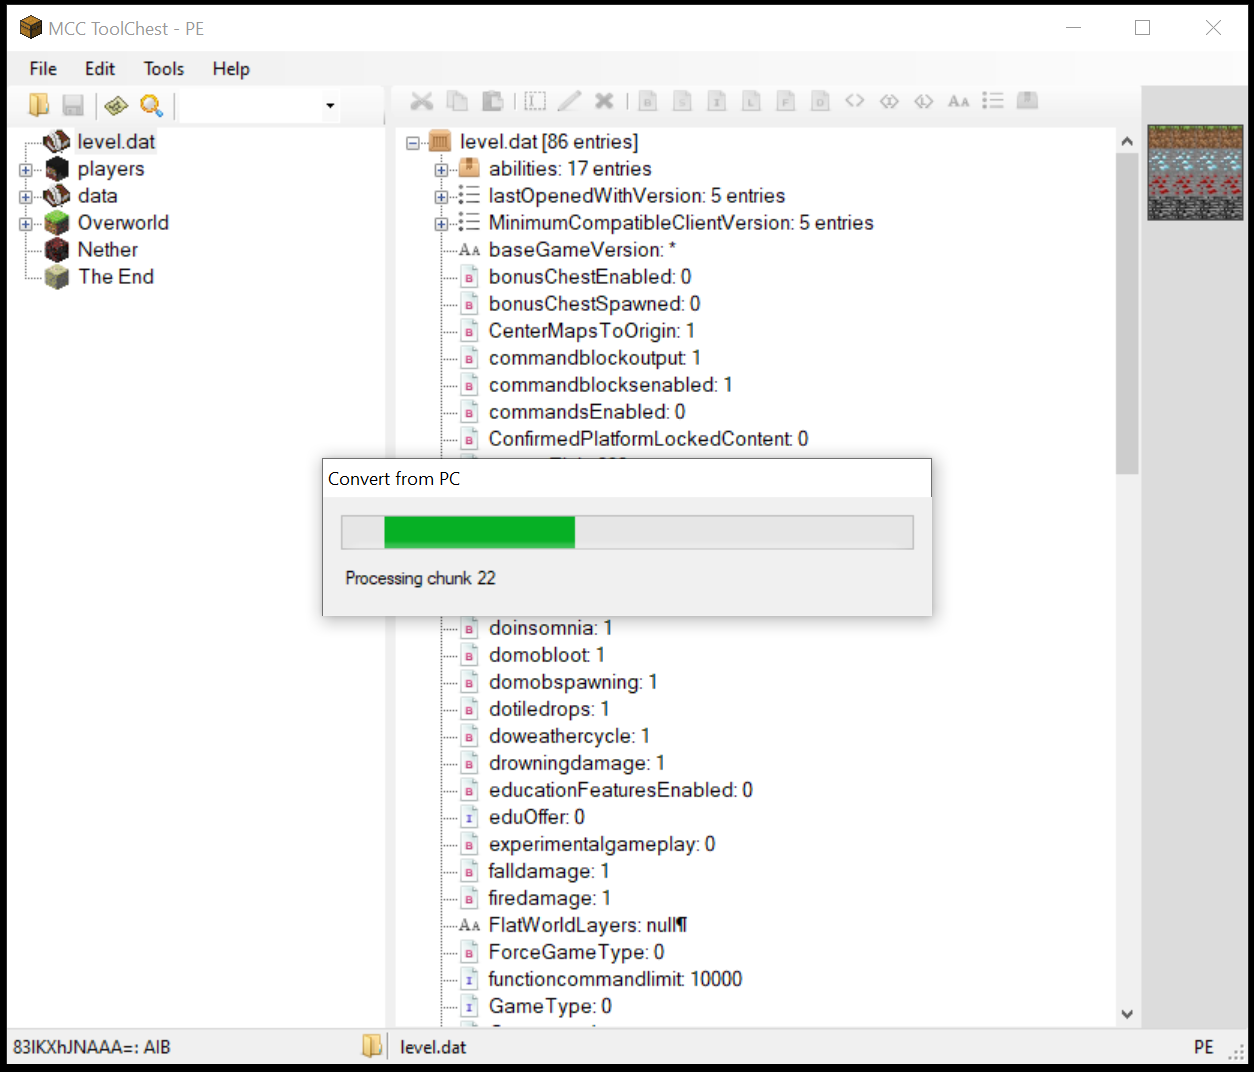
6. 모든 옵션을 기본값으로 두고 "전환"을 클릭합니다. 전환이 시작됩니다(세계가 크면 시간이 다소 소요될 수 있음).
7. 완료되면 "전환 완료" 메시지가 표시됩니다. "닫기"를 클릭하면 기본 MCC 창으로 돌아갑니다.
8. 새 창은 이전과 똑같아 보이지만, 이제 "파일" → "다른 이름으로 저장" → "새 세계"를 클릭하고 Java에서 Bedrock으로 전환된 세계에 이름을 지정하고 "확인"을 클릭합니다.
9.9. 이제 Java 세계가 저장되고 Bedrock 내에서 액세스할 수 있습니다! 보이지 않는다면 %USERPROFILE%\AppData\Local\Packages\Microsoft.MinecraftUWP_8wekyb3d8bbwe\LocalState\games\com.mojang\minecraftWorlds 를 열고 Worlds 폴더가 있는지 확인합니다.
10. 더 진행하기 전에 몇 가지 유의해야 할 사항이 있습니다.
- Xbox 참가자 허브 Minecraft RTX Beta에 참여하면, Windows 10용 Minecraft Bedrock, 참여자 프로그램의 다른 Minecraft Bedrock 또는 나중에 출시되는 전체 비베타 버전의 Minecraft RTX에서 여러분의 월드가 열리지 않을 수 있습니다. 그러므로 다른 Minecraft 버전에서 나중에 복원할 수 있도록 Minecraft RTX에서 플레이하기 원하는 모든 월드의 복사본을 만들어 백업해 두는 것이 좋습니다.
- 새로운 베타에 참여하기로 선택할 때 Minecraft RTX Beta를 다운로드 하기 위해 Minecraft 및/또는 현재 Xbox 참가자 Minecraft Windows 10 Bedrock Beta를 제거해야 할 수도 있습니다. 게임을 제거하면 해당 월드가 자동으로 제거될 수 있으므로 새 베타에 등록하거나 이전 게임버전을 제거하기 전에 유지하려는 모든 월드를 백업하세요.. 여기에는 방금 전환한 월드도 포함될 수 있습니다.
Minecraft에서 저장한 월드는 다음 위치에서 확인할 수 있습니다.
%LOCALAPPDATA%\Packages\Microsoft.MinecraftUWP_8wekyb3d8bbwe\LocalState\games\com.mojang\minecraftWorlds 및/또는 %USERPROFILE%\AppData\Local\Packages\Microsoft.MinecraftUWP_8wekyb3d8bbwe\LocalState\games\com.mojang\minecraftWorlds(과거에 사용한 게임 버전에 따름)
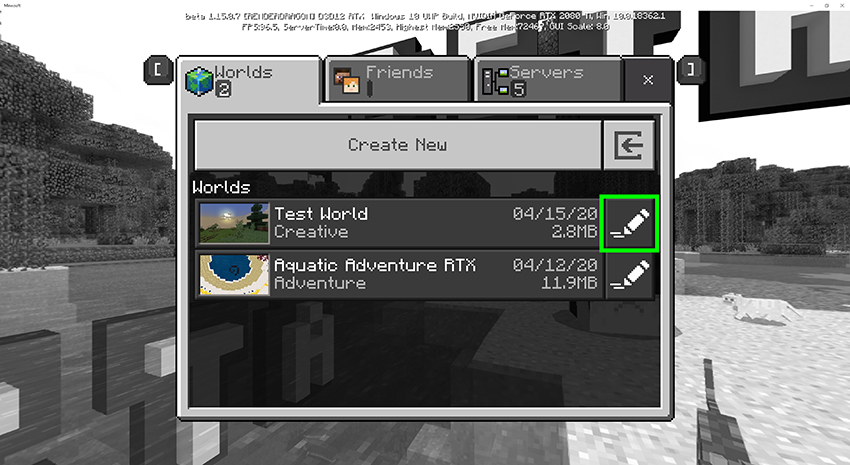
minecraftWorlds 디렉터리 내의 각 폴더가 게임 월드입니다. 이러한 폴더를 Minecraft 디렉터리가 아닌 PC의 다른 위치에 저장하세요. "편집" 연필 아이콘을 눌러 Minecraft에서 PC 또는 노트북의 바탕 화면으로 직접 월드를 내보낼 수도 있습니다. 플레이로 이동 > 편집 아이콘 클릭 > 새 화면에서 아래로 스크롤하여 "월드 내보내기" 버튼을 누릅니다.
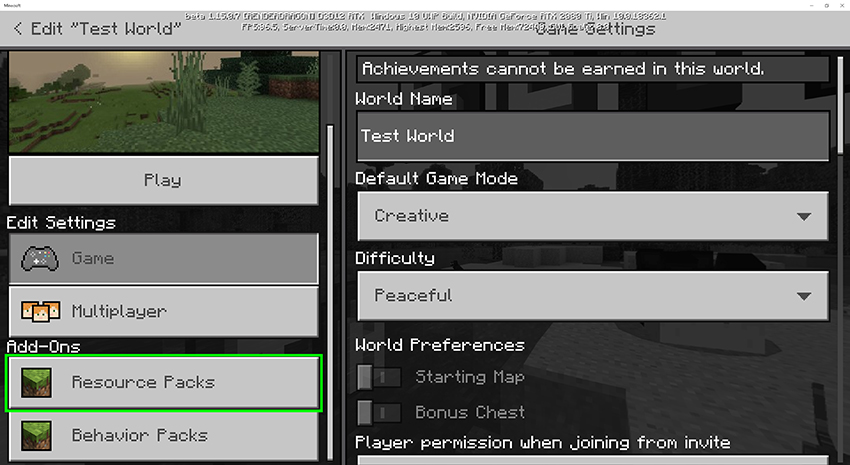
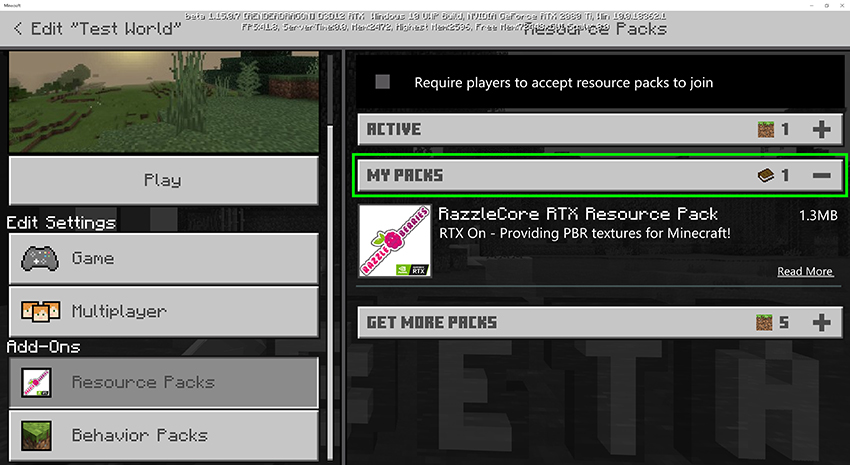
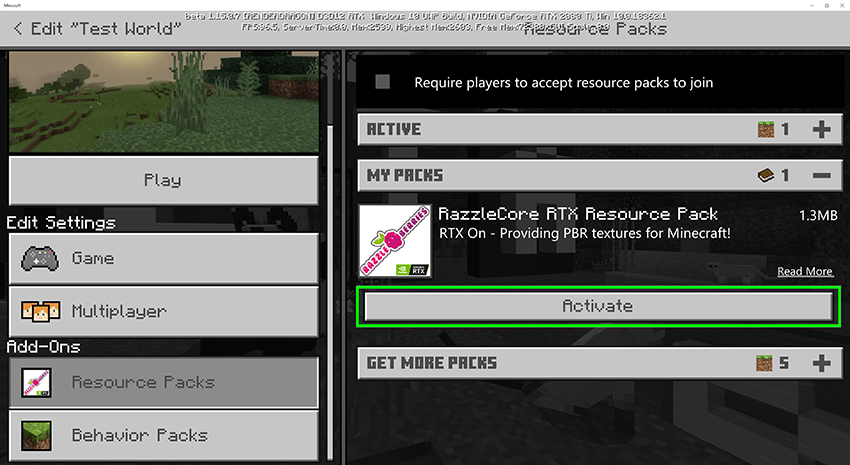
12. 이제 월드가 전환되어 적절한 minecraftWorlds 폴더에 배치되었으므로, 전환된 월드 저장 폴더에 PBR 레이 트레이싱 리소스 팩을 포함해야 합니다.
PBR 지원 리소스 팩이 아직 없다면 NVIDIA의 서버에서 다음 리소스 팩을 다운로드할 수 있습니다.
- NVIDIA에서 제작한 HD Decorative 리소스 팩과 HD Foundational 리소스 팩이러한 리소스 팩은 고해상도 텍스처이지만 현재 베타 버전의 한계로 인해 동시에 활성화하면 안 됩니다. 동시에 활성화하면 리소스 팩 폴백 현상이 나타나 다른 텍스처의 해상도가 줄어들게 됩니다.
- Muddle RTX 에서 제작한 올-블록 리소스 팩인 Razzleberries
- RazzleCore RTX 에서 제작한 올-블록 리소스 팩인 Razzleberries
아니면 직접 리소스 팩을 만들고자 하는 경우에는 물리 기반 렌더링 파이프라인을 사용해서 사용자 고유의 텍스처를 만드는 방법에 대한 가이드를 확인하세요.
결론
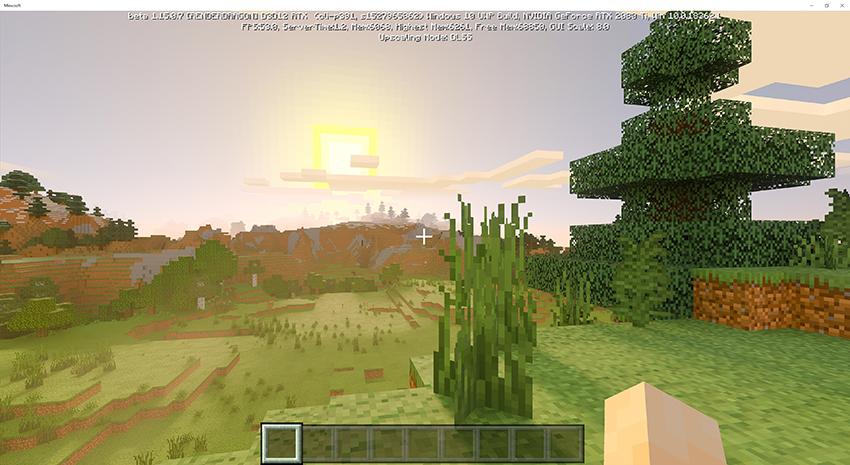
처음에는 벅차고 복잡하지만, 월드 전환은 도구와 워크플로우에 익숙해지면 몇 분 안에 완료할 수 있습니다. 이러한 도구와 워크플로우를 통해 모든 Java 월드를 Bedrock으로 빠르게 전환한 후 Minecraft RTX에서 레이 트레이싱으로 향상할 수 있습니다.
Minecraft RTX Beta에 대한 더 자세한 내용은 NVIDIA의 종합적인 전용 기사를 참고하세요.
